


The one file many Linux administrators are hesitant to edit is /etc/fstab. One wrong mistake and you could render your machine unbootable. Fortunately, this is Linux, so that file can be tested before a reboot, and worst case you can always recover by booting a live distribution, mounting the drive, and editing the file. For admins new to Linux, this file can be a bit daunting.
Once again, I say this is Linux, which means you’re not limited to the command line, even for the modification of the /etc/fstab file. So if you’re one to prefer a GUI, never fear, GNOME Disks has you covered. That’s right, the tool generally thought of as a partition management GUI also includes the ability to edit your /etc/fstab file.
I’m going to show you where to find that option and how to use it. I’ll be demonstrating on Elementary OS, but the tool can be used on many different Linux distributions. The one obvious caveat is that your Linux machine must have a GUI.
Installation
On the off-chance your distribution doesn’t include GNOME Disks, you should be able to find it within your desktop application store. If you’d rather use the command line installation method, the installation will go something like this (making sure to adjust according to your distribution’s package manager):
sudo apt install gnome-disk-utility
Once the installation completes, you should see an entry in your desktop menu labeled “Disks.” If not, you can always start it from the terminal with the command gnome-disks.
Usage
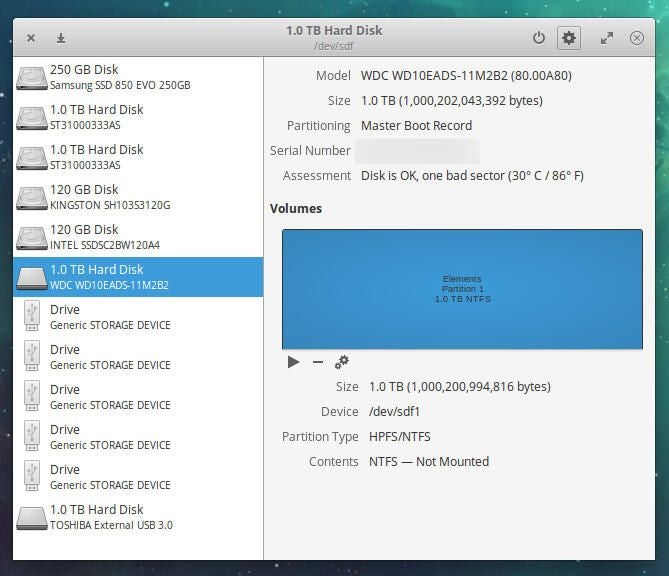
Editing the mount options for a drive with GNOME Disks isn’t exactly obvious. The developers haven’t tucked the option out of site, but you do have to know where to find them. Once you open the tool, select the drive whose fstab entry you want to edit (Figure A).
Figure A
Once you’ve selected a disk, you should see three icons below the Volumes display. Click on the gear icon to reveal a drop-down menu (Figure B).
Figure B
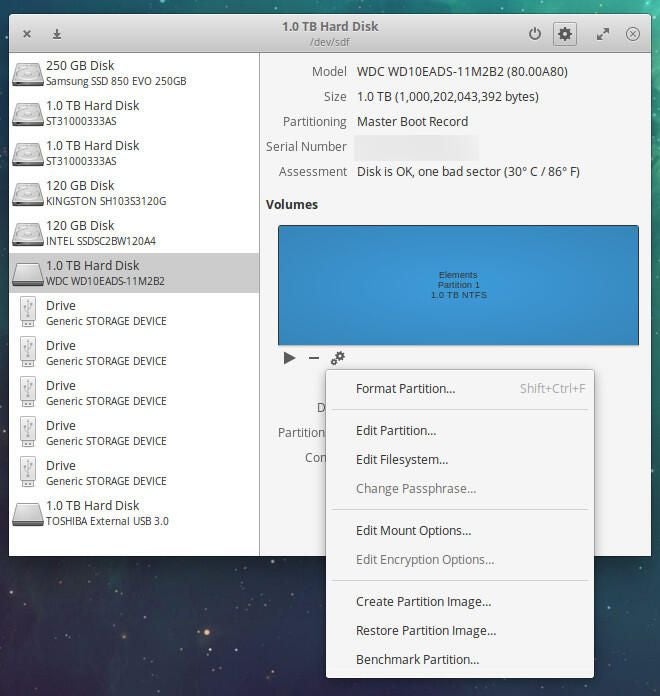
From that drop-down, select Edit Mount Options. In the resulting window (Figure C), you can edit the mount options for the selected drive.
Figure C
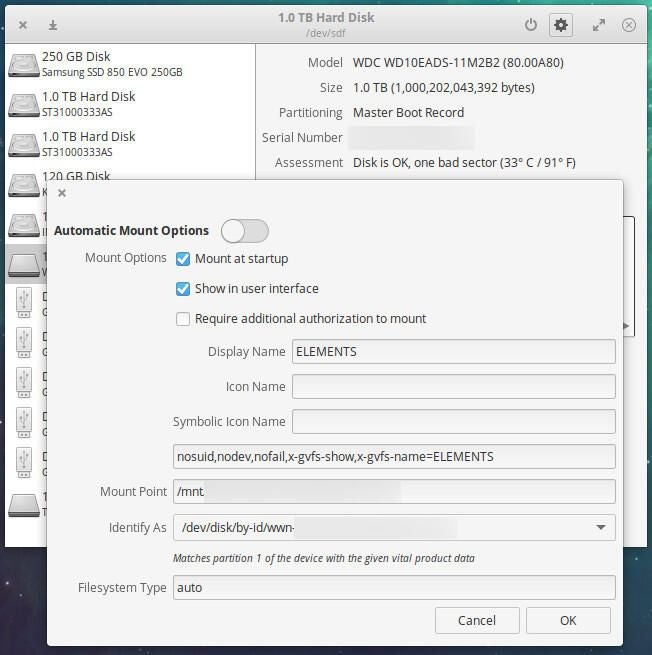
If you’re even remotely familiar with the /etc/fstab file, you’ll recognize these options.
If you notice all of your options are grayed out that means the Automatic Mount Options is on. To turn that off and be able to edit the mount options, move the top slider to the left. Once you’ve taken care of that, you can then edit all of the options for the drive. If you’re not sure about the mount options (such as nosuid, nodev, nofail, etc), issue the command man mount and look through the FILESYSTEM-INDEPENDENT MOUNT OPTIONS section.
After you make your changes, click OK, type your sudo password, and your edits will be saved to the /etc/fstab file.
Testing the changes
The GNOME Disks tool doesn’t include the means to test your changes. For that, you will have to return to the command line. Open up a terminal window and issue the command sudo mount -a. If no errors are returned, you are good to go. If you see errors, go back and edit the mount options and then repeat the sudo mount -a command. Go back and forth, until you see no errors from the sudo mount -a command.
Simple means to edit /etc/fstab
If you’re hesitant to manually edit the /etc/fstab or you just prefer a GUI tool for admin tasks, let GNOME Disks take care of the editing of disk mount point options. Just make sure to test your changes before rebooting, otherwise you could find yourself in a bit of a pickle.