


Kubernetes is an open-source system used for automating the deployment, scaling, and management of containerized applications. Kubernetes is enterprise-ready and can be installed on various platforms. I’ve already touched on how to get Kubernetes up and running on Ubuntu Server (see “How to quickly install Kubernetes on Ubuntu“). This time around, I’m going to walk you through the process of setting up a Kubernetes cluster on CentOS 7. This makes for an outstanding one-two punch for your containerized applications.
SEE: Quick glossary: Storage (Tech Pro Research)
What you’ll need
I’ll be demonstrating with three CentOS 7 servers (at the following IP addresses):
- kubemaster: 192.168.1.99
- kube2: 192.168.1.109
- kube3: 192.168.1.167
Make sure to change the IP addresses to fit your needs. You’ll also need root access on all three servers. I do suggest first testing this on virtual machines, before attempting the installation on production servers.
With that said, let’s install.
Pre-installation configuration
The first thing you want to do is configure your /etc/hosts file, so that each machine can ping one another via hostname. So on each machine, issue the su command (to change to the root user) and then edit the file with the command nano /etc/hosts. At the end of the file, append the following (again, adjusting the IP addresses to fit your needs):
192.168.1.99 kubemaster

192.168.1.109 kube2

192.168.1.167 kube3
Save and close that file.
Disable SELinux and swap
Now we need to disable both SELinux and swap. On all three machines, issue the following commands:
setenforce 0

sed -i --follow-symlinks 's/SELINUX=enforcing/SELINUX=disabled/g' /etc/sysconfig/selinux
Next, disable swap (on all three machines) with the following command:
swapoff -a
We must also ensure that swap isn’t re-enabled during a reboot on each server. Open up the /etc/fstab and comment out the swap entry like this:
# /dev/mapper/centos-swap swap swap defaults 0 0
Enable br_netfilter
For our next trick, we’ll be enabling the br_netfilter kernel module on all three servers. This is done with the following commands:
modprobe br_netfilter

echo '1' > /proc/sys/net/bridge/bridge-nf-call-iptables
Install Docker-ce
It’s time to install the necessary Docker tool. On all three machines, install the Docker-ce dependencies with the following command:
yum install -y yum-utils device-mapper-persistent-data lvm2
Next, add the Docker-ce repository with the command:
yum-config-manager --add-repo https://download.docker.com/linux/centos/docker-ce.repo
Install Docker-ce with the command:
yum install -y docker-ce
Install Kubernetes
This is also done on all three servers. First we need to create a repository entry for yum. To do this, issue the command nano /etc/yum.repos.d/kubernetes.repo and then add the following contents:
[kubernetes]

name=Kubernetes

baseurl=https://packages.cloud.google.com/yum/repos/kubernetes-el7-x86_64

enabled=1

gpgcheck=1

repo_gpgcheck=1

gpgkey=https://packages.cloud.google.com/yum/doc/yum-key.gpg

        https://packages.cloud.google.com/yum/doc/rpm-package-key.gpg
Save and close that file. Install Kubernetes with the command:
yum install -y kubelet kubeadm kubectl
Once the installation completes, reboot all three machines. As soon as each machine has rebooted, log back in and su to the root user.
Cgroup changes
Now we need to ensure that both Docker-ce and Kubernetes belong to the same control group (cgroup). By default, Docker should already belong to cgroupfs (you can check this with the command docker info | grep -i cgroup). To add Kubernetes to this, issue the command:
sed -i 's/cgroup-driver=systemd/cgroup-driver=cgroupfs/g' /etc/systemd/system/kubelet.service.d/10-kubeadm.conf
Restart the systemd daemon and the kubelet service with the commands:
systemctl daemon-reload

systemctl restart kubelet
Initialize the Kubernetes cluster
We’re now ready to initialize the Kubernetes cluster. This is done on kubemaster (and only on that machine). On kubemaster, issue the command (again, adjusting the IP addresses to fit your needs):
kubeadm init --apiserver-advertise-address=192.168.1.99 --pod-network-cidr=192.168.1.0/16
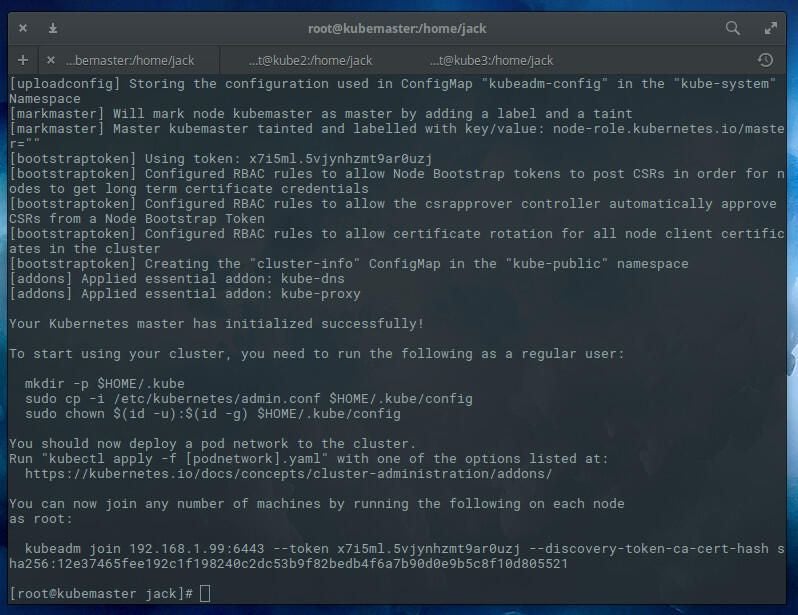
When this completes (it’ll take anywhere from 30 seconds to 5 minutes), the output should include the joining command for your nodes (Figure A).
Figure A
Once that completes, head over to kube2 and issue the command (adjusting the IP address to fit your needs):
kubeadm join 192.168.1.99:6443 --token TOKEN --discovery-token-ca-cert-hash DISCOVERY_TOKEN
Where TOKEN and DISCOVERY_TOKEN are the tokens displayed after the initialization command completes.
Configuring Kubernetes
Before Kubernetes can be used, we must take care of a bit of configuration. Issue the following three commands (to create a new .kube configuration directory, copy the necessary configuration file, and give the file the proper ownership):
mkdir -p $HOME/.kube

sudo cp -i /etc/kubernetes/admin.conf $HOME/.kube/config

sudo chown $(id -u):$(id -g) $HOME/.kube/config
Deploy flannel network
Now we must deploy the flannel network to the cluster with the command:
kubectl apply -f https://raw.githubusercontent.com/coreos/flannel/master/Documentation/kube-flannel.yml
Checking your nodes
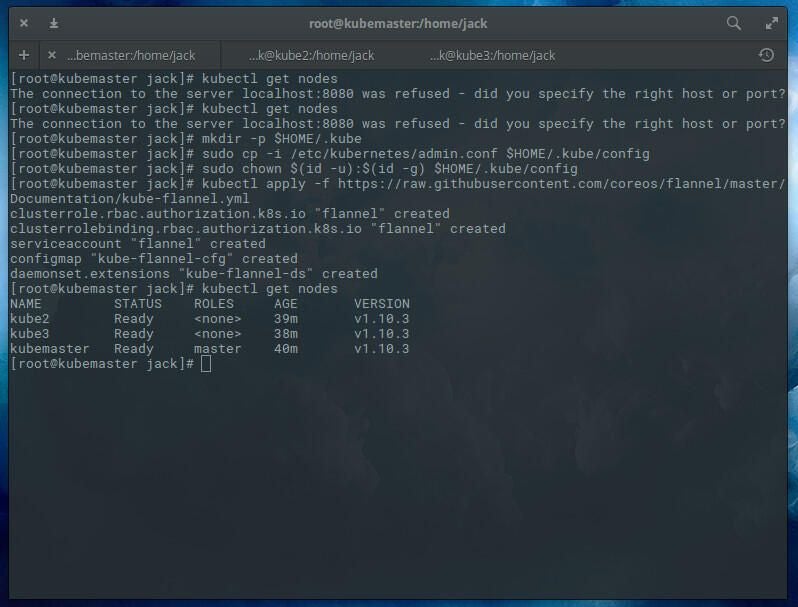
Once the deploy command completes, you should be able to see both nodes on the master, by issuing the command kubectl get nodes (Figure B).
Figure B
All ready
Congratulations, you now have a Kubernetes cluster ready for pods. I’ll be demonstrating how to deploy your first pod when next we visit the Kubernetes topic. Until then, happy clustering!