A proxy server is a computer that acts as an intermediary between a desktop computer and the internet and allows a client machine to make an indirect connection to network servers and services. There are many reasons why you might want to include a proxy server on your network:
- To share internet connection on a LAN
- To speed up internet surfing
- To hide the IP address of the client computer for anonymous surfing
- To implement internet access control
- To scan outbound content
- To circumvent regional restrictions
Clearly some of the above reasons are perfectly fitting for a business and some, well, may not fall in line with your best practices. Regardless, knowing how to install and configure a proxy server is a must-have skill for a network administrator. So, let’s take care of that. I will demonstrate installing the Squid proxy server on Ubuntu 16.04 server.
Installation
This installation and configuration will be handled completely from the command line, so open up a terminal window and prepare to type.
The first thing we want to do (as with software installation on Ubuntu) is to update apt. From your terminal window, issue the command sudo apt-get update. Once that completes, you could also run an upgrade with the command sudo apt-get upgrade. Of course, should this upgrade the kernel, you’ll want to do a reboot, so schedule this accordingly.
Once the update/upgrade is complete, install Squid with the command:
sudo apt-get install squid3
The installation will pick up the necessary dependencies (libecap3, libltdl7, squid-purge, and squid-langpack) and complete without issue.
That is all there is to the installation. Now we move on to the configuration of a basic proxy server.
Configuration
The configuration of the Squid Proxy Server is handled in the /etc/squid/squid.conf. I will show you how to configure a very basic proxy server. The first thing we need to do is uncomment the line (by removing the # character):
#http_access allow localnet
To find that line, issue the command:
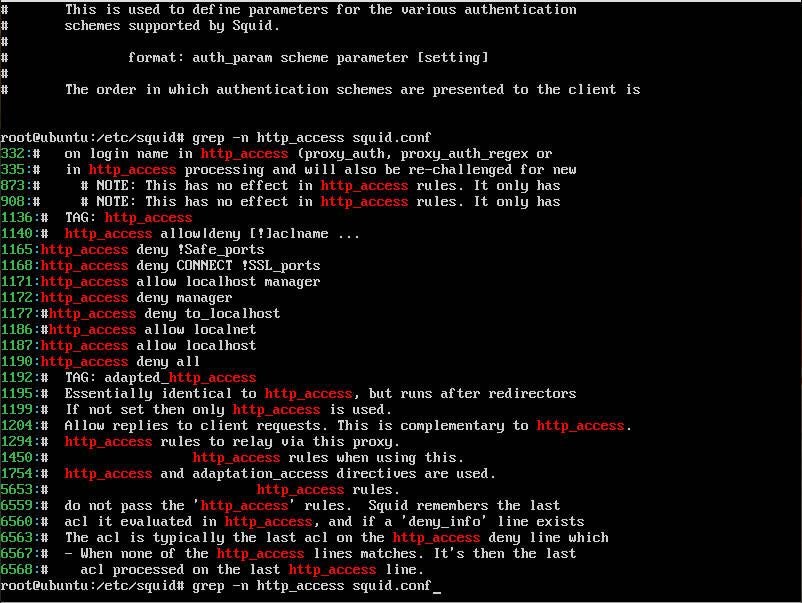
sudo grep -n http_access /etc/squid/squid.conf
As you can see (Figure A), the configuration option is found on line 1186 (of my installation). Open up the squid.conf file for editing, with the command sudo nano /etc/squid/squid.conf, and scroll down to that line and remove the # character.
Figure A

Next you want to look for the line:
#acl localnet src
There will be a number of them (for different network IP schemes). You will want to uncomment the one that matches your network (say 192.168.0.0/16) and alter it to your needs. Say you run your internal network on the 192.168.1.0/255.255.255.0 network. Your localnet configuration option would look like:
acl localnet src 192.168.1.0/255.255.255.0
Restart squid with the command:
sudo service squid restart
That’s it. You now have a basic proxy server up and running on port 3128 and the IP address of the system you just installed Squid on. So you would then go to your client machines and configure them (either on a per-application or OS basis) to use that newly configured proxy via IP and port.
Make it work for you
Of course, Squid can do quite a bit more than serve as a basic proxy server. If you need to get deep into the various configuration options for Squid, make sure to take a look at the official documentation, where you can find out how to configure options for third-party applications, configure options for the neighbour selection algorithm, configure various network parameters, and much more. In the meantime, you can always take a look at the /var/log/squid/access.log and /var/log/squid/cache.log to see what Squid is doing on your network.