If you (or your company) depend upon agile software development, design projects, V-model, Requirement Management, and IT Services Management, then you might be looking for a platform to help facilitate these processes. There are plenty of available options, one of which is the open source Tuleap.
Tuleap helps you create smart software together with:
- Project management
- Code versioning
- Code review
- Continuous integration
- Test management
- Documents and files
- Collaboration
- Tracking
Best of all, you can install Tuleap on off-the-shelf hardware (or a virtual machine), running the CentOS 7 platform. I’m going to show you how this is done.
SEE: Disaster recovery and business continuity plan (Tech Pro Research)
What you need
The only thing you need to make this happen is a running CentOS 7 server (on either a dedicated or virtual machine) and a user account with sudo privileges. Optionally (if you want your Tuleap server to be able to send email), you’ll need a fully qualified domain name. For testing purposes, it is possible to install Tuleap on a machine, using only an IP address. Although I will demonstrate on CentOS 7, the recommended platform is RedHat Enterprise Linux 7.x.
Installing dependencies
The first thing to take care of is the installation of the dependencies. Log into your CentOS 7 server and issue the command:
sudo yum install centos-release-scl
Next, install the remi-safe repository with the command:
sudo yum install https://rpms.remirepo.net/enterprise/remi-release-7.rpm
Create a new repo file with the command:
sudo nano /etc/yum.repos.d/Tuleap.repo
In this new file, past the following contents:
[Tuleap]

name=Tuleap

baseurl=https://ci.tuleap.net/yum/tuleap/rhel/7/dev/$

basearchenabled=1

gpgcheck=1

gpgkey=https://ci.tuleap.net/yum/tuleap/gpg.key
Save and close the file.
Install Tuleap
To install the Tuleap package (and other, relevant, packages), issue the command:
sudo yum install -y rh-mysql57-mysql-server tuleap-plugin-agiledashboard tuleap-plugin-graphontrackers tuleap-theme-burningparrot tuleap-theme-flamingparrot tuleap-plugin-git tuleap-plugin-pullrequest
Configure the database
Next, we must configure the database. The first thing to do is add a necessary line to the end of the /etc/opt/rh/rh-mysql57/my.cnf.d/rh-mysql57-mysql-server.cnf file. This is done with the following command:
sudo sed -i '20 a sql-mode=NO_AUTO_CREATE_USER,NO_ENGINE_SUBSTITUTION' /etc/opt/rh/rh-mysql57/my.cnf.d/rh-mysql57-mysql-server.cnf
Now we enable the MySQL server to run at boot with the command:
sudo systemctl enable rh-mysql57-mysqld
Start the MySQL server with the command:
sudo systemctl start rh-mysql57-mysqld
Finally, set a MySQL password with the command:
sudo scl enable rh-mysql57 "mysqladmin -u root password"
After running the above command, you’ll be prompted to enter and verify a new MySQL password.
Disable SELinux
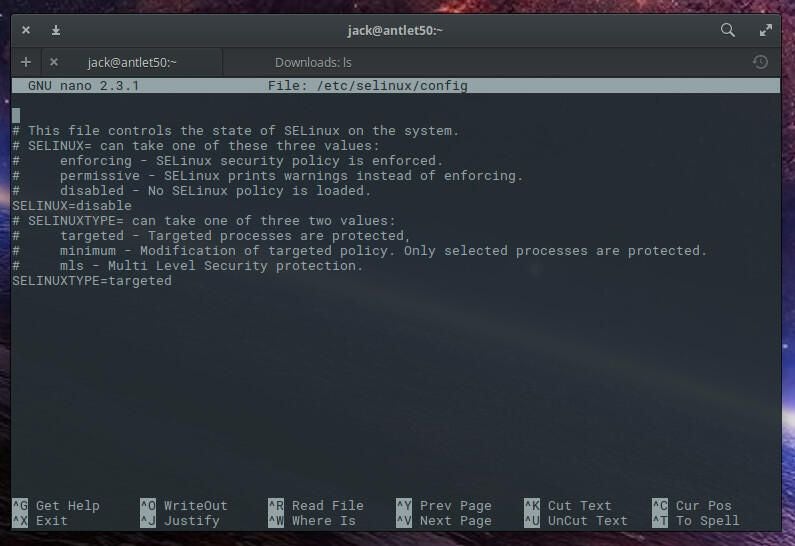
No matter how hard you try, Tuleap won’t install if SELinux is enabled. To disable this security system, issue the command:
sudo /etc/selinux/config
Make sure the SELINUX= line is set to disabled (Figure A).

Save and close that file. Reboot your CentOS 7 server to ensure the change takes effect.
Set up Tuleap
It is important to only run the following command once (so pay attention to what you type). The command is:
sudo /usr/share/tuleap/tools/setup.el7.sh --configure --server-name=FQDN --mysql-server=localhost --mysql-password=PASSWORD
Where:
FQDN is either the Fully Qualified Domain Name or IP Address, and PASSWORD is the password you set for the MySQL admin user.
Mail configuration
Tuleap does depend on the Postfix mail server to send and receive email communication. You only need to ensure four lines are uncommented out (remove the leading # character). Issue the command:
sudo nano /etc/postfix/main.cf
In that file, make sure to remove the comment character (#) from the following lines:
myhostname = mytuleap.domainname.example.com

alias_maps = hash:/etc/aliases,hash:/etc/aliases.codendi

alias_database = hash:/etc/aliases,hash:/etc/

aliases.codendirecipient_delimiter = +
You will also need to edit the myhostname entry and make sure it reflects your FQDN.
Finishing up
You can now point your web browser to http://SERVER_ADDRESS/tuleap (where SERVER_ADDRESS is either the FQDN or IP address of the Tuleap server). You will be prompted to log in with the admin credentials. Where are these credentials? They are created during the installation, but aren’t reported. The username is admin and the password can be found by issuing the command:
sudo cat /root/.tuleap_passwd
The password for the admin user will be displayed. Copy and paste that into the authentication window and log in to Tuleap.
Re-enabling SELinux
It’s important, once you have Tuleap installed, that you re-enable SELinux. To do this, issue the command:
sudo nano /etc/selinux/config
Change disabled to enforcing. Save and close that file. Reboot the server and, once it restarts, go back to the Tuleap site and make sure it’s still functioning properly.
Congratulations, you can now start working with your newly installed software lifecycle management system.