


More about data centers
- Stargate Norway: OpenAI’s First AI Data Center in Europe
- AI Data Centers’ Soaring Energy Use: Who Pays for Higher Utilities Costs?
- China’s Submerged AI Data Center Could ‘Influence Global Sustainable Computing’
- Google to Power Data Centers With Nuclear Energy by 2030 in First-Of-A-Kind’ Agreement
Podman is the RHEL/CentOS replacement for the Docker runtime engine. For any RHEL/CentOS user, you’d best get used to working with this container tool, as using Docker on those distributions is becoming harder and harder.
Podman is an outstanding drop-in replacement for Docker, so you shouldn’t miss a beat. With Podman, you have a few nifty tricks up your sleeve. One such trick is the ability to quickly create local repositories. These repositories should be considered (as the term implies) local only. In other words, you’re using them for your own development work. This might make you wonder what good they would do, since you wouldn’t be sharing them with a team. A local repository is a great way for you to do testing such that others don’t have access to your work.
With such a repository in place, you can push and pull images and work with them until they are just right. Once you are certain an image is exactly how you want it, you can then push it to a team or public repository.
If that sounds like something you might want or need, let’s make it happen.
SEE: IT Data Center Green Energy Policy (TechRepublic Premium)
What you’ll need
The only things you’ll need to make this work are a running instance of either Red Hat Enterprise Linux or CentOS 8, either of which has Podman installed. You’ll also need to have access to either the root user account or a user with sudo privileges.
Note: We are creating an insecure registry. Because of that, you’ll want to make sure the server being used is well protected. You can also make this work using a secure registry and Let’s Encrypt. This, of course, would require the server to have an associated domain. I’m going to assume your registry is for internal testing purposes only, hence the insecure bit.
I will, however, walk you through the extra steps to create a secure registry as well.
How to create a local registry
The first thing you must do is define your local registry. To do that, you must first create a directory to house container data with the command:
sudo mkdir -p /var/lib/registry
Next, we need to deploy the local registry with the command:
sudo podman run --privileged -d --name registry -p 5000:5000 -v /var/lib/registry:/var/lib/registry --restart=always registry:2
Now we need to define the insecure registry. To do that, open the necessary configuration file with the command:
sudo nano /etc/containers/registries.conf
In that file, look for the [registries.insecure] block. In that section you’ll see the line:
registries = []
Change the above line to:
registries = ['localhost:5000']
Save and close the file. Restart Podman with the command:
sudo systemctl restart podman
How to push an image to the local registry
Now that your local registry is up and running, it’s time to push an image to it. For testing, we’re going to pull down the hello-world image from the official docker.io repository and then push it to our new local repository.
First, pull down the hello-world image with the command:
podman pull hello-world
After that pull completes, you’ll then need to tag the image such that it can be pushed to the local repository. Tag the image with the command:
podman tag docker.io/library/hello-world localhost:5000/hello-world
Now that our image has been tagged, we can then push it to the local repository with the command:
podman push localhost:5000/hello-world
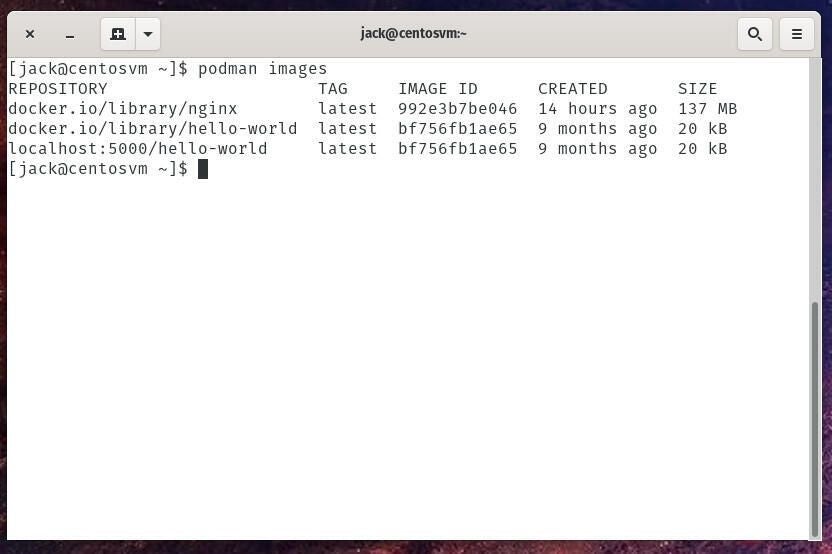
To ensure your image was pushed to the local repository, issue the command:
podman images
You should see the hello-world image listed in localhost:5000 (Figure A).
Figure A
You can now use this as an example for how to tag and push your own images to the local repository.
How to create a local repository with Let’s Encrypt
If you’d prefer to set up that local repository using SSL, here are the extra steps you must take.
First, create the directory for the registry data as you did above. Then, you must install the certbot-auto tool, which you’ll use to get the Let’s Encrypt SSL certificate. Do that with the following commands:
wget https://dl.eff.org/certbot-auto

chmod a+x certbot-auto

sudo mv certbot-auto /usr/local/bin/certbot-auto

sudo firewall-cmd --add-service https --permanent

sudo firewall-cmd --reload
Download the SSL certificate with the following commands:
export DOMAIN="YOURDOMAIN"

export EMAIL="YOUREMAIL"

sudo /usr/local/bin/certbot-auto --standalone certonly -d $DOMAIN --preferred-challenges http --agree-tos -n -m $EMAIL --keep-until-expiring
Where YOURDOMAIN is the domain associated with your server and YOUREMAIL is the email address associated with the domain,.
Create a conjob to auto renew the certificate by issuing the command:
crontab -e
Paste the following to the bottom of the file:
00 3 * * * /usr/local/bin/certbot-auto renew --quiet
Next, you must deploy the secure container registry with the following commands:
export REG_DOMAIN="YOURDOMAIN"

podman run --privileged -d  --name registry -p 5000:5000 -v /var/lib/registry:/var/lib/registry -v /etc/letsencrypt/live/${REG_DOMAIN}/fullchain.pem:/certs/fullchain.pem -v /etc/letsencrypt/live/${REG_DOMAIN}/privkey.pem:/certs/privkey.pem -e REGISTRY_HTTP_TLS_CERTIFICATE=/certs/fullchain.pem -e REGISTRY_HTTP_TLS_KEY=/certs/privkey.pem  registry:2
Where YOURDOMAIN is the domain associated with the server.
Finally, edit the registries.conf file to include your SSL-enabled registry. Open that file and edit the [registries.insecure] entry to look like:
registries = ['localhost:5000', 'YOURDOMAIN:5000']
Where YOURDOMAIN is the domain associated with the server.
Save and close the file. Restart Podman with the command:
sudo systemctl restart podman
And that’s it, your local registries are ready to be used. Push and pull your images to and from that registry and enjoy.
Subscribe to TechRepublic’s How To Make Tech Work on YouTube for all the latest tech advice for business pros from Jack Wallen.

Image: Getty Images/iStockphoto