If you’re overly paranoid about computer security, you probably know that standard DNS isn’t terribly secure. Why? Because, by default, DNS queries are not encrypted. That means DNS can be (and often is) exploited. To get around that weakness, it is possible to use DNS where all DNS queries are handled via the encrypted TLS (Transport Layer Secure) protocol. Out of the box, most operating systems don’t work with DNS over TLS.
If you happen to be using Linux, making this a reality is not only possible, it’s actually quite simple.
I’m going to show you how easy it is to add DNS over TLS on Ubuntu 18.04. To make this happen, we’ll use Stubby, which is an open source, DNS stub resolver, which encrypts DNS queries sent from a client machine to a DNS Privacy resolver increasing end-user privacy. I’ll demonstrate the installation on Ubuntu Desktop 18.04. All you need is a running instance of the latest Ubuntu platform and a user with sudo privileges.
Let’s install.
SEE: Network security policy (Tech Pro Research)
Installation
Installing Stubby is easy. Open a terminal window, and issue the following commands:
sudo apt-get update

sudo apt-get install stubby
Once the installation completes, start and enable Stubby with the commands:
sudo systemctl start stubby

sudo systemctl enable stubby
Testing the installation
We’ll want to use the netstat tool to make sure Stubby is listening. You might not find netstat installed. To install it, issue the command:
sudo apt-get install net-tools
Once this installation is complete, issue the command:
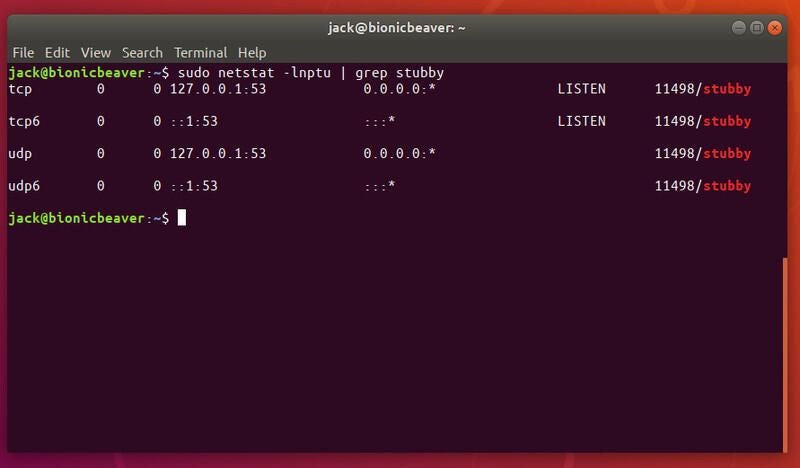
sudo netstat -lnptu | grep stubby
You should see that stubby is listening to the localhost (127.0.0.1) on port 53 (Figure A).
Figure A

Configuring Stubby
Out of the box, Stubby runs perfectly well. Should you want to make any configuration changes, the config file is found in /etc/stubby/stubby.yml. You will notice, in that file, Stubby uses (by default) the following DNS services that support TLS:
- dnsovertls.sinodun.com
- dnsovertls1.sinodun.com
- getdnsapi.net
Below that, you’ll find an Additional servers section that is commented out. There are a number other DNS over TLS servers that are available here, such as:
- dns.quad9.net
- unicast.censurfridns.dk
- dnsovertls3.sinodun.com
- dnsovertls2.sinodun.com
- dns.cmrg.net
- dns.larsdebruin.net
- securedns.eu
Some of the additional servers are listed with conditions that describe weaknesses or features that don’t work. You can also add additional DNS over TLS servers in this section. For example, the Cloudflare DNS over TLS servers can be added like so:
#CloudFlare DNS over TLS servers

- address_data: 1.1.1.1

tls_auth_name: "cloudflare-dns.com"

- address_data: 1.0.0.1

tls_auth_name: "cloudflare-dns.com"
Using Stubby
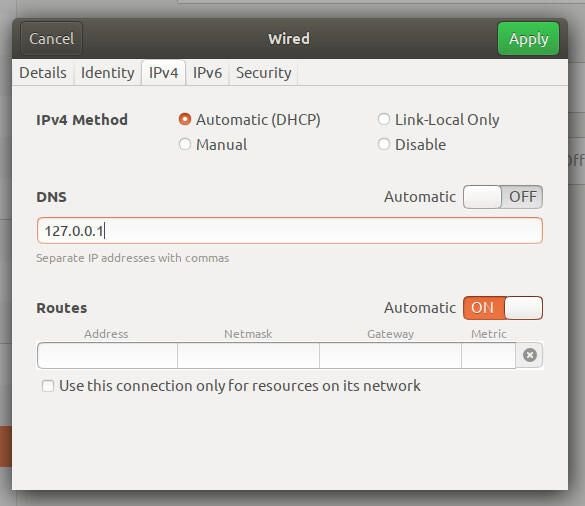
At this point, we need to inform Systemd to actually use Stubby for DNS queries. To do that, open the Network Settings app, and click the gear icon associated with your network connection. In the resulting window, click on the IPv4 tab and set DNS Automatic to OFF. Next, in the DNS textarea, enter 127.0.0.1 (Figure B). Click Save to apply the changes.
Figure B

To make the system aware of the changes, issue the command:
sudo systemctl restart NetworkManager
DNS encrypted
And that’s all. Stubby is now in charge of handling DNS over TLS. Your DNS queries are now encrypted, so you should enjoy a bit more security on your Ubuntu Desktop.
