


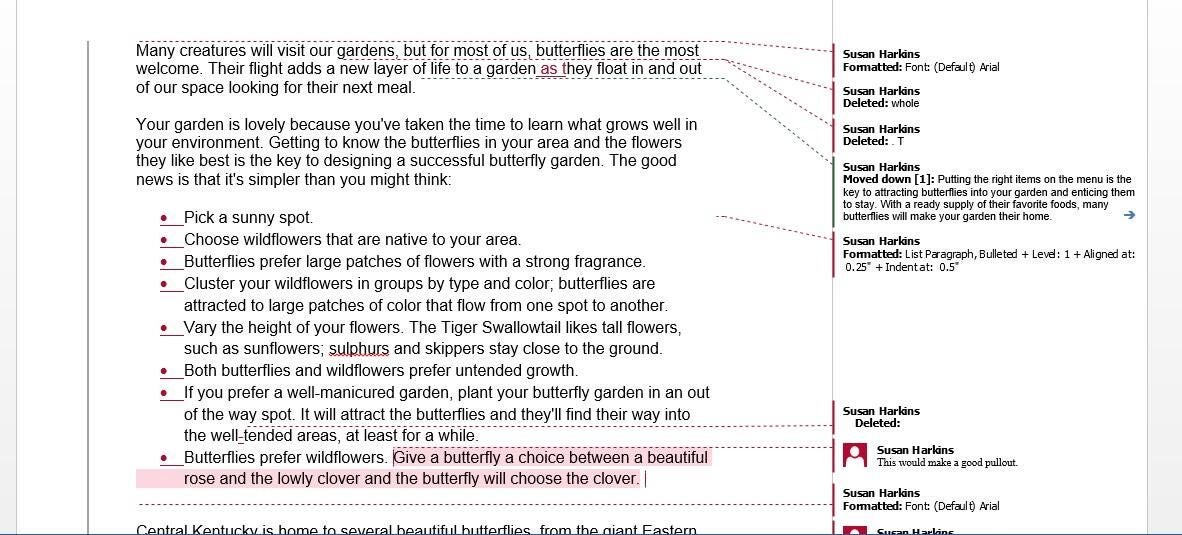
When editing documents in the old days, we passed around a printed document and used different colored pens. If you were in the publishing industry, you had specific marks to identify changes and you probably made suggestions in the margins. Word’s Track Changes feature is similar, but edits and changes are made electronically. It’s a collaborative tool that’s easy to use, but some users struggle with its many options and fail to get the most out of it. In this article, we’ll review the basics so you can put its flexibility to work for you.
Note: You can use most any document with plenty of text to edit if you’d like to follow along with the examples. Or you can download the example .docx or .doc document. If you’re still using Word 2003, your document won’t match those shown in this article, but the basic options are still available.
Turn it on
You can edit a document without using Track Changes — simply make your changes. For most of us, it’s all we need. If you need a version history or you want to collaborate with others, use Track Changes. To enable Track Changes, click the Review tab and then click the Track Changes option in the Tracking group. Then, select Track Changes from the drop-down’s list. In Word 2003, display the Reviewing toolbar by choosing Toolbars from the View menu and checking Reviewing.
Users are often confused by this feature’s on and off status. When Track Changes is enabled, the option’s background is solid, as shown in Figure A. When it’s disabled, the background is transparent. The button acts as a toggle — click it to enable it, click it again to disable it.
Figure A
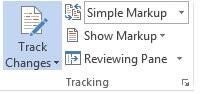
A background color indicates that the feature is enabled.
In addition, you can add the Track Changes indicator, shown in Figure B, to the Status bar by right-clicking the Status bar and selecting Track Changes.
Figure B
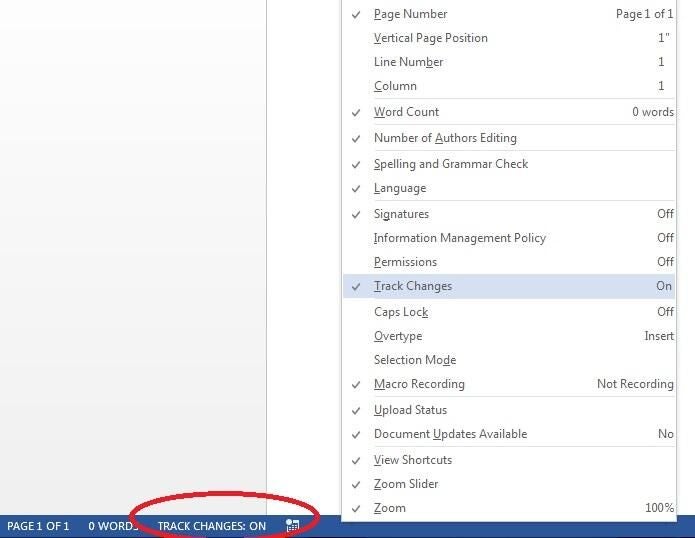
Add the Track Changes indicator to the Status bar.
If a change is necessary — not preferential — and you don’t need the author’s permission, you can temporarily disable Track Changes by clicking the Status bar indicator. Make your change, and then click the indicator again to turn the feature back on. That way, the author has fewer stops to make during the last edit.
What it looks like
With Track Changes enabled, changes are visible in markup form. For example, if you delete text, it doesn’t disappear. Instead, Word displays it using its Strikeout font. Word underlines added text. Figure C shows a simple markup including deleted and added text, among other changes.
Figure C
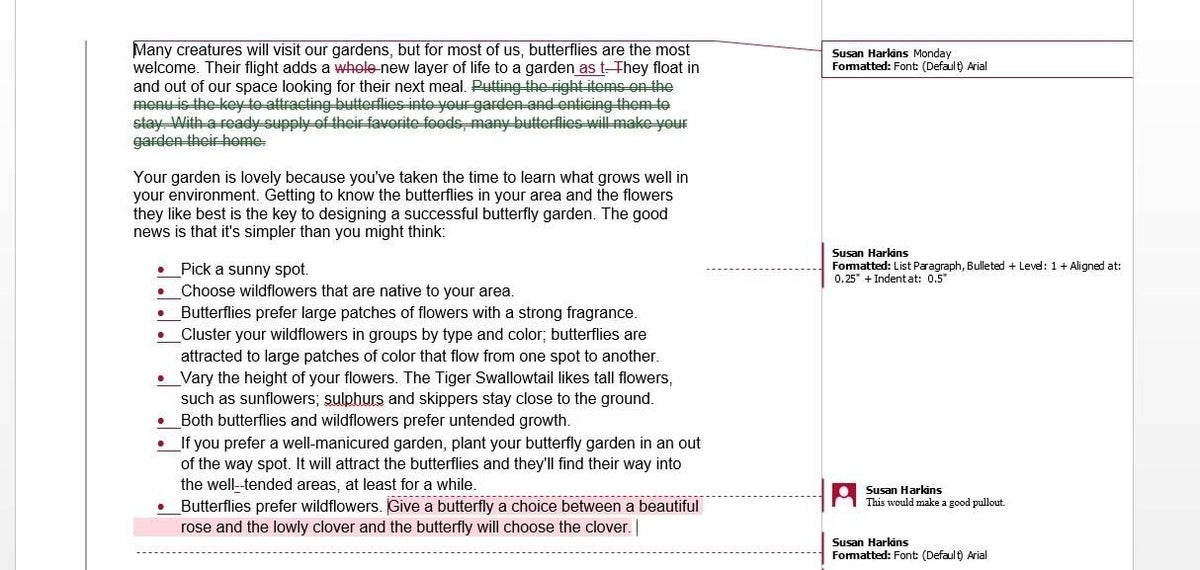
Track Changes lets you see suggested changes.
Most people never change the default formats, but you can by clicking the dialog launcher for the Tracking group. In the resulting dialog, click Advanced Options. In 2010, choose Change Tracking Options from the Track Changes drop-down. Figure D shows the resulting dialog. Spend a little time reviewing these options so you can customize the settings to your advantage.
Figure D
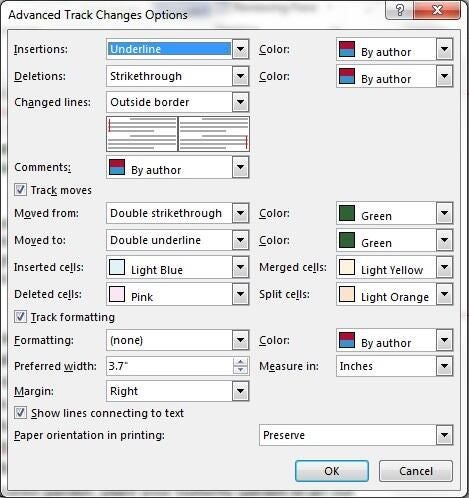
You can change the default formats.
Word will assign a different markup color for each user so you can easily track multiple reviewers. By default, the color for many edits is dependent on the reviewer, but you can force a specific color that’s independent of the reviewer.
You might find that you don’t need to view all revision notes, and Word will let you remove some of them. For instance, perhaps you don’t want to view formatting changes. In this case, you’d open the Track Changes Options (Figure D) and uncheck the Track Formatting option.
Comments
While in the editor role, it’s efficient to mark changes, such as typos and other formatting changes that you know must be made. Doing so makes it easy for the author to accept the change and move on to the next edit. You will, however, run into changes that are preferential. When this happens, use a comment to suggest the change. Here’s why: editing changes require that the author stop and reject or accept the edits, but the author can delete all the comments with one quick action.
There’s a danger that users who are unfamiliar with the feature will use comments for everything. That’s inefficient. You can save the author time by making editing changes that you know must be made. If you use a comment to suggest everything, the author will work harder than necessary by having to implement changes instead of accepting them.
When a comment is appropriate, position the cursor at the place you’re referencing, or simply select the text. Then, click New Comment in the Comments group. When Word displays the empty comment balloon, enter your comment, as shown in Figure E. Word will display a user name along with the comment.
Figure E

Use comments to suggest preferential changes.
View what you want, the way you want it
Features with lots of options often confuse users because they’re unable to take full advantage of all that flexibility. Fortunately, you can control the setup so that it works for you. For example, most revisions appear inline by default (Figure C). You might prefer to see these revisions in the right margin. (Many users find inline revisions distracting.) To implement this change, choose one of three options from the Show Markup drop-down (choose Balloons):
- Show Revisions in Balloons
- Show All Revisions Inline
- Show Only Comments and Formatting In Balloons
The first option shows all revisions in a special reviewing pane, which you can display to the right of or below the document, as shown in Figure F. Or you might choose the Vertical or Horizontal option from the Reviewing Pane drop-down. Besides being less distracting, balloons provide more detailed information about some edits.
Figure F
View markup to the right (or below) the document instead of inline.
If you’d rather see the markup to the left, open the Track Changes Options (Figure D) and choose Left from the Margin drop-down.
Putting it all together
Many users can get this far, but when you’re working with a complex document with lots of reviewers (and revisions), the author’s job is more difficult. What users don’t realize is that Track Changes isn’t an all-or-nothing feature; you can work with specific types of revisions, separately. For instance, let’s suppose you want to accept (or reject) all the formatting changes because doing so will facilitate the rest of your editing task. But you don’t want to accept anything else — not yet. You might think you’re stuck, but you’re not. You can accept only the formatting edits and get those out of the way:
- Click the Show Markup drop-down (in the Tracking group).
- Uncheck everything but the Formatting option, as shown in Figure G. At this point, Word will display only formatting markup.
Figure G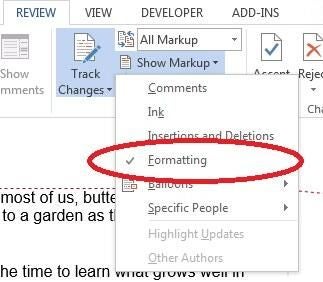
- In the Changes group, click the Accept drop-down and choose Accept All Changes Shown (rather than Accept All Changes In Document), as shown in Figure H. If this option is dimmed, you are currently displaying all markup. You must hide something for this option to be available.
Figure H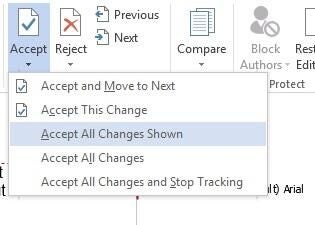
- After you’ve accepted (or rejected) the formatting revisions, repeat step 1 to reset all the markup displays.
Whether you’re working with a team or alone, you can use Track Changes to edit a Word document more efficiently. When the time comes to implement suggested changes, you simply reject or accept and Word applies the changes (or not) for you. Using all of the display options to your advantage will help you apply these changes more efficiently.
Do you have additional Track Changes tips and tricks? Share them in the discussion thread below.