Figure A
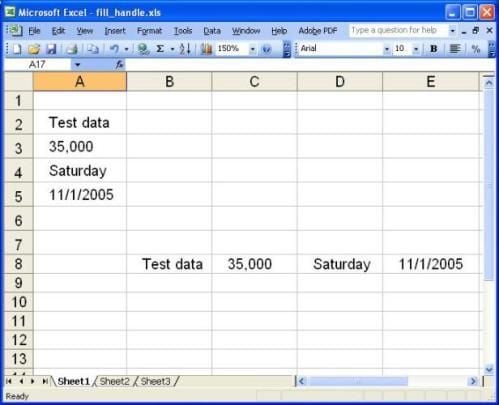
\r\nWe’ll experiment with four types of entries and fill them across and down.
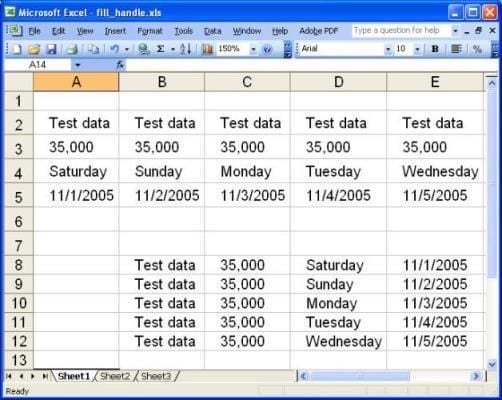
Figure B
\r\nIn the first selection, we dragged each entry’s fill handle across to column E. In the second selection, we dragged each entry’s fill handle down to row 12. As you can see, Excel copied the sample text and value. But because it recognized Saturday and 11/1/2005 as part of a series, it entered each successive value belonging to those series.
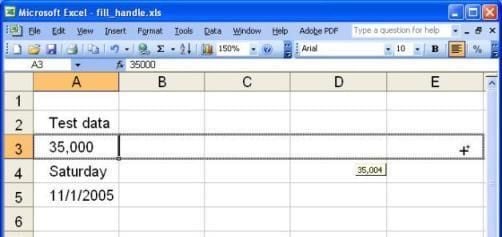
Figure C
\r\nYou can tell Excel to increment a value by 1. Just hold down [Ctrl] as you drag the fill handle either across or down. As you drag, you’ll see a tiny plus sign beside the mouse pointer.
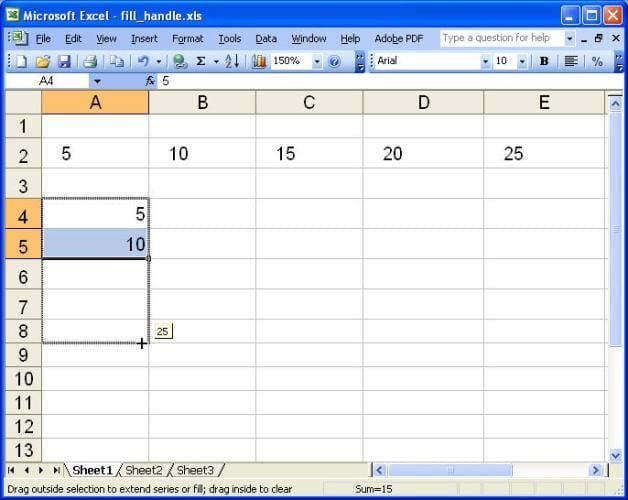
Figure D
\r\nIf you want Excel to increment a number by a specific interval, select two adjacent cells that establish that interval. Here, we’ve selected cells containing the values 5 and 10. When we dragged the fill handle for this selection, Excel extended the series by increments of 5.
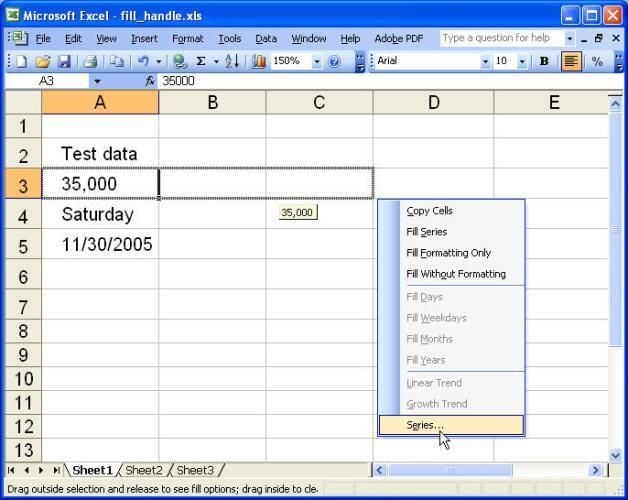
Figure E
\r\nIf you right-click on an entry’s fill handle and drag, Excel will display a shortcut menu when you release the mouse button. Selecting the Series command brings up the options shown in the next figure.

Figure F
\r\nThe Series dialog box offers context-specific options. In this case, the selection contained a numeric value, so Excel defaulted to the Linear option.
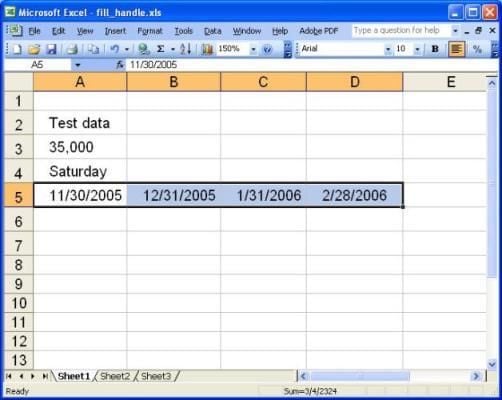
Figure G
\r\nHere, we right-clicked on the fill handle for a date entry–the last day of November–and dragged across three adjacent cells. We then selected Series from the shortcut menu and chose Month under Date Unit. When we clicked OK, Excel entered the last day of the subsequent three months.
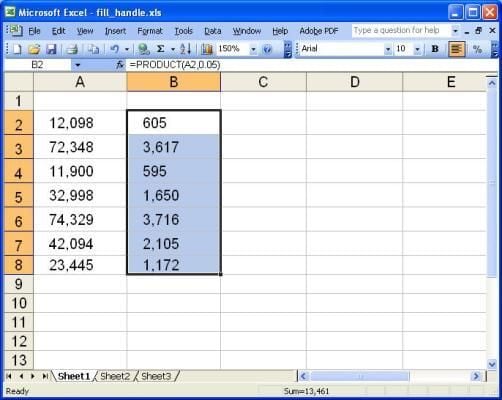
Figure H
\r\nWhen you need to copy a formula down through a column, you can use the fill handle to do it automatically. In this example, we entered the formula =PRODUCT(A2,0.05) into cell B2 to return five percent of the value in cell A2. To fill that formula down column B for every value in column A, we just double-clicked the fill handle. Of course, this technique is more impressive when you’re copying the formula down through, say, several hundred cells.
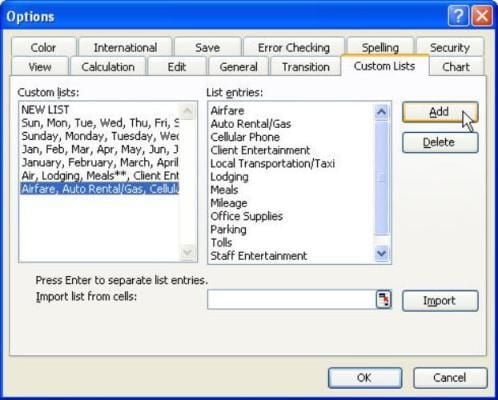
Figure I
\r\nExcel lets you create a custom fill list containing items you need to routinely insert in your worksheets. Choose Tools | Options, click the Custom Lists tab, and select New List. Then, just type your list in the List Entries box. Click Add and Excel will create your list, as shown here. An alternate approach is to create your list in a worksheet and select it. In the Custom Lists tab, use the Import button to create the list.
When you need to insert entries from your your custom list, just type the item you want to start with and drag that cell’s fill handle down or across through as many cells as necessary.
Figure J
\r\nHere’s one last trick. You can quickly delete all the entries in a selection by clicking the fill handle and dragging up and to the left. Excel will gray out the cells that you drag across, as shown here. When you release the mouse button, the entries will be gone.
Bill Detwiler is the Editor for Technical Content and Ecosystem at Celonis. He is the former Editor in Chief of TechRepublic and previous host of TechRepublic's Dynamic Developer podcast and Cracking Open, CNET and TechRepublic's popular online show. Previously, Bill was an IT manager in the social research and energy industries. He has bachelor's and master's degrees from the University of Louisville, where he has also lectured on computer crime and crime prevention.


