
Excel, like Word, has an out-of-the-box environment that might not provide the most efficient setup for the way you work. Changing those settings every time you start a new workbook can be a blow to productivity if you do it often. Instead, modify these settings so that each new workbook opens configured to your liking. In this article, I’ll share 10 default settings you might want to change.
I’m using Excel 2016 (desktop), but these options are customizable in earlier versions. There’s no downloadable demonstration file, and you can’t make these changes in the browser edition.
Note: This article is also available in the free PDF Make Office 2016 work your way by changing these default settings.
1: Number of sheets
Every workbook includes three sheets by default. You can add and delete sheets as needed, but you can also change the number initially provided. To change this setting:
- Click the File tab and then click Options.
- Click General in the left pane.
- In the When Creating New Workbooks section, enter the desired number in the Include This Many Sheets option (Figure A).
- Click OK.
Figure A
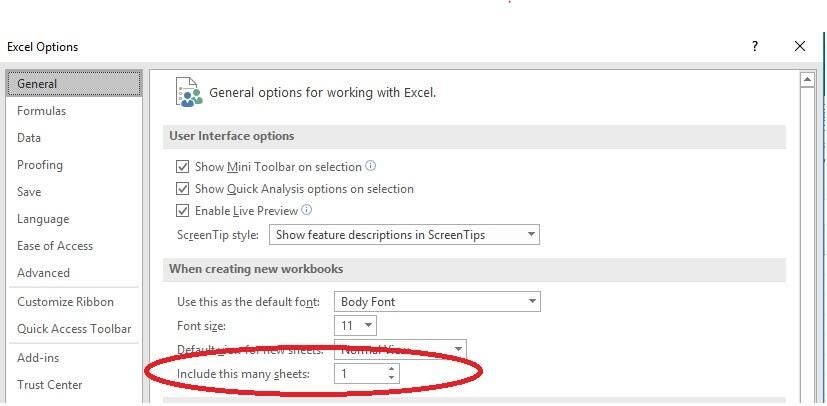
Specify the number of sheets in new workbooks.
2: Starting workbook
If you often work with the same workbook, you can open it and launch Excel at the same time. Simply save the file in Excel’s XLSTART folder. If you’re using Windows 10, you can find the folder here:
C:UsersusernameAppDataRoamingMicrosoftExcelXLSTART
If you can’t find the folder, open Excel Visual Basic Editor (VBE) by pressing Alt+F11. Then, enter the following command in the Immediate window and press Enter:
? application.StartupPath
The VBE will display the correct path in the Immediate window, as shown in Figure B. If the Immediate window isn’t open, press Ctrl+G.
Figure B

The Immediate window offers a quick way to find XLSTART.
During the save process, you might not see AppData. If this is the case, launch Windows Explorer and click the Hidden option in the Show/hide group on the View tab.
SEE: 30 things you should never do in Microsoft Office (free TechRepublic PDF)
3: Cursor movement
Excel moves the cursor down one cell when you press Enter. If most of your data input is from left to right, you’ll find this annoying. You can press Tab instead of Enter, or you can adjust this behavior as follows:
- Click the File tab and then choose Options.
- In the left pane, select Advanced.
- In the Editing Options section, choose Right from the Direction dropdown under the After Pressing Enter, Move Selection option (Figure C). You can choose Right, Left, Up, or Down.
- Click OK.
Figure C

Change the cursor’s movement behavior.
4: Font and font size
Most of us don’t need to change Excel’s default font and font size, but you certainly can. If your organization has a certain formatting requirement, changing this default will save you a lot of time:
- Click the File tab and choose Options.
- Choose General from the left pane.
- In the When Creating New Workbooks section, choose the appropriate font from the Use This As The Default Font dropdown.
- To change the size, choose a setting from the Font Size dropdown (Figure D).
Figure D
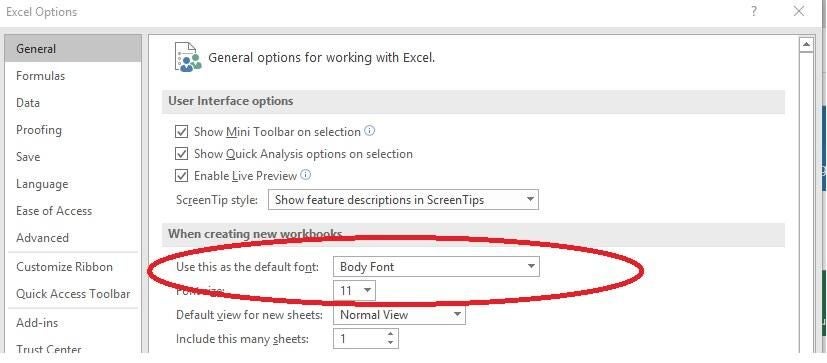
Update the font and font size for new workbooks.
5: Template modifications
Like Word, Excel bases all new workbooks on a template. Modifications you make to Book.xltm are present in all new workbooks. Simply make the changes you want to persist in all new workbooks and then save the file appropriately as a template:
- Click the File tab and choose Save As.
- Enter book as the filename.
- Choose Excel Macro-Enabled Workbook (*.xltm) from the dropdown.
- Use the browsing bar above to select your local drive (probably C:) and then enter the path to XLSTART (explained in tip #2), as shown in Figure E.
Figure E

Modify Excel’s basic template.
To use the modified version of Book.xltm, press Ctrl+N or click New on the Quick Access Toolbar (QAT). Excel will open a new workbook that reflects your template changes. If you want to make more modifications, be sure to open the Book.xltm template itself, as you would open any other file.
Be careful when modifying this template. All new workbooks will present these changes. In addition, if anything happens to the template, Excel will generate a new one, and it won’t contain your customizations. I prefer to create new templates and apply them as needed, but I want you to have the opportunity to choose for yourself.
SEE: Eight ways Word’s built-in styles can save you a ton of time (TechRepublic)
6: Secondary startup folder
Tips #2 and #5 rely on the built-in XLSTART folder. Anything you store in this folder will open automatically when you launch Excel. You can add a second startup location as follows:
- Click the File tab and choose Options.
- Select Advanced in the left pane.
- In the General section, enter the path to the alternate startup folder (Figure F).
- Click OK.
Figure F
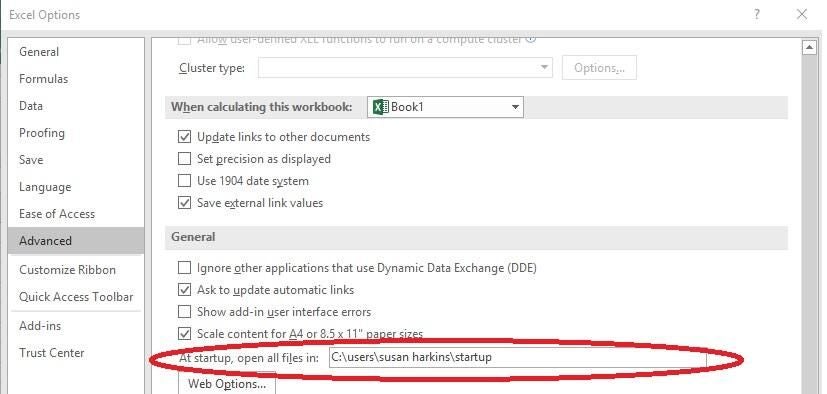
Add a second startup location.
Excel will continue to open files in XLSTART, but it will also open files in the alternate location.
7: Text Wrap
Long entries often extend past the cell’s right border if the cell isn’t wide enough to accommodate them. When no data lies to the right, it doesn’t matter. But if there’s data in the adjacent cell, it will take precedence, and the long entry to the left will be partially obscured. If you want long entries to automatically wrap within their cells, you can change the Normal style as follows:
- Click the Home tab.
- Right-click Normal in the Quick Styles gallery in the Styles group. Choose Modify from the shortcut menu.
- In the resulting dialog, click Format.
- Click the Alignment tab.
- Check the Wrap Text option in the Text Control section (Figure G).
- Click OK twice.
Figure G
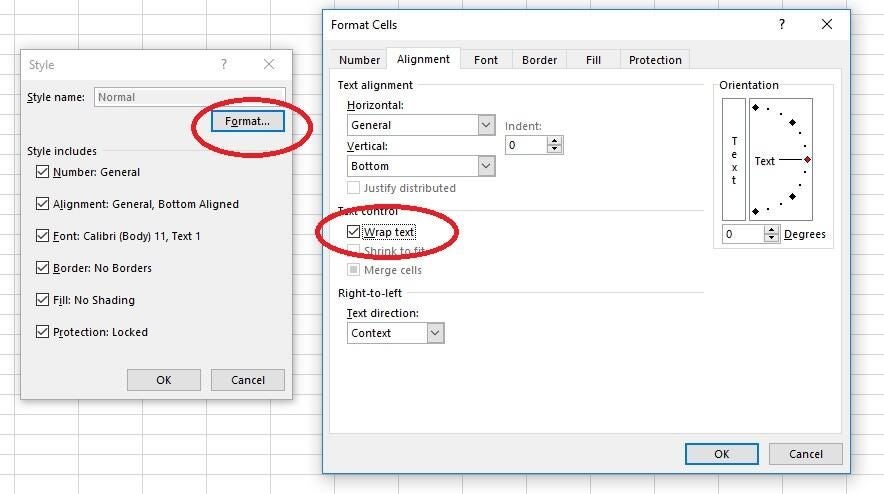
Make Text Wrap the default.
This default works in the current workbook only. If you want to update all new workbooks in this way, see tip #5. Bear in mind that wrapping text will increase the height of that row.
SEE: 10 things you should never do in Excel (TechRepublic)
8: Expanded formula bar
The formula bar’s height (or depth) is adequate for most of us, but those who enter long expressions might benefit from more space. Fortunately, it’s easy to achieve. Hover the mouse over the bottom border until it turns into the two-arrow pointer. Then, drag the bottom down (Figure H). The height will persist until you change it. You can also use the arrow at the far right to expand and collapse the bar.
Figure H

Increase the height of the formula bar to accommodate long expressions.
9: Recent list
When you click Open, Excel displays the most recently opened files. The list may be adequate, but if you work with a lot of files, you might find they fall off the list quicker than you’d like. You can display up to 50 files by changing a simple setting:
- Click the File tab and choose Options.
- Click Advanced in the left pane.
- In the Display section, change the value in the Show This Number Of Recent Workbooks control (Figure I).
- Click OK.
Figure I
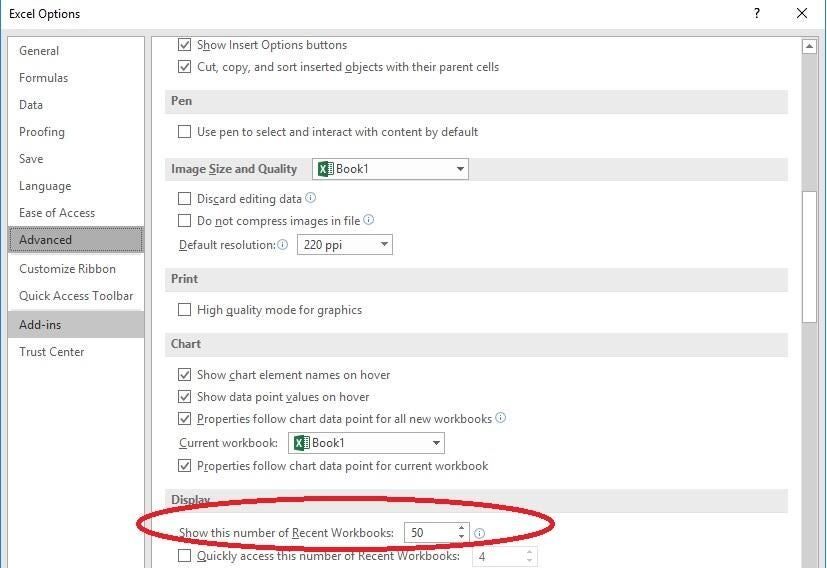
Specify the number of recently opened files displayed.
10: Ruler measurement
Excel ruler measurements default to inches (set by the Windows Regional setting) in the US. You’ll use these rulers in Page Layout view. But inches won’t always be appropriate. You can quickly change the measurement as follows:
- Click the File tab and choose Options.
- Choose Advanced from the left pane.
- In the Display section, choose the appropriate setting from the Rules Units dropdown (Figure J).
- Click OK.
Figure J
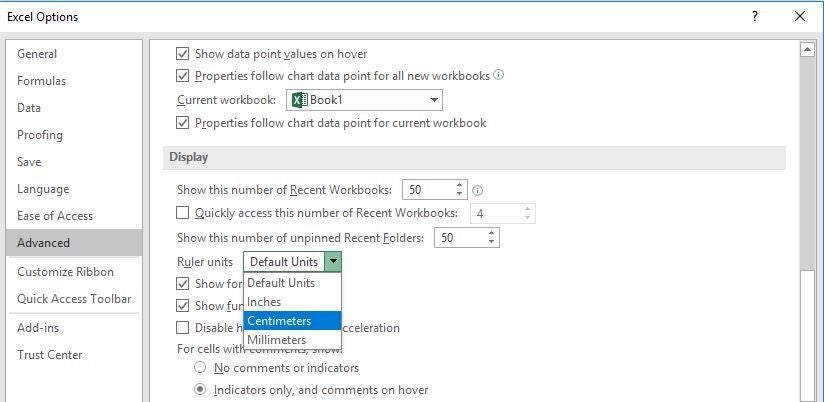
Change the ruler measurement to centimeters or millimeters.
More where these came from
I’ve shown you 10 easy ways to set defaults that work the way you work, but there are many more. Spend some time reviewing the options via the File tab and you may discover other changes you can make to save time and effort.
Send me your question about Office
I answer readers’ questions when I can, but there’s no guarantee. Don’t send files unless requested; initial requests for help that arrive with attached files will be deleted unread. You can send screenshots of your data to help clarify your question. When contacting me, be as specific as possible. For example, “Please troubleshoot my workbook and fix what’s wrong” probably won’t get a response, but “Can you tell me why this formula isn’t returning the expected results?” might. Please mention the app and version that you’re using. I’m not reimbursed by TechRepublic for my time or expertise when helping readers, nor do I ask for a fee from readers I help. You can contact me at susansalesharkins@gmail.com.
Also read…
- How to add a drop-down list to an Excel cell (TechRepublic)
- How to become a cloud engineer: A cheat sheet (TechRepublic)
- 50 time-saving tips to speed your work in Microsoft Office (free PDF) (TechRepublic download)
- How to add a drop-down list to an Excel cell (TechRepublic)
- Cost comparison calculator: G Suite vs. Office 365 (TechRepublic Premium)
- Microsoft Office has changed, how you use it should too (ZDNet)
- Best cloud services for small businesses (CNET)
- Best to-do list apps for managing tasks on any platform (Download.com)
- More must-read Microsoft-related coverage (TechRepublic on Flipboard)

