


If you’re creating a web application using Linux, more often than not you’ll find yourself at the mercy of the command-line MySQL administration tools that are included with that database. While these tools are quite robust, they can be cumbersome for less experienced developers. And even if you’re a more seasoned developer, there are plenty of times when you don’t want to be bothered with the process of entering long batches of commands.
Graphical tools, particularly those that are web-based, can simplify database administration tasks. And in keeping with the theme of simplicity, Adminer delivers spectacularly. Adminer is a PHP script you can copy into your web server, and without having to do any configuration, you can jump right in and administer almost any database that’s running on most major database server applications.
This tutorial will provide you with a quick refresher of how to set up a LAMP environment and how to get Adminer up and running on top of it.
Jump to:
- What you’ll need to install Adminer
- How to install MySQL
- How to install Adminer with MySQL
- How to access the Adminer web interface
- Why Adminer?
- Security considerations
What you’ll need to install Adminer
To get Adminer up and running, you’ll need an instance of Ubuntu Server — I’m demonstrating on 23.04, but you can also use 22.04 or 20.04 — and a user with sudo privileges. That’s it. Let’s make some database magic.
SEE: The nuts and bolts of upgrading from Ubuntu Server 20.04 to 22.04.
How to install MySQL
I’m going to demonstrate how to set up Adminer with the MySQL database. To make sure we get everything installed, we’ll go the route of the full LAMP stack — Linux Apache MySQL PHP.
- You’ll want to first run the command:
sudo apt-get install lamp-server^ -y
- After the installation completes, start and enable the MySQL and Apache services with the following commands:
sudo systemctl enable --now apache2
sudo systemctl enable --now mysql
- Next, secure the MySQL installation, and give the admin user a password with the command:
sudo mysql_secure_installation
You can follow the prompts to get MySQL properly configured, but if you need more information about doing that, feel free to consult Setting up MySQL and MariaDB.
How to install Adminer with MySQL
Adminer runs as a PHP script you can download directly into your Linux server’s webroot directory via the wget utility. If you installed Apache via the lamp-server package above, then your default webroot directory is /var/www/html, and this directory is owned by root. Unless you change these defaults, you will need to use sudo to download and install Adminer. As of this writing, the latest version of Adminer is 4.8.1.
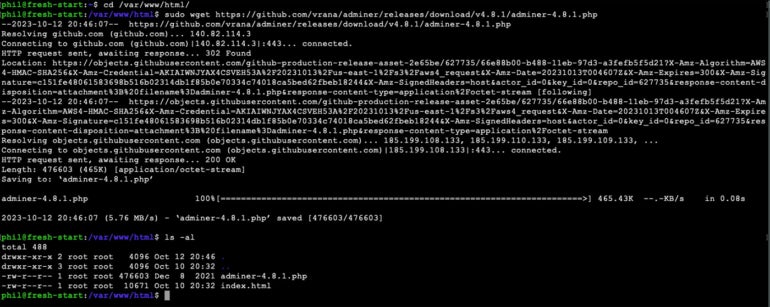
The commands below will show you how to switch into /var/www/html directory and download the Adminer PHP code directly into it:
cd /var/www/html

sudo wget https://github.com/vrana/adminer/releases/download/v4.8.1/adminer-4.8.1.php
If the above link doesn’t work, you can browse the Adminer website to find the correct link to the latest version. If all works correctly, you should see something similar to Figure A.
Figure A
How to access the Adminer web interface
Believe it or not, that’s all there is for the installation. However, you cannot log in using the MySQL admin credentials. Instead, you have to create another user who has permission to create databases. To do that:
- Log into the MySQL console with the command:
sudo mysql
- Create a new user — we’ll call it dbadmin, but you can name it whatever you like — using the command:
CREATE USER 'dbadmin'@'%' IDENTIFIED BY 'PASSWORD';
Where PASSWORD is a strong/unique password.
- Give the user reload on global rights with:
GRANT CREATE USER, RELOAD ON *.* TO 'dbadmin'@'%';
- Grant the necessary rights with:
GRANT ALL ON `db`.* TO 'dbadmin'@'%' WITH GRANT OPTION;
Do notice, in the above command, on either side of db are backticks and not single quotes. If you run the command with single quotes there, it will error out.
- Finally, grant the user create privileges with:
GRANT CREATE, CREATE USER, SELECT, RELOAD ON *.* TO 'dbadmin'@'%';
- Flush privileges and exit with:
FLUSH PRIVILEGES;
exit
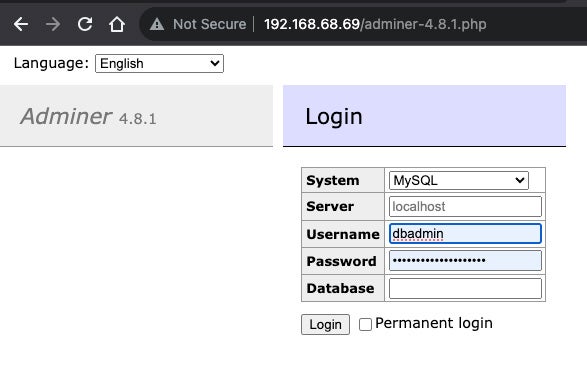
You can now point a web browser to
http://SERVER/adminer-4.8.1.php
Where SERVER is the IP address of the hosting server, and be greeted by the Adminer login window (Figure B).
Figure B
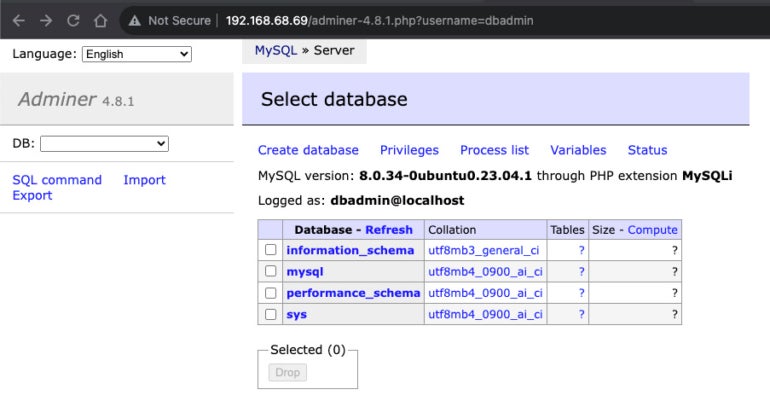
At this point, you should be able to create and modify databases to your admin heart’s desire (Figure C). Note that your access is limited by the permissions of the account you are using to connect to the database.
Figure C
And that’s how easy it is to get Adminer up and running on top of a MySQL database. Give this platform a go with whatever database you need to work with and see if it doesn’t make your job considerably easier.
Why Adminer?
Adminer naturally provides the functionality you’d expect in a web-based database management tool:
- Database server connection via username and password.
- Database creation.
- List by fields, indexes, foreign keys and table triggers.
- Edit name, engine, collation, auto_increment and comment for tables.
- Alter the name, type, collation, comment and default values for columns.
- Add and drop tables or columns.
- List data in tables with search, aggregate, sort and limit results.
- Insert, update and delete records.
- Supports all data types and blobs via file transfer.
- Execute any SQL command.
- Show and kill processes.
- Display and edit users and rights.
Adminer goes beyond most graphical database administration tools in that it supports many other relational database management systems besides MySQL, including MariaDB, PostgreSQL, SQLite, MS SQL, Oracle, Elasticsearch and MongoDB. In this regard, Adminer delivers the utility of a web-based database administration tool and the convenience of being able to administer multiple database systems with a single easy-to-install tool.
Security considerations
Sadly, the convenience introduced by any web-based database administration solution will bring with it significant security risks. This is because a web-based database administration solution will bypass any network-based restrictions that are imposed against a database.
Open source: Must-read coverage
- Debian vs Ubuntu: Which Linux Distro Fits Your Needs Best?
- Ubuntu Server: A Cheat Sheet
- Llama 3 Cheat Sheet: A Complete Guide for 2024
- CISA Report Finds Most Open-Source Projects Contain Memory-Unsafe Code
PREMIUM: Check out this database engineer hiring kit.
For example, you might have a WordPress site running under Apache on a public-facing web server that makes use of a MySQL server that runs on a private server. In this scenario, MySQL is configured with a user account that can only access the MySQL server from the WordPress server. Even if someone has the username and password for this account, the MySQL’s built-in security won’t allow access.
It’s imperative that access to any web server that has Adminer installed be restricted from public access. Otherwise, anyone in the world will gain administrative access to any database Adminer has access to. You may want to consider placing such a server behind a VPN or a firewall that will suitably restrict access only to those who should have it.