


Creating a numbered or bulleted list is one of Word’s easiest features to implement. You click a button–seriously, that’s about it. But with that ease comes a fixed set of properties, and you might want something a bit different. In addition, not every list is a numbered or bulleted list. In this article, I’ll show you five ways to alter lists to get exactly what you want.
More about Software
- Software Installation Policy
- Five Methods to Insert a Checkmark Into Microsoft Office Products
- How to Hide and Handle Zero Values in an Excel Chart
- How to Use Section Breaks to Control Formatting in Word
I’m using Word 2016 (desktop) on a Windows 10 64-bit system, but most of these tips will work in earlier versions. You can work with any list content or download the demonstration .docx file. None of these tips will work in Word Online (browser version).
1: Undo list indent for a single list
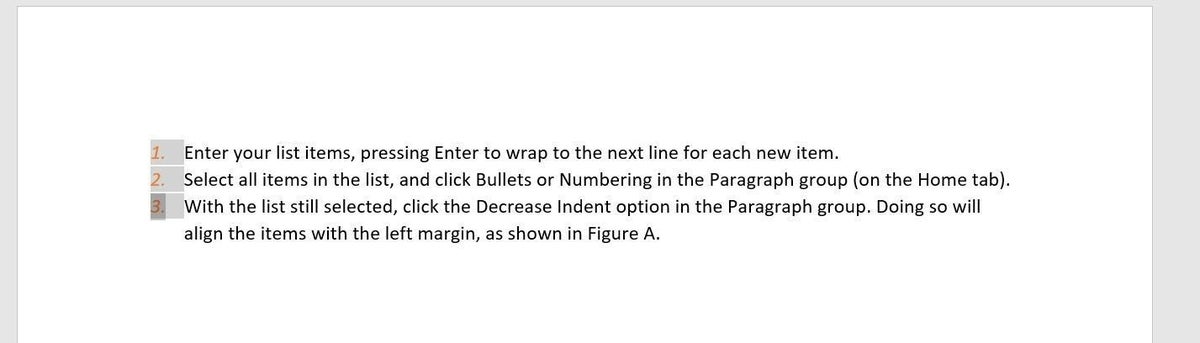
By default, Word indents a list. It’s adequate most of the time, but when it’s not, you can easily remove the indent. To demonstrate, let’s create a list and change the indent as follows:
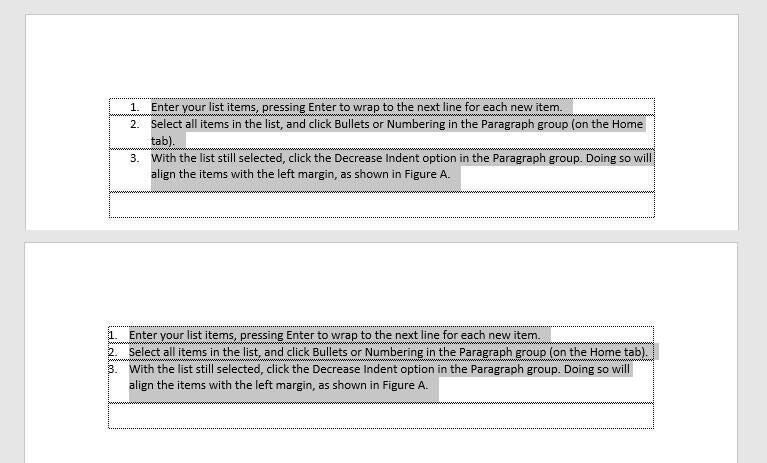
- Enter your list items, pressing Enter to wrap to the next line for each new item.
- Select all items in the list and click Bullets or Numbering in the Paragraph group (on the Home tab).
- With the list still selected, click the Decrease Indent option in the Paragraph group. Doing so will align the items with the left margin, as shown in Figure A.
Figure A
Word indents the list by default, but you can quickly remove the indent.
SEE: 50 time-saving tips to speed your work in Microsoft Office (TechRepublic PDF)
2: Change the default indent
If you know you’ll be entering lots of lists, you can eliminate the last step (above) by resetting the default alignment. Simply enter your first list as you normally would and then do the following:
- Click any number in the list to select the entire list.
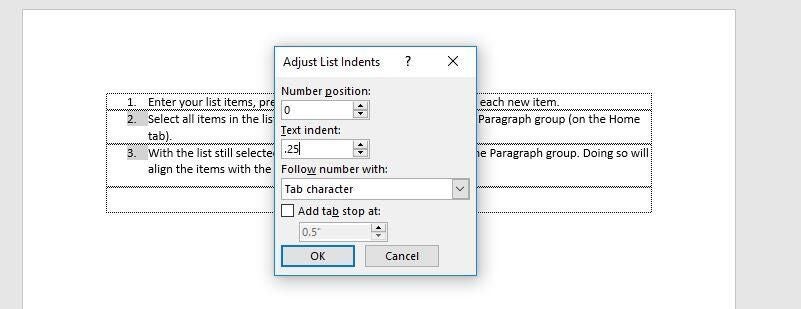
- Right-click the selection and choose Adjust List Indents.
- In the resulting dialog, set the Number Position setting to 0 (which represents the left margin).
- Set Text Indent to .25 (Figure B)–or not. This setting determines the text alignment position.
- Click OK.
Figure B
Reset the text alignment setting.
This option is a document-level setting, which affects all subsequent lists in the same document.
3: Sort a simple list
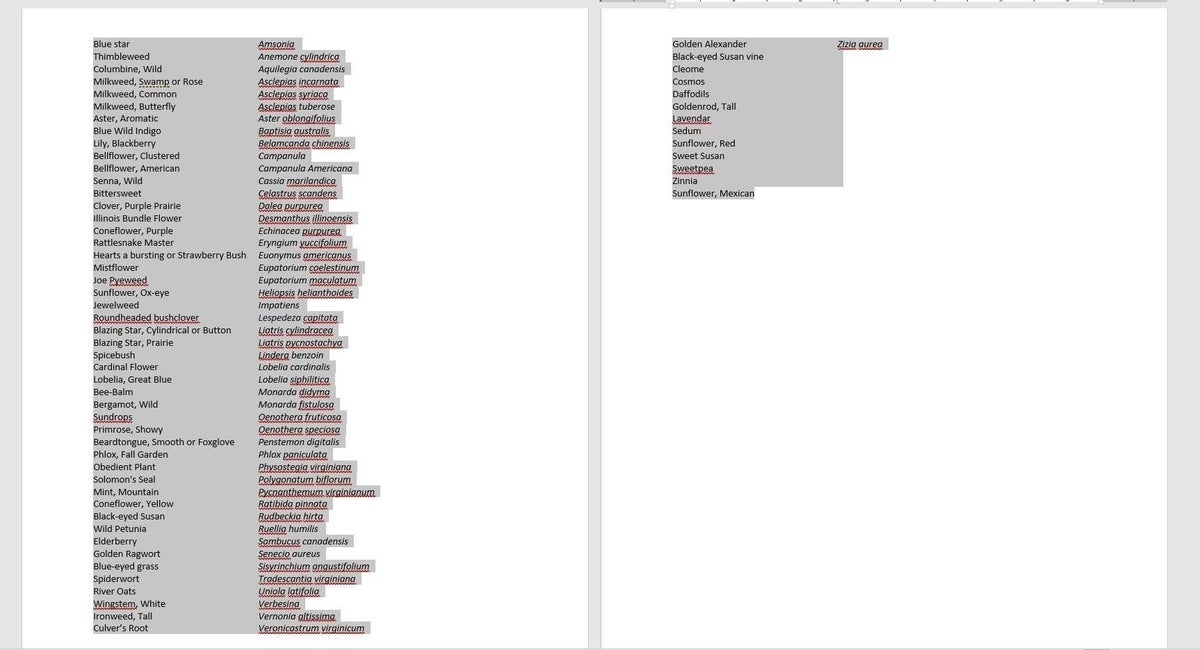
Regardless of how you enter list items–or more important, how someone else entered them–you can sort items numerically or alphabetically. For instance, you might want to sort the two-column list of flowers shown in Figure C by their common names. (A left-aligned tab separates the two columns.)
Figure C
We’ll sort this list of flowers.
To sort this list alphabetically by the values in the first column, do the following:
- Select the entire list.
- In the Paragraph group (on the Home tab), click Sort.
- In the resulting dialog (Figure D), click OK.
Figure D
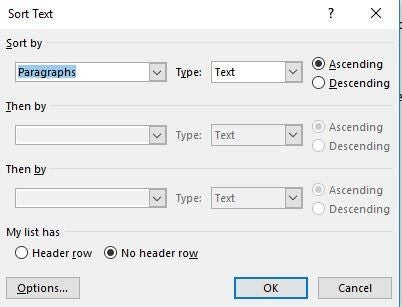
Accept the default settings.
Word does a good job of anticipating your request. The Sort By option is Paragraphs; Word uses a hard return to determine each new paragraph. The Type sort is alphabetical because the content is text. Figure E shows the sorted list.
Figure E

Word easily sorts a list.
You can just as easily sort by the botanical names in the second column, as follows:
- Select the entire list.
- In the Paragraph group, click Sort.
- In the resulting dialog, change the Sort By setting from Paragraphs to Field 2 (Figure F).
Figure F
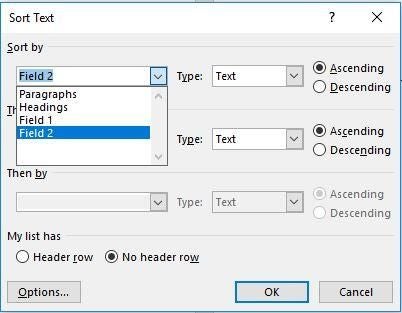
Choosing Field 2 denotes the second column in the list.
By choosing the appropriate field from the Sort By dropdown, you can sort by any column.
SEE: Microsoft Office Certification Training Bundle (TechRepublic Academy)
4: Convert a list to a table
A list of multiple columns is easy to create in Word by simply inserting a tab character between each column. However, Word still treats the list as plain text, so formatting and even moving the list might be awkward. Converting the list into a table can be helpful in either situation. To quickly convert a list into a table, do the following:
- Select the list.
- Click the Insert tab.
- From the Table dropdown (in the Tables group), choose Convert Text To Table (Figure G).
- In the resulting dialog, click OK. Again, Word does a good job of anticipating your needs (Figure H). When that’s not the case, you can adjust as necessary.
Figure G
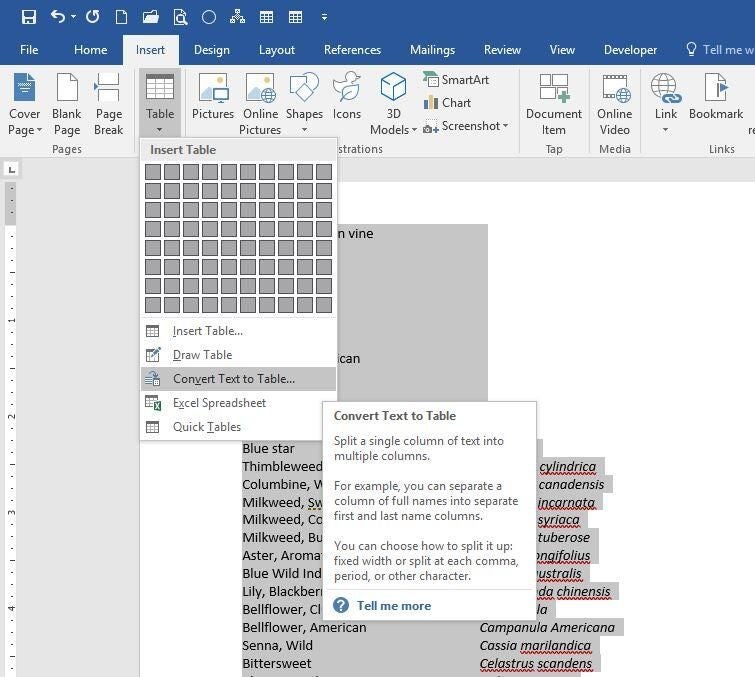
Our list has two columns separated by a tab character.
Figure H
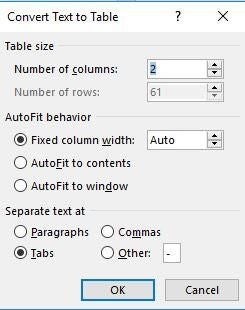
These settings determine the dimensions of the new table.
Now you can quickly move the list as a single unit by dragging the table’s Move handle (at the top-left corner). You can also choose a built-in style from the Table Styles gallery (on the contextual Design tab). If you don’t want to display and print the borders, simply remove them using the Border Styles dropdown in the Borders group on the contextual Design tab. Once the list is a table, you can do much more with it.
5: Format the numbers in a list
You might want to format only the numbers in a list and doing so is easy. Simply click any number in the list. This will select all, but only, the numbers. Then, apply the formatting. Figure I shows the results of clicking Italics and choosing orange from the Font Color dropdown in the Font group (on the Home tab).
Figure I
Format only the numbers in a numbered list.
It’s a bit trickier if you want to apply a format to a single digit. To do so, first click Show/Hide in the Paragraph group to display paragraph marks. Then, select the paragraph mark at the end of the line of the item whose number you want to format. With the paragraph mark selected, apply the formatting. Keep in mind that formatting applied this way doesn’t take precedent over list formatting, so if the formatting doesn’t show up, you must remove the conflicting list format. For instance, you could apply a strikeout or some other font characteristic to the existing formatting, but you couldn’t change the font color of a single number because you’ve directly applied orange to the entire list.
Send me your question about Office
I answer readers’ questions when I can, but there’s no guarantee. Don’t send files unless requested; initial requests for help that arrive with attached files will be deleted unread. You can send screenshots of your data to help clarify your question. When contacting me, be as specific as possible. For example, “Please troubleshoot my workbook and fix what’s wrong” probably won’t get a response, but “Can you tell me why this formula isn’t returning the expected results?” might. Please mention the app and version that you’re using. I’m not reimbursed by TechRepublic for my time or expertise when helping readers, nor do I ask for a fee from readers I help. You can contact me at susansalesharkins@gmail.com.
Also read…
- Microsoft broadens Office 365 through the Windows Store test program (ZDNet)
- Office Q&A: Placeholder formats and disappearing white space (TechRepublic)
- How to return the last value in an Excel data range (TechRepublic)
- How to use a conditional format to highlight subtotal rows in Excel (TechRepublic)