


Excel’s data validation feature is underused because many users don’t realize how versatile it is, especially where dates are concerned. Dates seem to complicate things, but only in your head! This feature handles dates fine. Here are four ways to express dates using data validation: literal values, input values, a list, and formulas.
More about Software
- Software Installation Policy
- Five Methods to Insert a Checkmark Into Microsoft Office Products
- How to Hide and Handle Zero Values in an Excel Chart
- How to Use Section Breaks to Control Formatting in Word
I’m using Excel 2016 (desktop) on a Windows 10 64-bit system. You can work with your own data or download the demonstration .xlsx and .xls files. Excel’s Table object isn’t supported in the menu version, so #3 won’t work in .xls files. The browser version supports existing validation controls, but you can’t create them or modify them in the browser.
1: The easiest way
Using literal dates is the simplest way to create a validation control that limits input to a range of dates. You just enter the first and last acceptable dates as follows:
- Select the cell to which you’re adding the validation control. (For this example, I’ll use cell C4 and add a fill color so it’s easy to spot.)
- Click the Data tab.
- In the Data Tools group, click Data Validation.
- In the resulting dialog, choose Date from the Allow dropdown. Doing so updates the dialog. The Data control defaults to Between, which is what we want, so don’t change that setting.
- In the Start Date control, enter the first date in the period.
- In the End Date control, enter the last date in the period (Figure A).
- Click OK.
Figure A
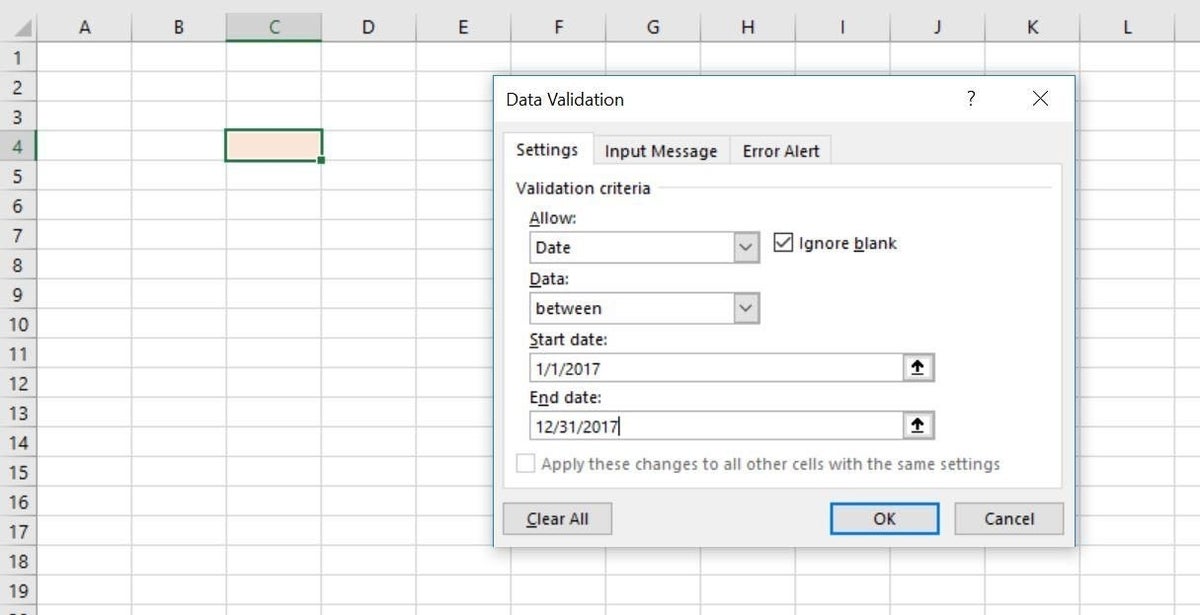
Enter the first and last date in your date range.
As you can see in Figure B, the control rejects a 2018 date. The setting is inclusive of both the start and end dates.
Figure B
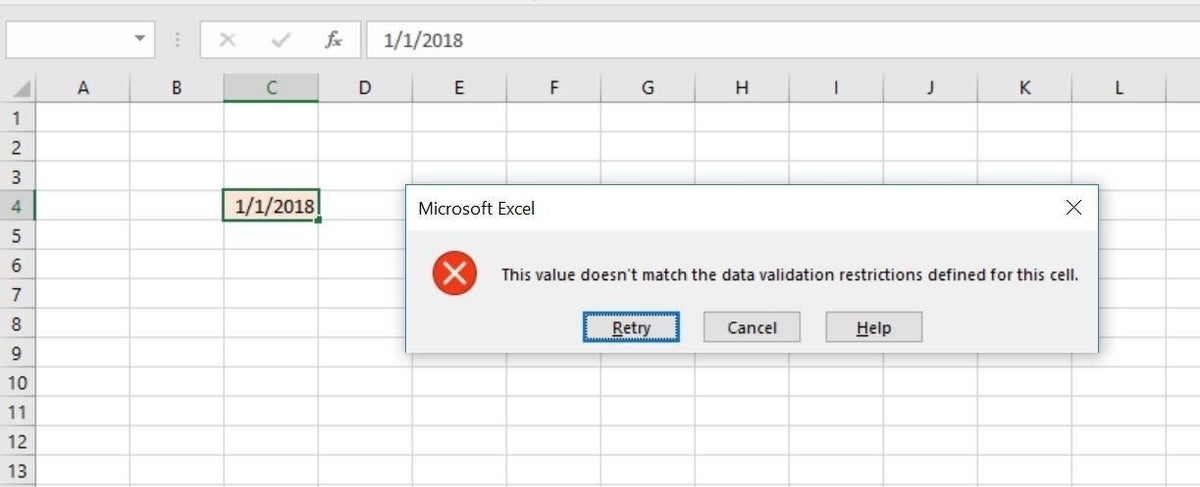
The validation control rejects any date that isn’t in 2017.
This is the simplest way to designate a range for a data validation control. There’s nothing wrong with taking the easy route! It’s easy to implement and easy to modify–simply select the cell, repeat the above steps, and change one or both dates. In addition, we used the Between operator to represent a range of dates–a time period. There are several operators; you should review them so you’ll know what’s available.
SEE: Cost comparison calculator: G Suite vs. Office 365(Tech Pro Research)
2: Input values
Easy is great, but suppose you often update the boundaries of your date range? The solution is still simple, but it requires two input cells at the sheet level. Figure C shows two input cells, C1 and C2, for the start and end dates, respectively. At this point, the process is almost the same as #1, except that you will refer to the input cells instead of entering literal date values. To create this validation control, do the following:
- Select C4.
- Click the Data tab.
- In the Data Tools group, click Data Validation.
- In the resulting dialog, choose Date from the Allow dropdown.
- Click inside the Start Date control and enter =C1.
- In the End Date control, enter =C2 (Figure C).
- Click OK.
Figure C
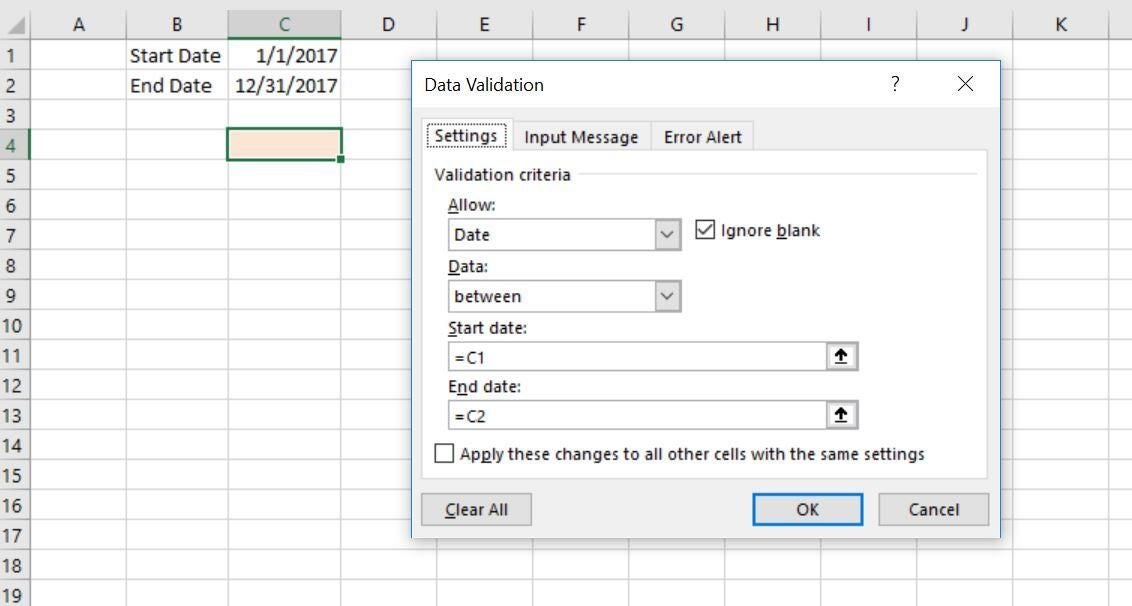
Refer to dates at the sheet level.
This control is still simple to implement, but it gives you the flexibility to change either or both dates without changing the control’s settings.
It’s worth noting that you could give the input cells names and reference those in steps 5 and 6. For instance, you might name C1 StartDate and C2 EndDate. Then, you’d enter =StartDate and =EndDate in steps 5 and 6, respectively.
3: A dynamic list
Instead of a range of dates, you might have a list of dates you want to offer. First, you need a list of dates similar to the one shown in Figure D. As you can see, the list consists of the first day of each month in 2018. Once you have the list, convert it to a Table object. Simply click any cell in the list and press Ctrl+T. Or click the Insert tab; you’ll find the Table option in the Tables group. In the resulting dialog, check the My Table Has Headers option and then click OK.
Figure D
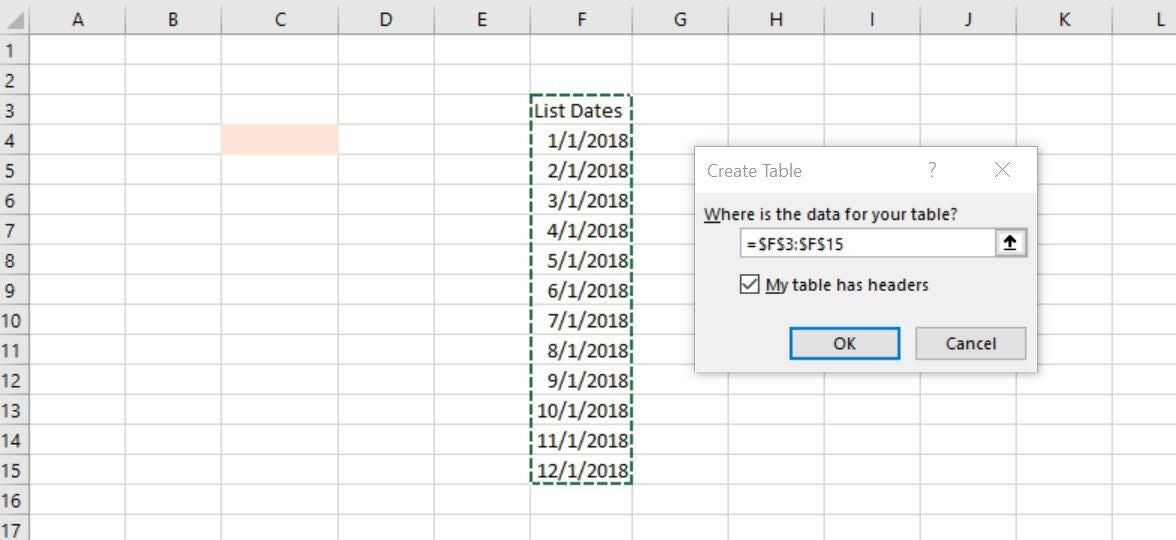
Enter a list of dates.
To create the validation control, do the following:
- Select C4.
- Click the Data tab and in the Data Tools group, click Data Validation.
- In the resulting dialog, choose List from the Allow dropdown.
- Click inside the Source control and then highlight the Table. Or enter the range: =$F$4:$F$15 (Figure E). Don’t include the header cell in the reference.
- Click OK. As you can see in Figure F, the validation control offers a dropdown list of dates.
Figure E

Reference the date Table object as the source.
Figure F
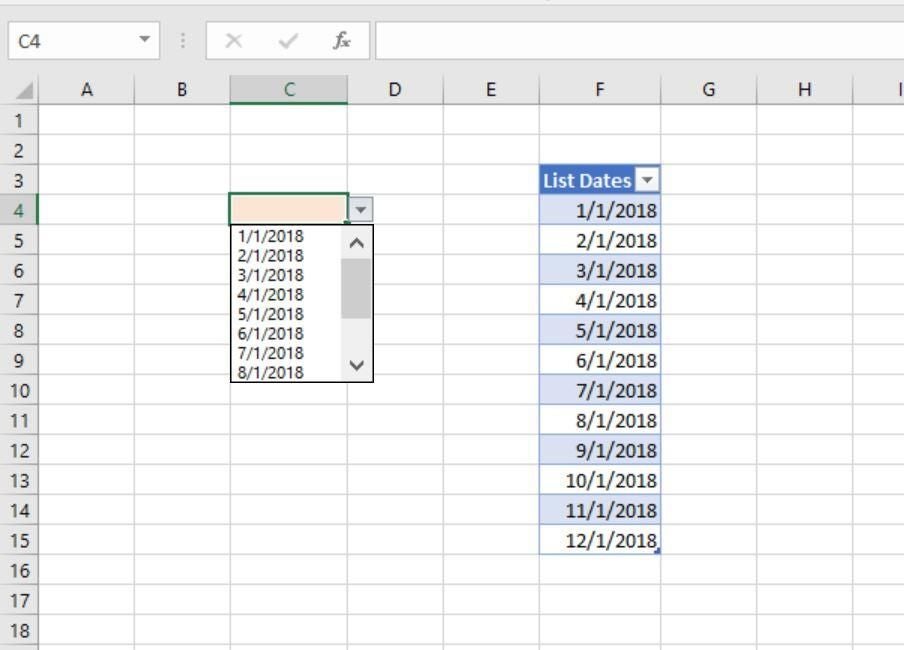
This validation controls limits you to twelve dates.
Because the sheet-level list is a Table object, the control will update as you modify the list. For instance, if you delete or add a date, the list will update accordingly.
SEE: Make Office 2016 work your way by changing these default settings (free TechRepublic PDF)
4: A formula
The validation controls in #1 and #2 restrict users to any date within the year 2017. You accomplished this by entering a start and end date. You can do the same thing with a formula instead of with literal dates. To do so, select C4 and launch the Data Validation dialog as you’ve done before. Then, do the following:
- Choose Custom from the Allow dropdown.
- In the Formula control, enter the following formula (Figure G):
=YEAR(C4)=2017 - Click OK.
Figure G
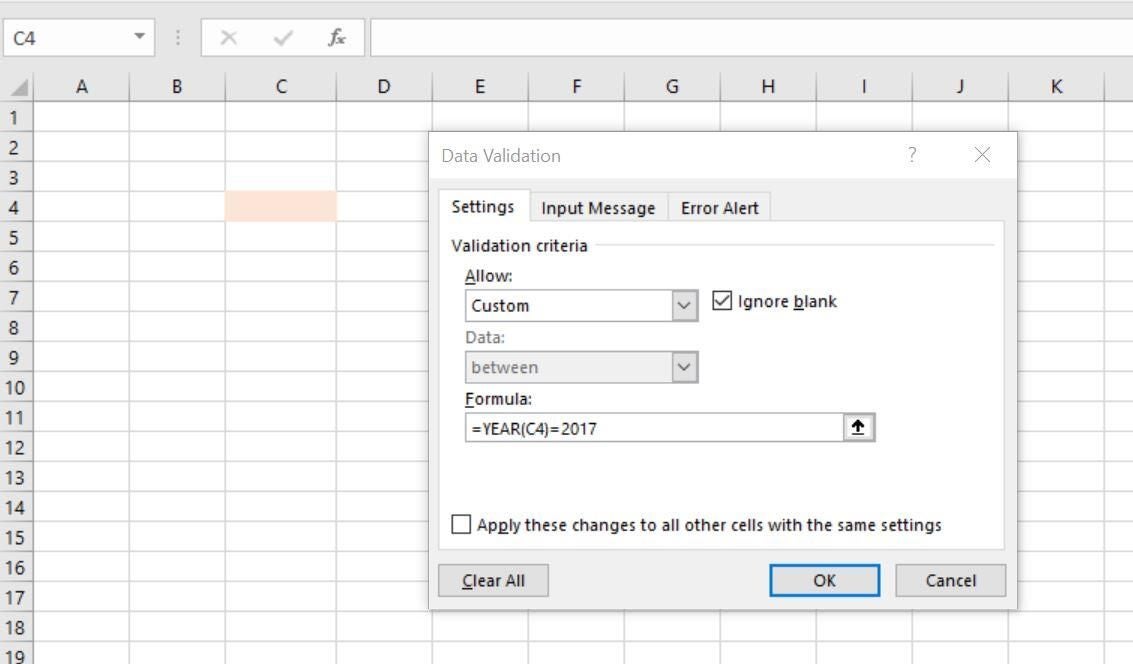
Use a formula to express any date in the year 2017.
This formula evaluates the date’s year value. If it’s 2017, the formula returns True and the control excepts the date. If the year isn’t 2017, the formula returns False and the control rejects the date. You could do the same with any date component. For instance, you could reject all dates that aren’t in the month of January by using the MONTH() function.
Let’s complicate things a bit. Let’s suppose you want to reject dates that aren’t in the current year. To do so, you’d use the following formula in step #3:
=YEAR(C4)=YEAR(TODAY())
The YEAR(TODAY()) component returns the year of the current day. So, if it’s 2018, you can enter only 2018 dates. If it’s 2019, you can enter only 2019 dates. You don’t need to update the formula or the control as time passes.
Let’s try one more, because it’s bound to come up. How would you reject weekend dates? Again, a formula comes to the rescue:
=WEEKDAY(C4,2)<6
This formula assumes the work week begins with Monday; the weekday values 6 and 7 refer to Saturday and Sunday, respectively. This formula doesn’t care about the year. You can enter any date if it’s a Monday through Friday date.
The WEEKDAY() function has two arguments, the date and the return_type, as shown in Figure H. Simply adjust the return_type value to match your workweek. Or change the operator. For instance, you could reject dates that don’t fall on a Wednesday using the formula =WEEKDAY(C4,2)=3. Or you could accept any date except those that fall on a Wednesday using the formula =WEEKDAY(C4,2)<>3.
Figure H
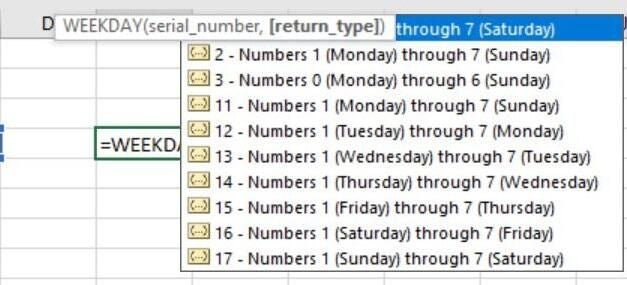
You can change the first day of the week using WEEKDAY().
Validating
Validation is simple, but it’s also flexible–and dates are no problem. You can enter literal values, use input values, generate a list, and even use date functions to restrict values accepted (or rejected) by a validation control.
Our examples were all single-cell controls to keep things simple. With very little effort, you can use a validation control in a Table object. To learn more about this, read How to create two advanced dynamic lists in Excel.
Send me your question about Office
I answer readers’ questions when I can, but there’s no guarantee. Don’t send files unless requested; initial requests for help that arrive with attached files will be deleted unread. You can send screenshots of your data to help clarify your question. When contacting me, be as specific as possible. For example, “Please troubleshoot my workbook and fix what’s wrong” probably won’t get a response, but “Can you tell me why this formula isn’t returning the expected results?” might. Please mention the app and version that you’re using. I’m not reimbursed by TechRepublic for my time or expertise when helping readers, nor do I ask for a fee from readers I help. You can contact me at susansalesharkins@gmail.com.
Also read…
- You’ve been using Excel wrong all along (and that’s OK) (ZDNet)
- CES 2017: The Big Trends for Business (ZDNet/TechRepublic special feature)
- Office Q&A: Counting conditional unique values in Excel (TechRepublic)
- 30 things you should never do in Microsoft Office (free TechRepublic PDF)