
No one really has to tell you that it’s important to back up the data on your hard disk. With tools like File History and Create A System Image at your disposal, protecting your data is easy. The hard part often is remembering to use these tools regularly.
Recently a friend of mine let his backup routine slide. He was using File History to save his data on a weekly basis and creating a system image of his hard disk every couple of months. For some reason, he stopped using File History but kept up his system image routine. Sure enough he encountered a problem and lost some files that were very important.
It was then that he realized his mistake in forgetting to follow his File History routine. The files he needed were not on his most recent File History backup, which was several months old by this time, but the files were backed up on the system image stored on an external hard disk. He was ready to restore his whole hard disk from a system image to retrieve those files, when I told him I knew a better way to go about the task by taking advantage of Windows 10’s native VHD support. Let’s take a closer look.
SEE: How to enable an Administrator to open Metro apps in Windows 10
Some background information
A VHD is a virtual hard disk that is most notably used with virtual PC programs like Windows 10’s Client Hyper-V. And since Windows 10 lets you work natively work with VHD and ISO files, you can mount them simply by double-clicking on them in File Explorer. When you do, the operating system creates a virtual drive from the file, assigns a drive letter, and makes the drive available in Computer.
What you may not know is that a VHD is at the heart of a system image of your hard disk. In other words, when you create a system image, the operating system actually creates a VHD file and stores the contents of the hard disk in it.
You can create a system image on a set of DVD discs, on an external hard disk, or on a network drive. When you use a set of DVDs, the VHD file is broken up into pieces and stored on multiple discs. However, when you create a system image on an external hard disk or on a network drive, you end up with a single VHD file.
Because a system image on a set of DVD discs contains a VHD file that is broken into pieces, the native VHD support can’t mount the VHD. By itself, Windows 10 can’t put the pieces together. However, since a system image on an external hard disk or on a network drive is a single VHD file, you can mount it and easily access the files that it contains.
This means that in Windows 10, you can restore individual files from a system image. Of course, there are a few tricks necessary to make this happen.
SEE: Microsoft Bookings promises painless customer appointment scheduling
Attach the VHD
To make this work, you need to use Disk Management the first time you access a VHD in a system image. From that point forward, the VHD will be recognized by the operating system and you can access it directly from File Explorer.
To begin, press [Windows]+X to bring up the Start button’s context menu and select Disk Management, as shown in Figure A. When the tool launches, pull down the Action menu and select the Attach VHD command. In the Attach Virtual Hard Disk dialog box, click Browse, and then use the Browse dialog box to locate the VHD file.
Figure A
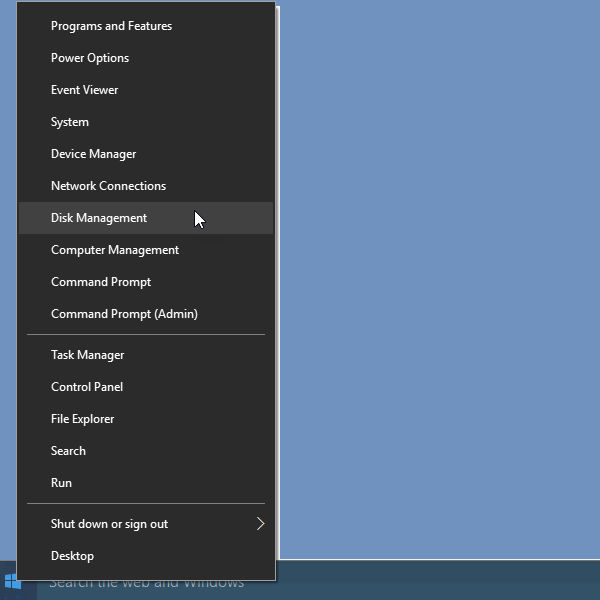
You can find Disk Management on the Start button’s context menu.
Figure B shows the procedure for accessing the system image VHD (or more specifically, VHDX) file on my external hard disk from within Disk Management.
Figure B
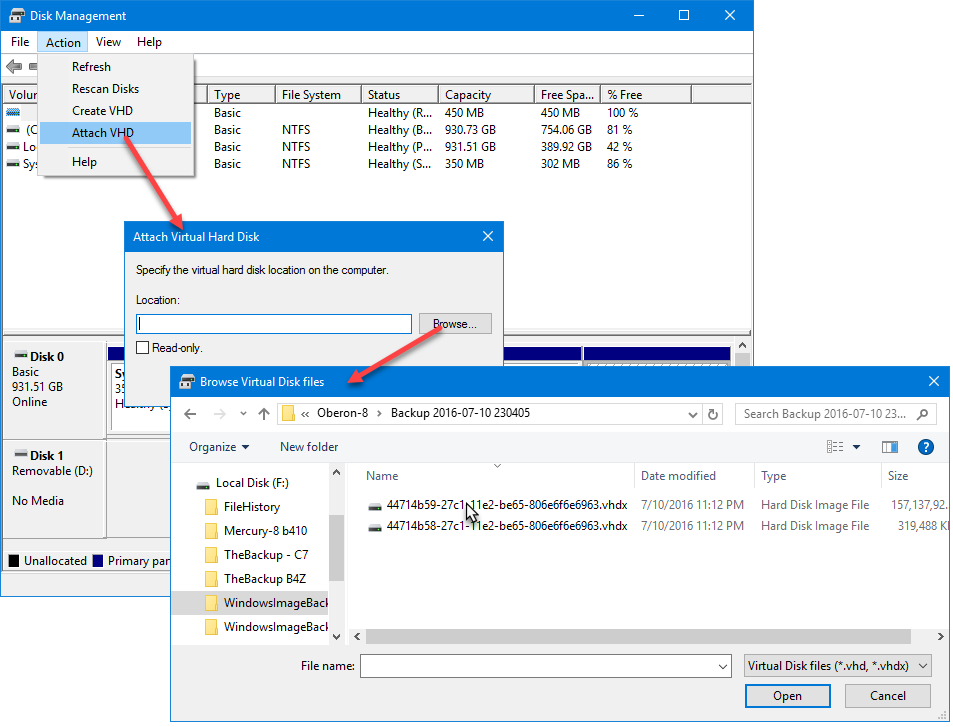
The first time you access a VHD in a system image, you’ll need to use Disk Management.
There are actually two VHD files, and you want to use the largest one. In my example, the largest VHD file is 157GB.
When you select the VHD file, it will appear in Disk Management with a blue icon and will be assigned the next available drive letter, as shown in Figure C.
Figure C
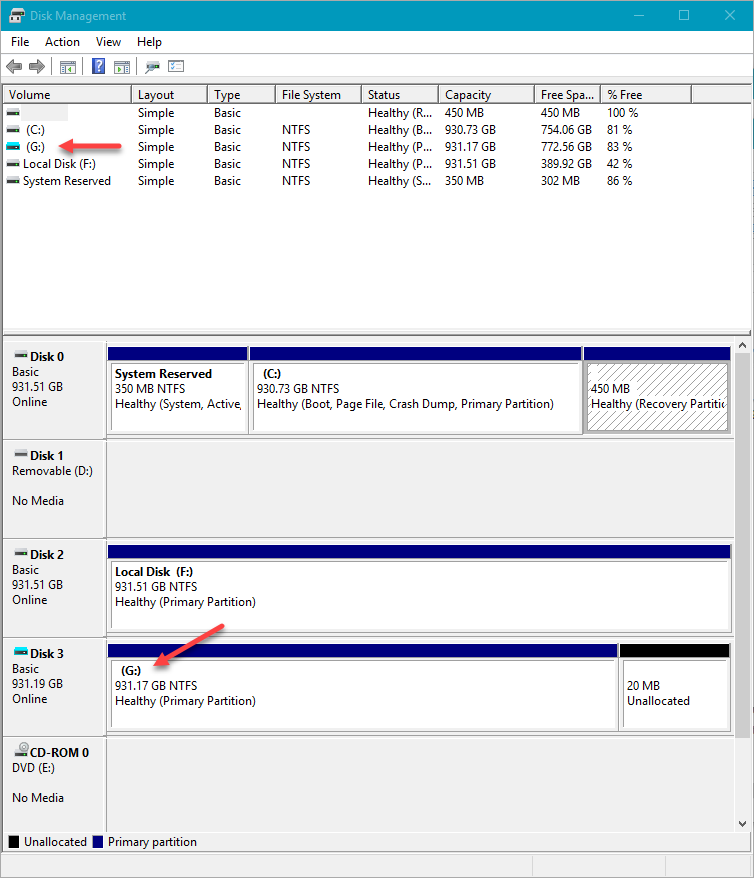
When you attach a VHD from your System Image it will appear in Disk Management with a blue icon and will be assigned a drive letter.
Close Disk Management and open File Explorer. Then select This PC and locate the new drive. You can now navigate the system image VHD just like you would any disk in File Explorer, as shown in Figure D.
Figure D
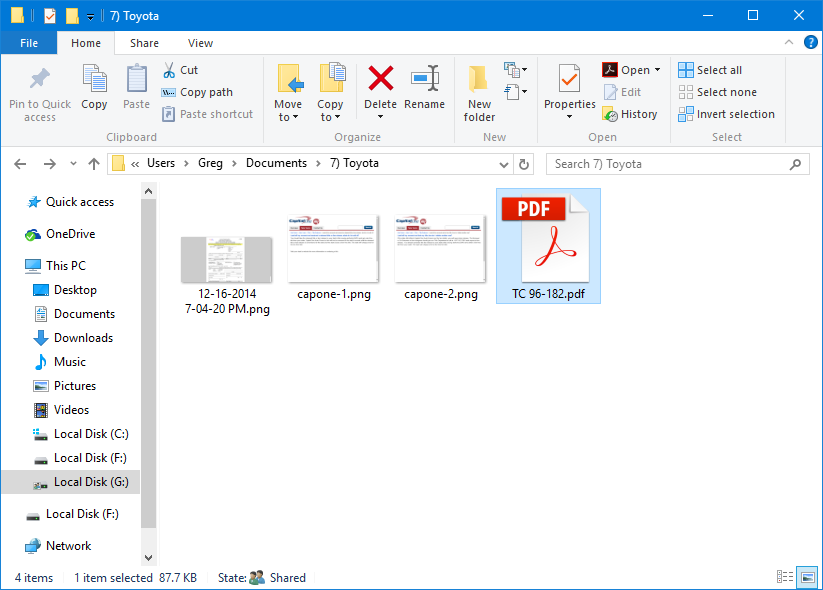
Once you attach the VHD, you can easily access any of the files stored in your system image.
When you are finished with the VHD, right click on the drive letter and select the Eject command, as shown in Figure E.
Figure E
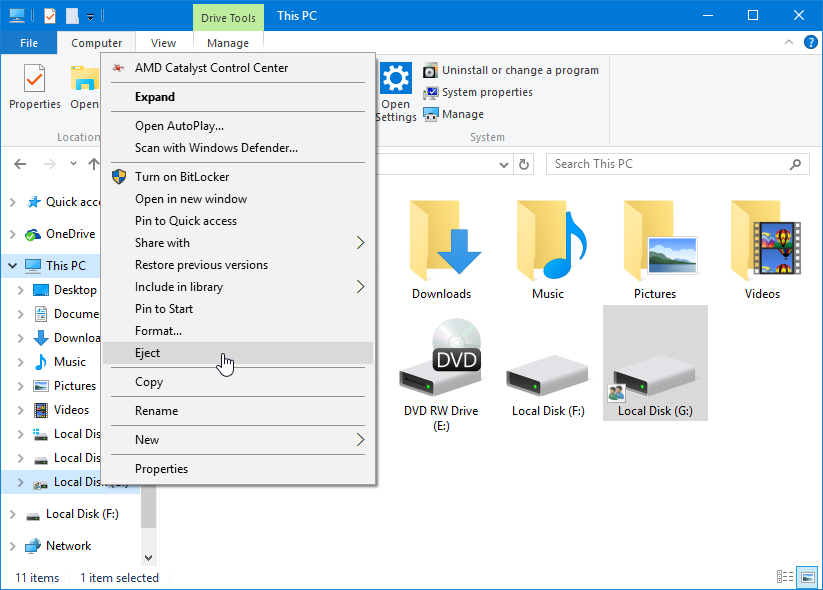
Use the Eject command to close the VHD when you are finished.
If you want to access it again later, you can do so right from within File Explorer. Just locate and double-click the VHD file and it will immediately be assigned a drive letter.
Also read…
- How to revive your Windows 10 installation with System Image Recovery
- Protect your data files with Windows 10’s enhanced File History tool
- Restoring files from Windows 10’s File History
- How to configure the Microsoft Deployment Toolkit
What’s your take?
Have you ever needed to restore individual files from a system image? Have you tried this technique? Share your experiences and advice with fellow TechRepublic members.