In last week’s article, How to clean up system files with the Windows 10 Disk Cleanup tool, I told you about the WinSxS folder and how it can accumulate a lot of extraneous files. I then showed you how to enable and use the Cleanup System Files feature in the Disk Cleanup tool to remove unnecessary files from the WinSxS folder as well as from other locations on your hard disk.
In measuring the success of Disk Cleanup’s work with the WinSxS folder, I mentioned that the Clean Up System Files feature removes only those files in the WinSxS folder that it determines are no longer needed by the system. As a result, you may find that a lot of files have been removed from your system–or that very few files have been removed from your system. It all depends on how many files Windows deems are necessary.
In this article, I’ll show you another method you can use to take a whack at the WinSxS folder.
Warning!
Before I get started, I need to provide you with a warning. After the last article was published, I received a couple of emails from readers asking why you can’t just open the WinSxS folder and delete everything in sight. That may sound like a good idea, but it’s not. I should have included this warning in the first article.
The purpose of the WinSxS folder is to store all the files that the operating system may need to keep functioning stably during and after various update procedures. If you were to delete everything in the WinSxS folder, Windows would become severely unstable and could even be damaged so badly the system might not boot. And even if the system were able to boot, it would be impossible to update. So it’s best to stick with the prescribed methods of cleaning up the WinSxS folder.
The Task Scheduler method
By default, Windows comes with a preconfigured task in Task Scheduler called StartComponentCleanup. While Task Scheduler will automatically run the StartComponentCleanup task on a regular basis, you can also run it manually at any time. Let’s take a closer look.
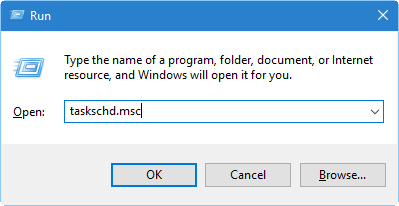
The easiest way to launch Task Scheduler is to access the Run command by pressing [Windows]+R and typing taskschd.msc in the Open box, as shown in Figure A. To continue, click OK.
Figure A

Use the Run command to launch Task Scheduler.
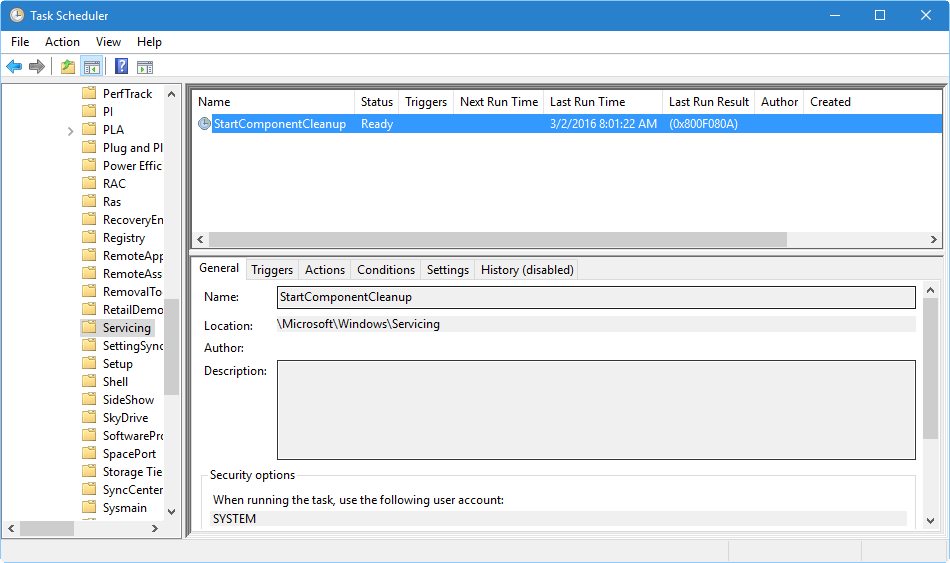
Once Task Scheduler launches, expand the console tree on the left and navigate to Task Scheduler Library\Microsoft\Windows\Servicing. Then, select StartComponentCleanup, as shown in Figure B.
Figure B

The StartComponentCleanup task runs on a regular basis.
Unfortunately, even though the StartComponentCleanup task runs on a regular basis, you really can’t find out much about how and why it runs or even when it will run next. As you can see, the Triggers column is blank, as is the Next Run Time column. You’ll also notice that the History option is disabled. All you can see for sure are the date and time in the Last Run Time column.
In most cases, the Last Run Result shows “The operation completed successfully. (0x0).” However, as you can see on this example system, the Last Run Result is the code 0x800F080A, which is cryptic to say the least. As far as I’ve been able to determine, it translates to “session object updated, must recreate session.” So I assume that indicates a failure.
To manually launch the StartComponentCleanup task, right click it and select Run from the context menu. The Status column will then read Running. When the StartComponentCleanup task runs, it analyzes the contents of the WinSxS folder and looks for files that are identified as being safe to remove and that have been in the folder for at least 30 days after the updated component has been installed.
Keep in mind that running the StartComponentCleanup task will take a long time–and there isn’t a gauge, like the one in Disk Cleanup, to keep you informed of the progress of the operation. Also note that when you run the StartComponentCleanup task manually, it’s configured to automatically stop the task if it runs longer than one hour.
What’s your take?
Have you used the StartComponentCleanup task in Windows 10? If so, what kind of disk space savings did you encounter? Share your advice and experiences with fellow TechRepublic members.
Also read…
- Microsoft updates Office 365 with six new Excel functions
- How to use Windows 10’s System Restore as a recovery tool
- From DOS to the golden age of Windows: The classic operating systems you can run in the browser (pictures)
- How to access Safe Mode in Windows 10