


![]()
The article How to display the filename and path in a Word document or title bar discusses methods for displaying a Word file’s path and name that are compatible with both Ribbon and menu versions. But these approaches can be awkward to apply–and they all come with inherent problems. This month, I’ll show you an easier way to display a file’s location using the Quick Access Toolbar (QAT). This simple technique has a few advantages over the techniques discussed in the earlier article:
- It’s easy to implement.
- It automatically updates when you save the file using a new name.
- It displays the full path, whether it’s local, on OneDrive, or even stored on a SharePoint site.
Because of all the storage options built-in to the Office interface, the last item is probably the most important. The answer to Where did I save this file? requires only a quick glance at the QAT. Because this method uses the Quick Access Toolbar (QAT) it’s not supported by the menu versions of Office. On the other hand, because this method utilizes the QAT, it’s available in all Office apps (except Access).
I’ll be working in Word 2016 (desktop) on a Windows 10 64-bit system, but you can apply this to earlier Ribbon versions and to other Office apps. The QAT isn’t supported by any of the Office Online apps. You don’t need a document for this technique, so there’s no downloadable example file.
More about Software
- Software Installation Policy
- Five Methods to Insert a Checkmark Into Microsoft Office Products
- How to Hide and Handle Zero Values in an Excel Chart
- How to Use Section Breaks to Control Formatting in Word
About the QAT
If you’ve been using the Office Ribbon for a while, you’re already familiar with the QAT. If not, it’s the small toolbar in the top-left corner. Out of the box, it displays only a few options. You can add some frequently used tools by clicking the dropdown and choosing from the list shown in Figure A. Toggle the options to display or hide, accordingly.
Figure A
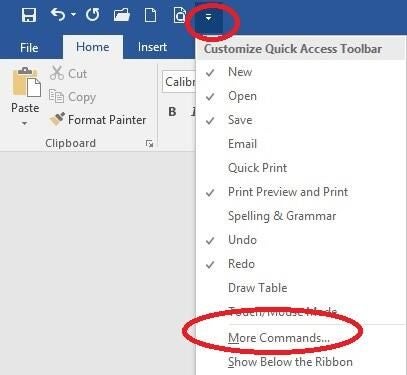
Add default options to the QAT for quick accessibility.
You’re not limited to the options in the dropdown list; you can execute macros and add other custom options.
SEE: How to use Task Manager’s Processes tab to troubleshoot issues in Windows 10
Display file location
Displaying the current file’s location is just one of the options you can add to the QAT. Of course, you can always use the Save As feature or add a field code to the document to see the file’s location, but glancing at the QAT is quicker and easier. To add this capability to the QAT, do the following:
- Click the QAT’s dropdown and choose More Commands. You can also right-click the QAT and choose Customize Quick Access Toolbar or click the File tab, choose Options, and select Quick Access Toolbar in the left pane.
- To narrow the possibilities, choose Commands Not In The Ribbon from the Choose Commands From dropdown (Figure B).
- Select Document Location (Figure C). Click inside the resulting list and press D to quickly jump to the first option that begins with the letter D to avoid browsing the long list.
- Click Add and Word will display the option in the list to the right (Figure D). If you want to limit the Document Locator to only the current document, change the option in the Customize Quick Access Toolbar (above).
- Click OK to return to the document, where you’ll find the document’s full path location displayed on the QAT (Figure E).
Figure B
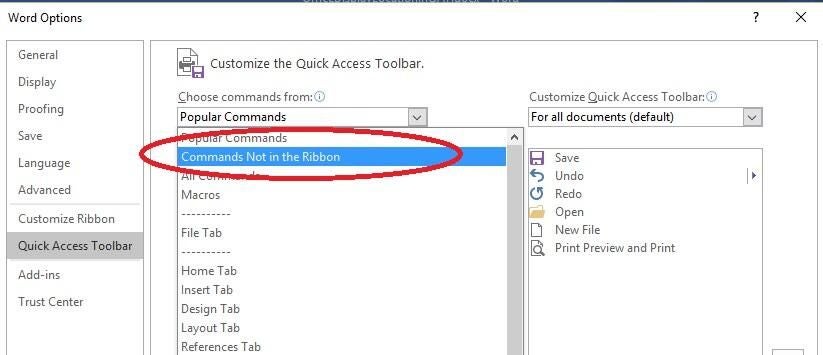
Narrow the options.
Figure C
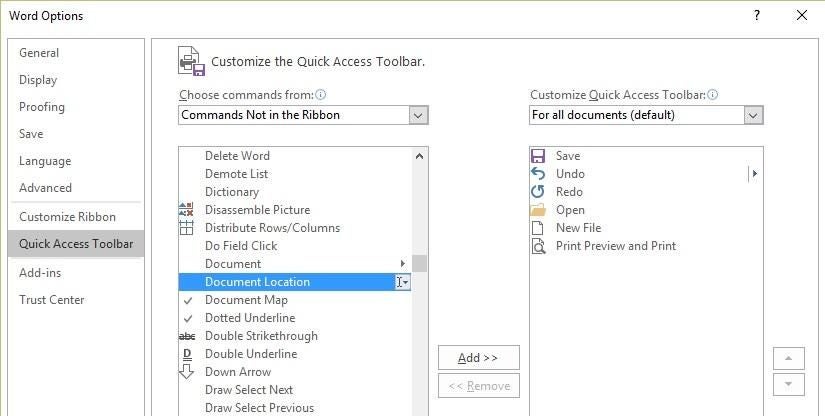
Choose Document Location.
Figure D

Add Document Location to the QAT.
Figure E

The QAT displays the document’s name and location.
A bit more
This control displays more than the current file’s path location and filename. Click the dropdown list to see a list of recently visited web sites via your default browser, as shown in Figure F. Select an item in the list to quickly revisit it.
Figure F

Quickly revisit recently visited websites.
This feature is easy to implement, but as you can see, the width inhibits the display of the full path and filename. Unfortunately, you are stuck with this property. Click inside the control and use the right and left arrows to move through the contents.
- If you want to change the option’s position on the QAT, do the following:
- Click the QAT’s dropdown and choose More Commands.
- Click Document Locator in the list to the right.
- Click the Move Up and Move Down options (to the right).
- Click OK to close the dialog.
Send me your question about Office
I answer readers’ questions when I can, but there’s no guarantee. Don’t send files unless requested; initial requests for help that arrive with attached files will be deleted unread. When contacting me, be as specific as possible. For example, “Please troubleshoot my workbook and fix what’s wrong” probably won’t get a response, but “Can you tell me why this formula isn’t returning the expected results?” might. Please mention the app and version that you’re using. I’m not reimbursed by TechRepublic for my time or expertise when helping readers, nor do I ask for a fee from readers I help. You can contact me at susansalesharkins@gmail.com.