Illustration: Andy Wolber / TechRepublic
In most cases, your internet provider is also your Domain Name System (DNS) provider by default. When anyone connected to your network attempts to access a web page, DNS directs people to the requested site. However, a switch to an alternative DNS provider may deliver faster, more secure, or more reliable results.
For example, both Cloudflare and Google offer free DNS services that anyone may use. In my experience, both Cloudflare and Google DNS services often perform better than ISP-provided DNS services.
I have used NextDNS across several devices since mid-2019. Even with the site’s beta status, I’ve found it to be both reliable and fast. It’s an excellent option to explore for people who want more control over DNS configurations and settings, but don’t want to deal with setting up and managing a dedicated DNS device.
Technically proficient people might run their own DNS setup; in an organization, this typically requires systems that need to be configured, monitored, and maintained, such as physical or virtual servers. In smaller settings, some people use a low-cost solution–such as a Raspberry Pi–to filter and deliver DNS. In either case, it takes time, attention, and some degree of technical skill to manage your own DNS device. With your own DNS setup though, you gain control over which domains are allowed or blocked, as well as insight into the sites that devices on your network access most often.
NextDNS offers cloud-hosted DNS services that you can configure and manage from a browser. The following steps cover the setup and capabilities of the service. The service is currently in beta, so features may change. Additionally, during the beta, the service is free, although the site’s pricing page conveys the eventual intent to charge once your DNS queries exceed a threshold.
SEE: Hiring kit: Network administrator (TechRepublic Premium)
1. Create a configuration in NextDNS
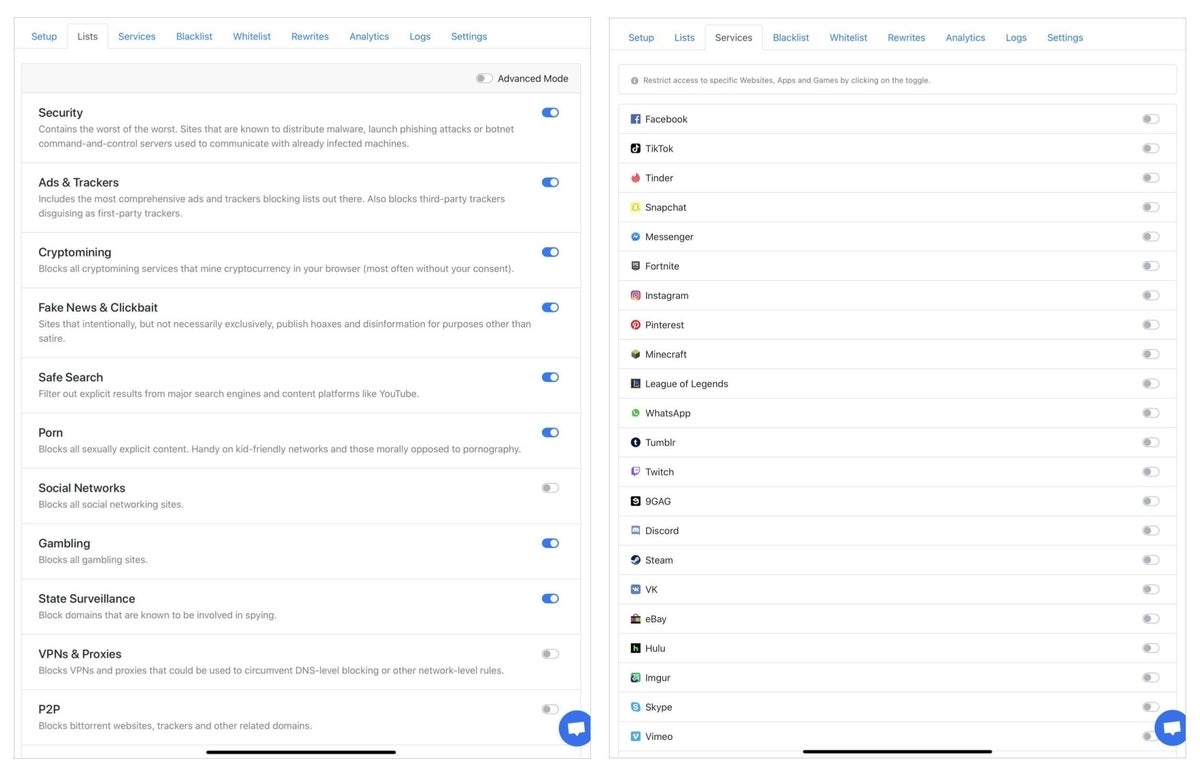
You can try NextDNS without the need to create an account. Go to https://my.nextdns.io/start in your browser. This will open a new configuration page, with a distinct identifier. You may select various Lists (categories of sites) and Services to block, as well as specify sites to always allow or always block (Figure A).
Figure A

2. Configure NextDNS on devices
Select the NextDNS Setup tab. The top portion of the page displays configuration information that you may use to configure your DNS settings (Figure B).
Figure B

Scroll down to the How To Setup section for instructions for Android, iOS, Windows, macOS, Linux, Chrome OS, Firefox, as well as router configuration. In most cases, you install a NextDNS app, then enter your custom Configuration ID to point the device to your defined configuration.
Once you have both a NextDNS configuration with lists and services selected on the web, and NextDNS deployed on a device, you can test it. For example, you might try to visit a site you have blocked in your configuration.
3. Create a NextDNS account
To use NextDNS in the longer term, you will likely want to create an account. An account makes it easier to manage and adjust more than one configuration. You might create a configuration to use on a router, for example, that is less restrictive than a configuration you use for a public access computer. The ability to point different devices to different NextDNS configurations lets you selectively restrict or allow access to different sets of sites for different people.
4. Monitor and analyze performance in NextDNS
NextDNS provides both an Analytics and Logs section. Analytics displays data such as Total Queries and Blocked Queries, along with additional data about the domains blocked. Logs lets you search and view DNS requests routed to the selected NextDNS configuration (Figure C).
Figure C

You may choose to disable logging, or limit the time that Query Logs will be retained (i.e., limit to 1 hour, 6 hours, 1 day, 1 week, 1 month, 3 months, 6 months, or 1 year) (Figure D).
Figure D

5. Adjust configuration in NextDNS
When you deploy NextDNS in a situation that may affect other people, make sure they can quickly contact you to request access to any sites blocked. For example, in one configuration I created, I found that access to the National Weather Service site was blocked by NextDNS. I adjusted the settings to always allow access to “weather.gov” for that configuration.
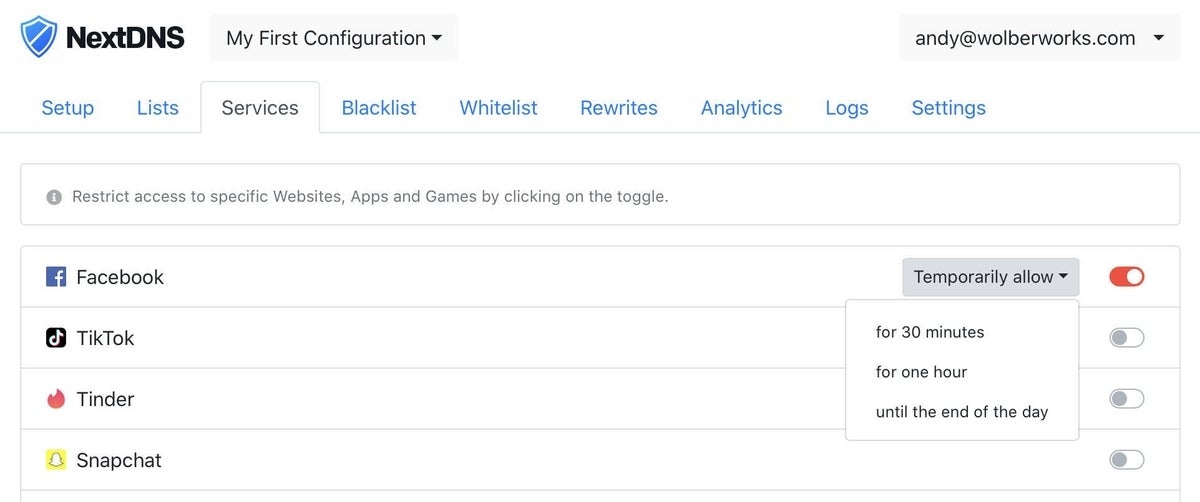
NextDNS lets you temporarily allow access to any of the sites listed on the Services tab. For any service that is blocked, you may choose from a drop-down to temporarily allow access to that service For 30 Minutes, For One Hour, or Until The End Of The Day (Figure E). This might be useful if you manage a computer lab, for example, and want to temporarily allow access to Facebook for a training session.
Figure E

What are your experiences with DNS?
To what extent do you adjust and manage DNS settings on devices you or others use in your organization? Do you rely on DNS from your internet service provider? If you use another configuration, which DNS service or setup works best for you? If you’ve tried NextDNS, what do you think of it? Let me know what your experience with DNS has been–either in the comments below or on Twitter (@awolber).