Image: FORGEM, Getty Images/iStockphoto
For certain “power” users of Microsoft Windows 10, speed is the most important factor when it comes to measuring computer performance. For those individuals, nothing their PC does is ever fast enough and that includes both the booting and shutdown processes.
While starting the shutdown sequence on a Windows 10 PC is relatively quick, the process itself is prone to delays as the OS takes time to close open applications, stop running processes, and clean up accessed files. In some situations, Windows has been known to wait indefinitely for an application to close, which means the OS never actually shuts down, even though it has been asked to—frustrating for speed craving power users and typical users alike.
There is a remedy for the built-in delay in the Windows 10 shutdown process, but it requires a few strategic edits of the Windows Registry file. The how-to tutorial shows you what registry keys to edit and what parameters to enter to speed up your Windows 10 shutdowns.
SEE: Windows 10 May 2019 Update: 10 notable new features (free PDF) (TechRepublic)
How to speed up the Windows 10 shutdown process
Disclaimer 1: Editing the Windows Registry file is a serious undertaking. A corrupted Windows Registry file could render your computer inoperable, requiring a reinstallation of the Windows 10 operating system and potential loss of data. Back up the Windows 10 Registry file and create a valid restore point before you proceed.
Disclaimer 2: The Windows Registry edits suggested by this article will drastically alter the way the Windows 10 shutdown process works. The results for your PC are unpredictable and could increase the instability of your operating system. Use this technique carefully and judiciously.
To begin, open the registry editor app by typing “regedit” into the desktop search box. Click the appropriate item from the list of results and then navigate to this key in the Windows Registry file:
HKEY_LOCAL_MACHINE\SYSTEM\
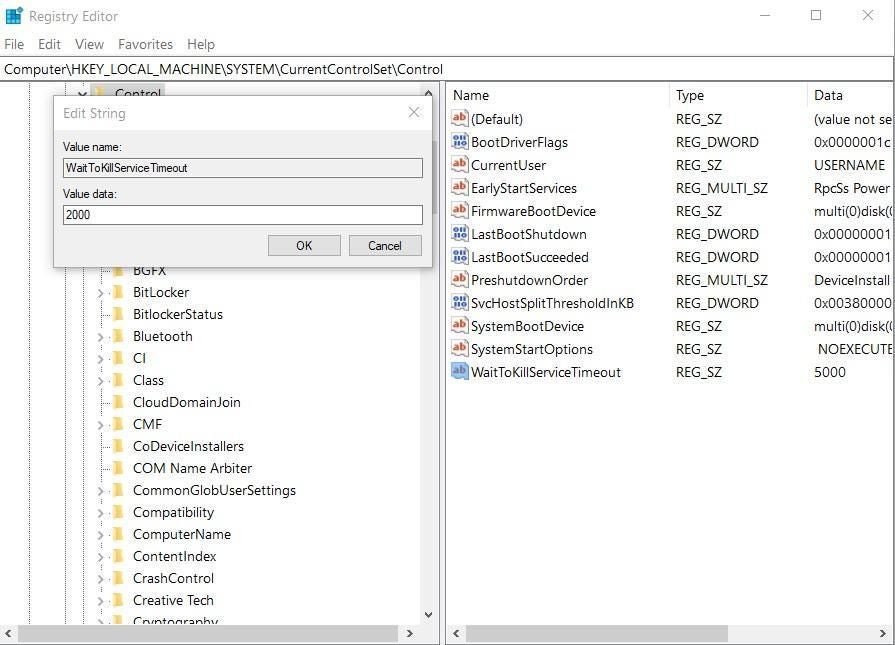
Click the Control key folder, as shown in Figure A, and look for the WaitToKillServiceTimeout key. Double-click that key and change the value from the 5000 default to 2000, and then click OK.

Figure A
This changes the time Windows 10 will wait for an unresponsive service from 5ms to 2ms. It is not recommended that you set this parameter any lower than 2ms.
Next, navigate to this key in the Windows Registry file:
HKEY_CURRENT_USER\Control Panel\Desktop
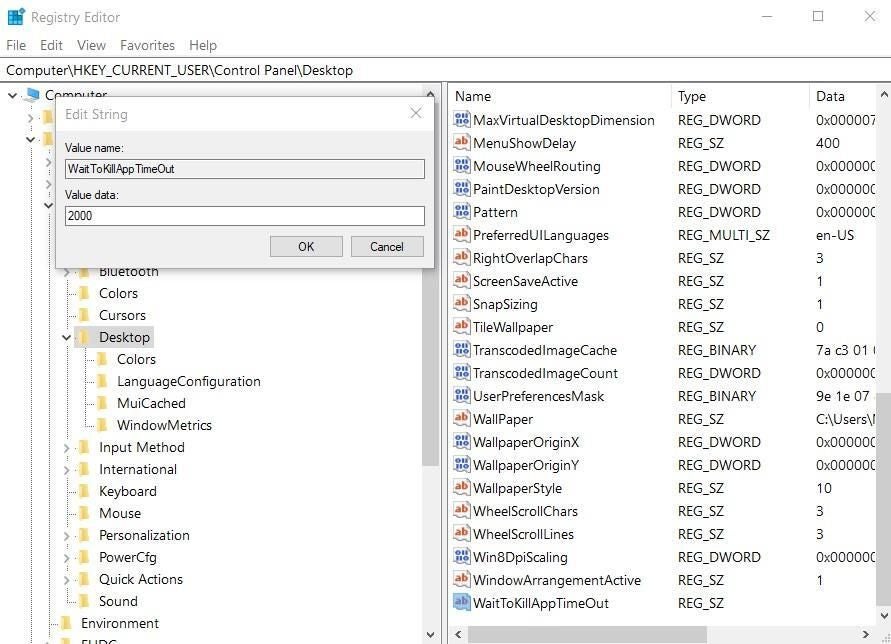
We have to create several new keys. Right-click the Desktop folder, as shown in Figure B, and select New | String Value and give it the name WaitToKillAppTimeOut. Double-click the new key, give it a value of 2000, and then click OK.

Figure B
Right-click the Desktop folder again, as shown in Figure C, and select New | String Value and give it the name HungAppTimeout. Double-click the new key, give it a value of 2000, and then click OK.

Figure C
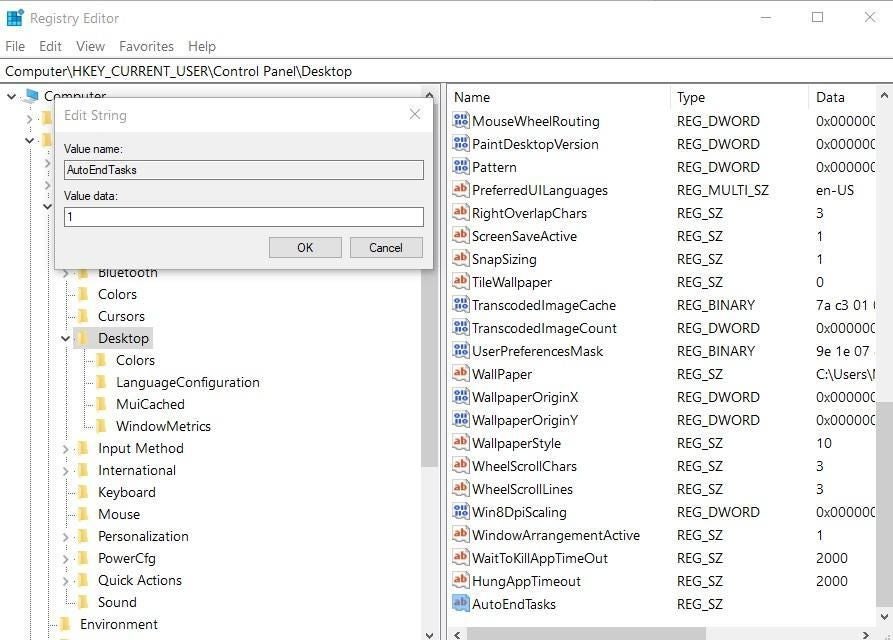
Right-click the Desktop folder for the last time, as shown in Figure D, and select New | String Value and give it the name AutoEndTasks. Double-click the new key, give it a value of 1, and then click OK.

Figure D
The changes and additions to the Windows Registry file will decrease the time the operating system will wait for applications, services, and tasks to close, therefore increasing the speed at which the Windows 10 shutdown will complete.
Note: Under these time constraints, it is possible that a service or application will not be able to close. Generally speaking, if your work is saved that should not cause a problem, but you should monitor outcomes and modify the parameters as necessary.