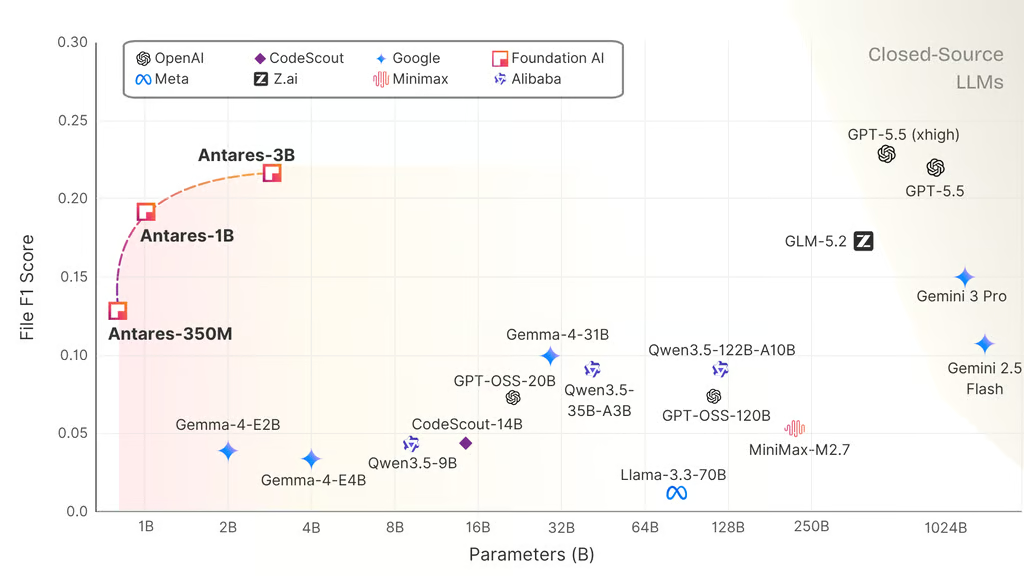
Having your own on-premises Git repository isn't nearly as challenging as you think.

If you use Git and you're looking for a user-friendly means of managing on-premises repositories, you might want to have a look at GitBucket. This tool, written in Scala, offers:
- Intuitive UI
- Plugin system
- API compatibility with GitHub
- Public and private repositories
- GitLFS support
- Repository viewer
- Online file editor
- Activity timeline
- Email notifications
- Account and group management (using LDAP integration)
- And more
SEE: 10 free alternatives to Microsoft Word and Excel (TechRepublic download)
What you'll need
The only things you'll need to make this work are:
- A running, updated instance of Ubuntu Server 18.04
- A user account with sudo privileges
Installing Java
The first thing to be done is the installation of Java. To do this, open a terminal window and issue the command:
sudo apt-get install default-jdk -y
Install NGINX
GitBucket requires a web server. We'll use NGINX. If your Ubuntu Server includes Apache, you must first stop and disable it with the commands:
sudo systemctl stop apache2 sudo systemctl disable apache2
Install NGINX with the command:
sudo apt-get install nginx -y
How to add a new group
We're going to add a new group and unprivileged user for the running of GitBucket. Back at the terminal window, create the group with the command:
sudo groupadd -g 555 gitbucket
Next add the unprivileged user with the command:
sudo useradd -g gitbucket --no-user-group --home-dir /opt/gitbucket --no-create-home --shell /usr/sbin/nologin --system --uid 555 gitbucket
How to download and install GitBucket
It's now time to download GitBucket with the command:
wget https://github.com/gitbucket/gitbucket/releases/download/4.31.2/gitbucket.war
Once the file has downloaded, create a new directory with the command:
sudo mkdir /opt/gitbucket
Move the downloaded file into the newly created directory with the command:
sudo mv gitbucket.war /opt/gitbucket
Give the .war file the proper permissions with the command:
sudo chown -R gitbucket:gitbucket /opt/gitbucket
How to create a Systemd file
In order for the service to start, we need to create a systemd file. Issue the command:
sudo nano /etc/systemd/system/gitbucket.service
In that new file, paste the following:
# GitBucket Service [Unit] Description=Manage Java service [Service] WorkingDirectory=/opt/gitbucket ExecStart=/usr/bin/java -Xms128m -Xmx256m -jar gitbucket.war User=gitbucket Group=gitbucket Type=simple Restart=on-failure RestartSec=10 [Install] WantedBy=multi-user.target
Save and close the file. Reload systemd with the command:
sudo systemctl daemon-reload
Start and enable the new service with the following commands:
sudo systemctl start gitbucket sudo systemctl enable gitbucket
How to configure a database connection for GitBucket
Next we must configure a database connection for GitBucket. To take care of this, issue the command:
sudo nano /opt/gitbucket/database.conf
In that file, paste the following into this new file:
db { url = "jdbc:h2:${DatabaseHome};MVCC=true" user = "sa" password = "sa" }
How to configure NGINX as reverse proxy
Now we need to create an NGINX virtual host file, and set NGINX as a reverse proxy. To do this, create a new file with the command:
sudo nano /etc/nginx/sites-available/gitbucket.conf
In that new file, paste the following:
upstream gitbucket { server 127.0.0.1:8080 weight=100 max_fails=5 fail_timeout=5; } server { listen 80; server_name your-domain.com; location / { proxy_set_header X-Forwarded-Host $host; proxy_set_header X-Forwarded-Server $host; proxy_set_header X-Forwarded-For $proxy_add_x_forwarded_for; proxy_pass http://gitbucket/; } }
Save and close the file.
Enable the NGINX virtual host with the command:
sudo ln -s /etc/nginx/sites-available/gitbucket.conf /etc/nginx/sites-enabled/
Restart NGINX with the command:
sudo systemctl restart nginx
How to access the web interface
Open a web browser on your network and point it to http://SERVER_IP:8080 (where SERVER_IP is the IP address of your hosting server). You should be greeted by the GitBucket main page. Log in with the credentials root/root. At this point you should see a brand new instance of GitBucket (Figure A), where you can begin the process of creating and managing new repositories for your projects.
Figure A
The GitBucket main page.
Do make sure to click the "r" drop-down (top right corner), click System Administration, and change the default root password. Other than that, your instance of GitBucket is ready for work.
Also see
- How to become a software engineer: A cheat sheet (TechRepublic)
- Choosing your Windows 7 exit strategy: Four options (TechRepublic Premium)
- How to install GitHub Desktop (TechRepublic)
- How to set up a GitLab server and host your own Git repositories (TechRepublic)
- Git: A cheat sheet (TechRepublic)
- How to set up a Gitstorage appliance for in-house code collaboration (TechRepublic)
- GitHub Actions moves GitHub into DevOps (ZDNet)
- The 10 most important iPhone apps of all time (Download.com)
- It takes work to keep your data private online. These apps can help (CNET)
- Must-read coverage: Programming languages and developer career resources (TechRepublic on Flipboard)