Simple tools are often hidden at our fingertips. Like the arrow adjacent to an auto’s fuel gauge revealing which side of the car possesses the gas cap (which is especially handy when driving rentals), the macOS whois command can save Mac users time and trouble. The whois command is particularly helpful for Mac users who regularly fulfill web registration, development, design, hosting, and related consulting services. Instead of navigating to various websites that vary in reliability, Mac users can open Terminal.
SEE: macOS Sierra: The smart person’s guide (TechRepublic)
What the whois command does
The whois command permits discovering administrative and technical information for a web domain (using .com, .net, and .edu domain extensions) or even a public IP address. The command can reveal the date when a domain name was registered, who registered the domain, and who serves as the domain’s administrative and technical contacts. The command also permits discovering a domain’s registrar and the domain’s registration expiration date. Further, whois lists the name servers responsible for routing a domain or IP addresses’ internet traffic and lists ISP contacts for reporting abuse.
As Jack Wallen noted in his TechRepublic article The best tools and methods to track down suspect IP addresses and URLs, the whois command can help to determine who’s managing or administering a specific IP address. If you’re receiving requests to provide information to a specific party, or if you seek to confirm who’s administering a specific IP address, the whois command will confirm the organization managing the address.
These are important elements when coordinating and fulfilling web services, whether internally for an organization or externally for clients. Leveraging the Terminal’s whois command permits immediately accessing such information. Using Terminal, users can also quickly export the whois documentation to a text file for later reference by clicking Shell from the menu bar, selecting Export Text As, providing a filename and location for the resulting file and clicking Save. For documentation search and retrieval purposes, users can also enter corresponding tags, such as the domain or client name.
SEE: System Monitoring Policy (Tech Pro Research)
How to use the whois command
To perform a whois search, open Terminal (go to Applications | Utilities | Terminal). I recommend dragging the Terminal icon to the Dock to make the program more immediately available.
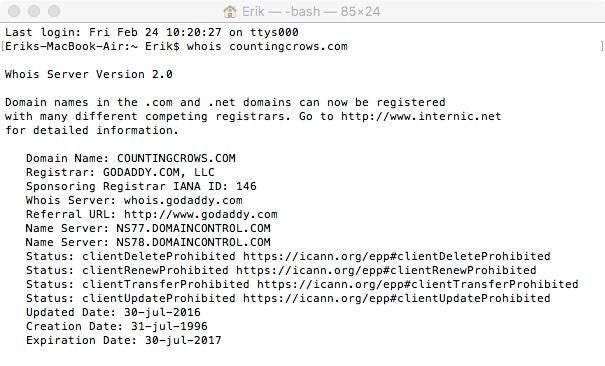
With Terminal open, type whois followed by the domain name you wish to check. For example, assume you seek to determine the domain registrar, domain registration expiration, and name servers for your client, the band Counting Crows. Type whois countingcrows.com and press enter. The command’s results (Figure A) reveal the Counting Crows domain name is registered with GoDaddy, the domain name registration is in force through July 30, 2017, and the name servers are ns77.domaincontrol.com and ns78.domaincontrol.com.
Figure A

If you want to confirm who administers a specific IP address, such as the commonly used 8.8.8.8 and 208.67.222.222 IP addresses recommended for DNS resolution, type either address and press enter, as such:
whois 8.8.8.8
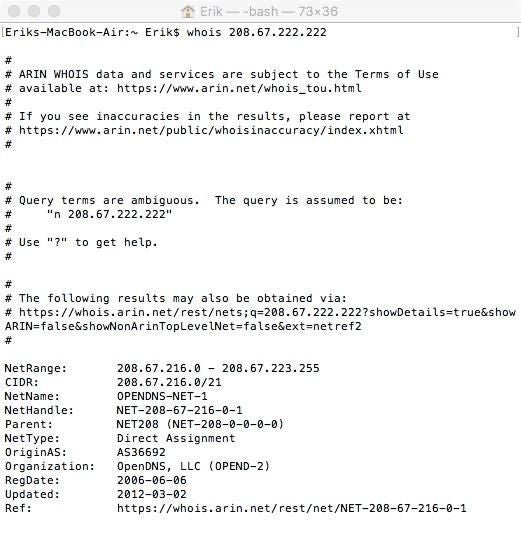
whois 208.67.222.222
The whois command ultimately reveals 8.8.8.8 is administered by Google, while 208.67.222.222 is administered by OpenDNS (Figure B).
Figure B

Another option when seeking to perform a whois lookup on a specific registrar’s server is to specify the domain registrar server upon which the command should be run using the -h switch. To specify checking GoDaddy as the source for the Counting Crows domain, enter this command:
whois -h whois.godaddy.com countingcrows.com
The whois command can also specify using a different port than the traditional TCP port 43 whois servers monitor for whois requests. The -p switch enables specifying the port, using whois -p, and supplying the corresponding port. However, such occasions are likely quite rare and beyond the scope of this quick tutorial.
