


How many times have you tried to configure a static IP address for a machine on your network, only to realize you had no idea what addresses were already taken? If you happen to work with a desktop machine, you could always install a network protocol analyzer to find out what addresses were in use. But what if you’re on a GUI-less server? You certainly won’t rely on a graphical-based tool for scanning IP addresses. Fortunately, some very simple-to-use command line tools can handle this task.
I’m going to show you how to scan your Local Area Network (LAN) for IP addresses in use with two different tools (one of which will be installed on your server by default). I’ll demonstrate on Ubuntu Server.
SEE: Top Commands Linux Admins Need to Know (TechRepublic Premium)
The arp command
The first tool we’ll use for the task is the built-in arp command. Most IT admins are familiar with arp, as it is used on almost every platform. If you’ve never used arp (which stands for Address Resolution Protocol), the command is used to manipulate (or display) the kernel’s IPv4 network neighbor cache. If you issue arp with no mode specifier or options, it will print out the current content of the ARP table. That’s not what we’re going to do. Instead, we’ll issue the command like so:
arp -a
The -a option uses an alternate BSD-style output and prints all known IP addresses found on your LAN. The output of the command will display IP addresses as well as the associated ethernet device.
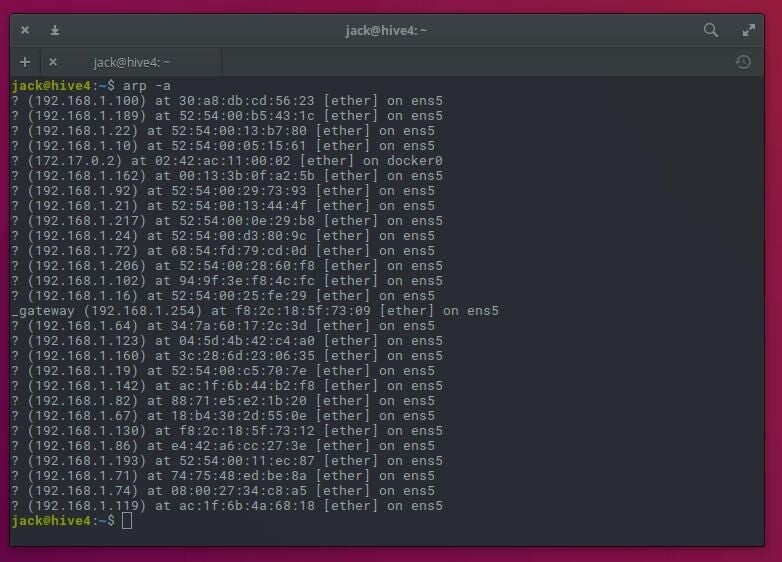
You now have a listing of each IP address in use on your LAN. The only caveat, is that (unless you know the MAC address of every device on your network), you won’t have a clue as to which machine the IP addresses are assigned. Even without knowing what machine is associated with what address, you at least know what addresses are being used.
NB. The arp command only works for IPv4. If you have IPv6, you’ll need to use the command ndp (which stands for Neighbor Discovery Protocol):
ndp -a
It’s easy to tell if you’re using IPv4 or IPv6 addresses. The former use periods, the latter use colons. IBM offers an explainer on the subject if you want more details.
SEE: How to Add an SSH Fingerprint to Your known_hosts File in Linux (TechRepublic)
Open source: Must-read coverage
- Debian vs Ubuntu: Which Linux Distro Fits Your Needs Best?
- Ubuntu Server: A Cheat Sheet
- Llama 3 Cheat Sheet: A Complete Guide for 2024
- CISA Report Finds Most Open-Source Projects Contain Memory-Unsafe Code
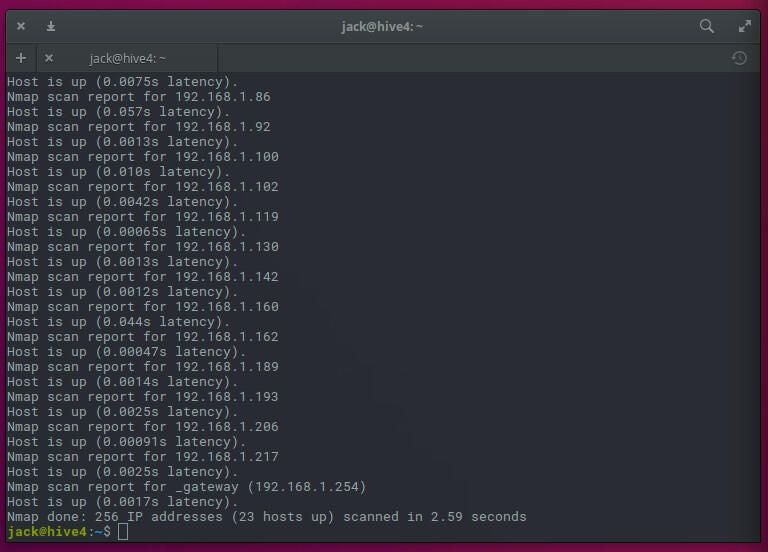
Nmap
Next, we use a command that offers more options. Said command is nmap (which stands for Network Mapper). You won’t find nmap installed on your Linux machine by default, so we must add it to the system. Open a terminal window (or log into your GUI-less server) and issue the command:
sudo apt-get install nmap -y
Once the installation is completed, you are ready to scan your LAN with nmap. To find out what addresses are in use, issue the command:
nmap -sP 192.168.1.0/24
Note: You will need to alter the IP address scheme to match yours.
The output of the command, will show you each address found on your LAN.
Let’s make nmap more useful. Because it offers a bit more flexibility, we can also discover what operating system is associated with an IP address. To do this, we’ll use the options -sT (TCP connect scan) and -O (operating system discovery). The command for this is:
sudo nmap -sT -O 192.168.1.0/24
Depending on the size of your network, this command can take some time. And if your network is large, consider sending the output of the command to a file like this:
sudo nmap -sT -O 192.168.1.0/24 > nmap_output
You can then view the file with a text editor to find out what operating system is attached to an IP address.

With the help of these two simple commands, you can locate IP addresses on your network that are in use. Now, when you’re assigning a static IP address, you won’t accidentally assign one already in use. We all know what kind of headaches that can cause.