
Image: Microsoft
Excel has several advanced sorting options, but most of us never venture beyond the ordinary alphabetic and numeric sorts. If you need more than a simple sort, check out Excel’s advanced sorting options. In this article, we’ll discuss several advanced options. Then, I’ll show you how to create a custom sort for those times when even advanced settings aren’t adequate.
I’m using Excel on Office 365 on a Windows 10 64-bit system, but you can apply these sorting techniques to earlier versions. Custom sorts aren’t supported in the browser edition. You can use your own data or download the demonstration .xlsx and .xls files.
How to use advanced sorting options in Excel
Once you’ve mastered the simple sorts–alpha and numeric–you might want to check out the advanced sorting options. You might never need them, but if you do, they’re invaluable.
To find these options, click the Data tab and then click the Sort option in the Sort & Filter group. Then, click the Options button to launch the dialog shown in Figure A. (You must select a range of values to access these settings.)
Figure A
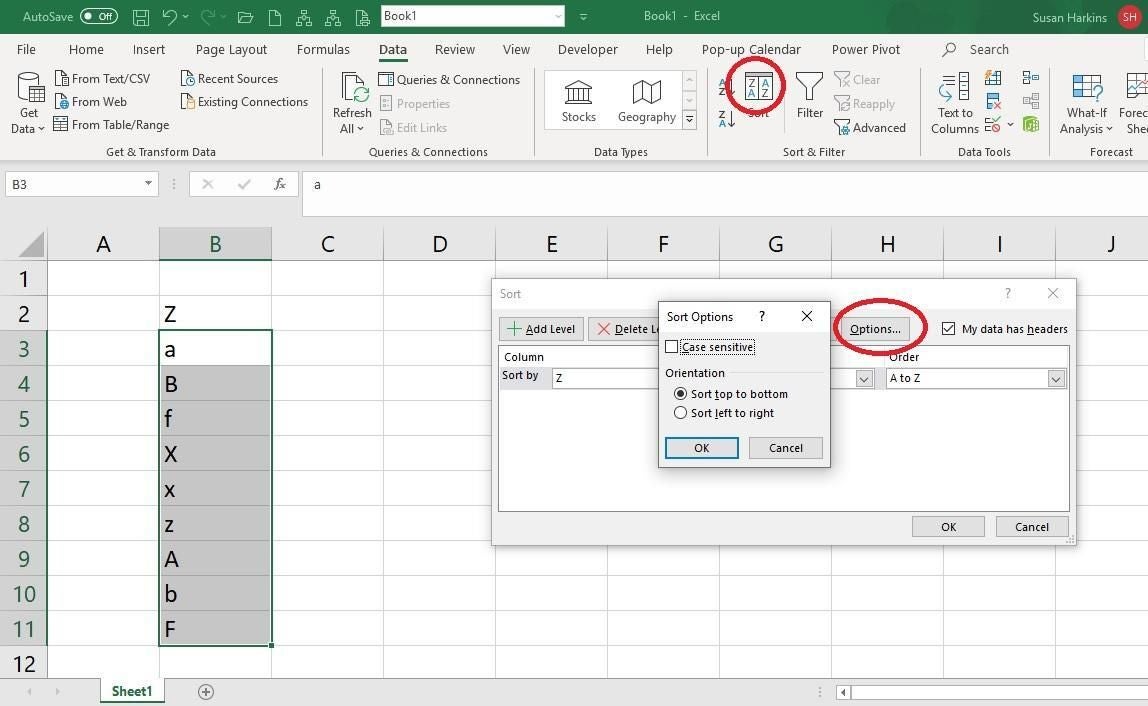
The three advanced options we’re going to discuss are:
- Case sensitive
- Sort top to bottom
- Sort left to right
As you can see, only the Sort top to bottom advanced option is set by default, which makes sense. Generally, that’s the direction we sort by—top to bottom (not left to right).
Let’s start with the Case sensitive option. Figure B shows the results of two sorts: The default, which is case neutral, and the case sensitive sort. As you can see, the lowercase characters sort before the uppercase. (I selected the sort ranges before sorting, and if there are adjacent columns, you’ll be prompted to expand or keep the current selection.)
Figure B
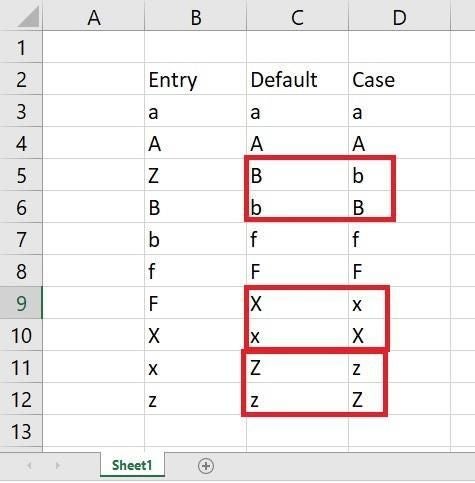
Sort top to bottom is the default, and you’re already familiar with it, so let’s look at Sort left to right. Figure C shows the result of changing this option to Sort left to right. The result is the same as the case sensitive because I didn’t uncheck that option–it remains set until you unselect it (you should watch out for this small gotcha). In contrast, the Sort left to right option remains set until you run a top to bottom sort–Excel changes it for you automatically. When using the left to right sort, you’ll probably need to set the row in the Sort by control. If you receive an error, try again and check that option.
Figure C

Other advanced sorting options include cell and font color and conditional formatting icons. You can also add sorting layers to form subgroups. You probably won’t use these advanced options frequently. None of these advanced options allow you to apply a custom sort order.
How to use Excel’s custom sort feature
Excel’s custom sort feature lets you determine the sort order because some data comes with a sort order that’s not alphabetic or numeric–it’s sorted by business rules. For instance, a list of sizes (petite, small, medium, large, and x-large) could be sorted alphabetically, but it wouldn’t sort by sizes, from smallest to largest and vice versa. For this, we can create a custom sort as follows:
- Click the File tab and select Options.
- Select Advanced in the left pane.
- In the General section, click Edit Custom Lists. You’ll see Excel’s built-in lists–you probably rely on a few already and perhaps never knew you were using a custom sort.
- In the List entries control, enter the list in sort order (Figure D): Petite, small, medium, large, x-large. (If the list is long or already exists as natural data, you can specify the cell reference and click Import.)
- Click Add, and Excel will transfer the new custom sort to the Custom lists on the left.
- Click OK twice.
Figure D
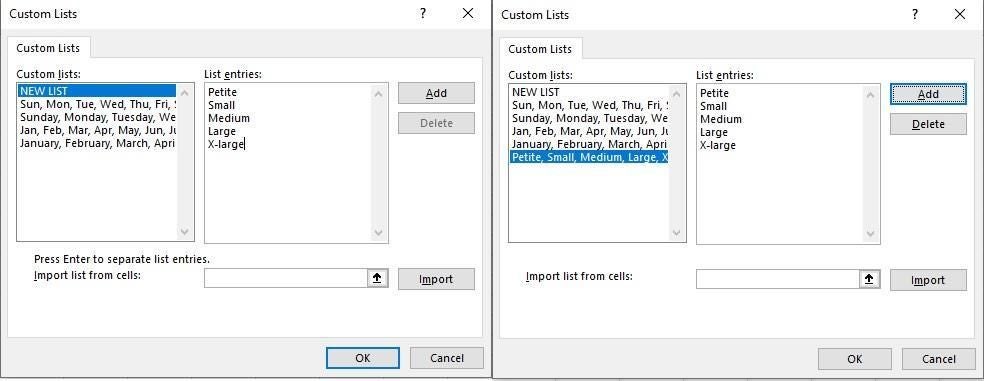
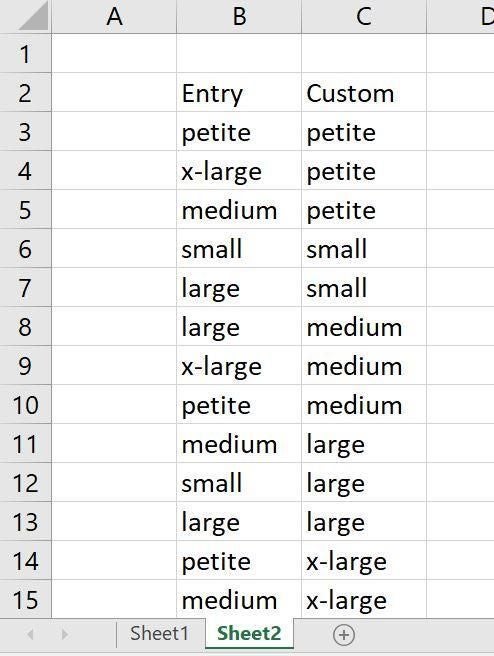
To apply the custom soft, select the list you want to sort. Then, click the Home tab, click Sort & Filter in the Editing group, and choose Custom Sort from the dropdown list. If data exists in adjacent columns, you’ll be prompted to expand the selection, but don’t–choose Continue with the current selection and click Sort. From the Order dropdown, choose Custom List (Figure E). Select the size list shown in Figure F and click OK twice. Figure G shows the sorted list.
Figure E
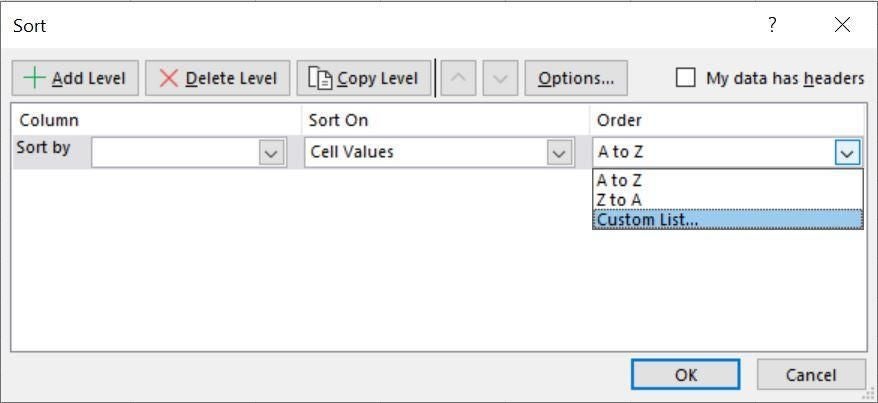
Figure F
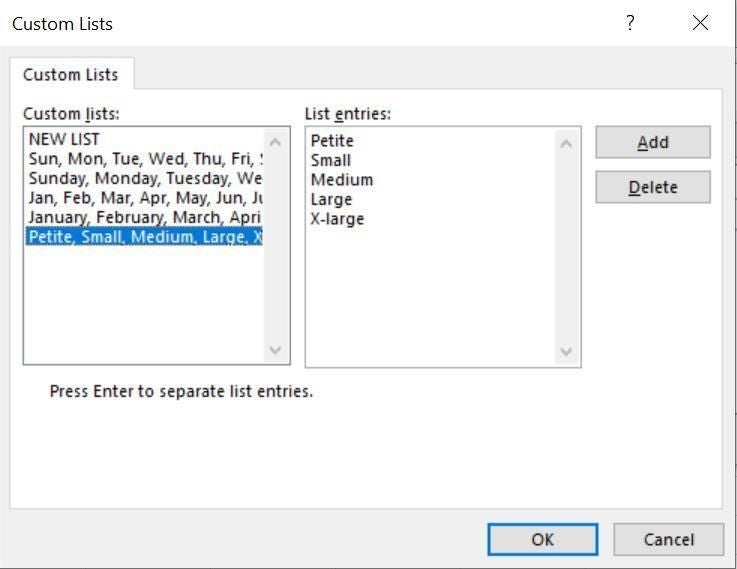
Figure G
Anytime you have a sort pattern that’s not supported by the built-in features, consider building a custom list to sort by.
Send me your question about Office
I answer readers’ questions when I can, but there’s no guarantee. Don’t send files unless requested; initial requests for help that arrive with attached files will be deleted unread. You can send screenshots of your data to help clarify your question. When contacting me, be as specific as possible. For example, “Please troubleshoot my workbook and fix what’s wrong” probably won’t get a response, but “Can you tell me why this formula isn’t returning the expected results?” might. Please mention the app and version that you’re using. I’m not reimbursed by TechRepublic for my time or expertise when helping readers, nor do I ask for a fee from readers I help. You can contact me at susansalesharkins@gmail.com.


