


Under the hood, macOS X has a Unix shell that lets you runs powerful command-line utilities. This makes it easier for IT teams to manage devices running macOS because personnel can log in via SSH and run commands remotely to do things like install software or update Macs.
Learn basic command-line tips that every Mac user and large businesses relying on and managing Macs should know. To use these command-line tips, I utilize the Terminal application that ships with every copy of macOS–there’s nothing extra to install or download. Find this application by opening the Finder and navigating to Applications | Utilities. You’ll type the commands into the Terminal and then press return to execute them.
SEE: Windows, Linux, and Mac commands everyone needs to know (free PDF) (TechRepublic)
- How to update your Mac with the softwareupdate Terminal command
- How to copy output of a command with the pbcopy Terminal command
- How to view system utilization with the top Terminal command
- How to caffeinate your Mac to keep it from turning off
- How to clear the DNS cache
- How to use the opendiff Terminal command to find differences between files
- How to find out how long your Mac has been turned on
- How to force macOS to shut down
- How to use the Terminal command qlmanage to get a QuickLook preview
How to update your Mac with the softwareupdate Terminal command
If you want to update your Mac remotely via SSH, or you don’t want to go through the steps to open System Preferences and perform the updates, your Mac can also be updated directly through the Terminal.
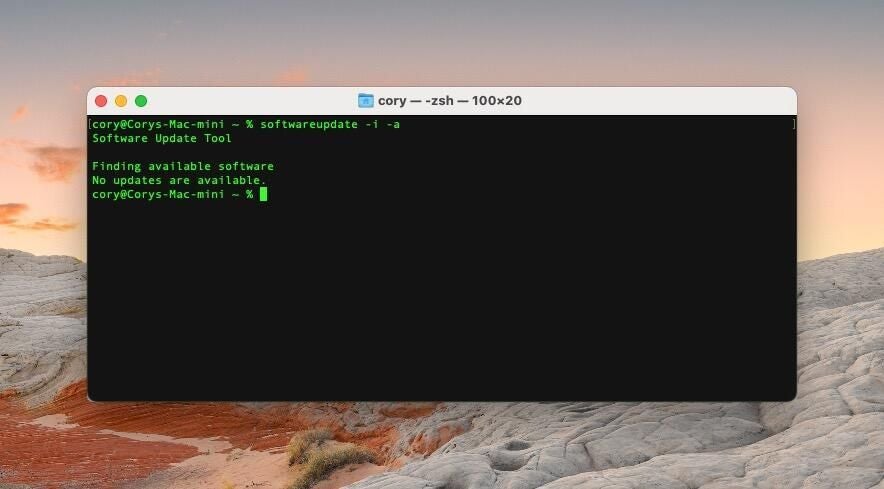
To do this, I’ll utilize a command called softwareupdate. This command, when passed two options, both downloads and installs the updates. Open Terminal and type the following command to check for, download, and install any available updates for your system:
softwareupdate -i -a
When you run this command, the utility will open, check for updates in the same manner as System Preferences, and then download and install them if any updates are found (Figure A). If a restart is required after installation, you’ll be alerted that the restart is required to complete the install.
Figure A
How to copy output of a command with the pbcopy Terminal command
As a developer, I often open a file only to copy the contents of it and then close the file. With the Terminal, you can easily copy the contents of a file (or the output of any command) by piping the output of the command to pbcopy.
In this example below, I’ll pipe the output to the clipboard of a file using the cat command on a file on the Desktop:
cat ~/Desktop/myfile.txt | pbcopy
When you run this command, it will cat (echo the output of) the file called “myfile.txt” on the Desktop. This output will be piped into the pbcopy utility, which will replace the contents of the clipboard with the contents of that file–all without ever having to open the file, select all and copy.
Note that because you’re piping the output directly to the clipboard, you will not see the text echoed into the Terminal window–it will be written to the clipboard instead, and you can paste it into any macOS app.
How to view system utilization with the top Terminal command
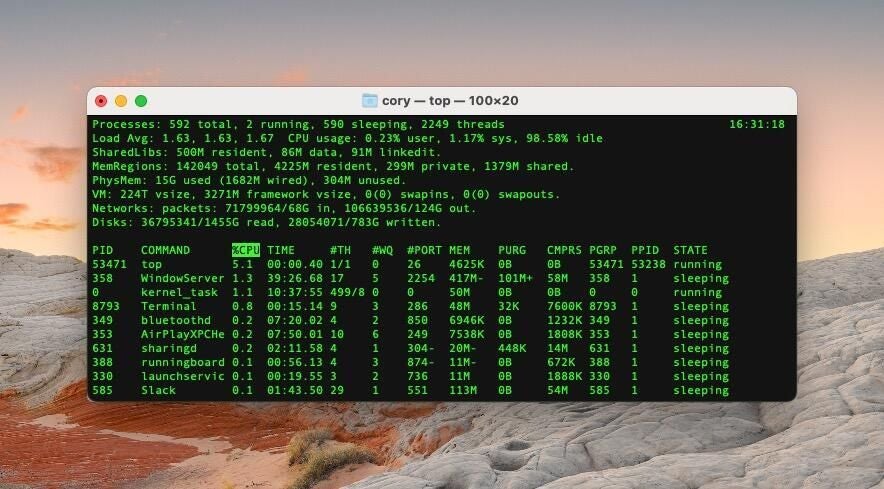
On the Mac, there’s a handy utility called Activity Monitor that lets you inspect all sorts of system features and utilization across the CPU, memory, disk and more. However, if you want to instantly inspect the top items on your Mac running and some simpler stats about your system utilization, you can run the top command by typing this into the Terminal:
top
You’ll see the stats of your system updated in the Terminal window, including the memory, CPU and disk utilization. You’ll also see a running list of the top apps using the CPU and their state, ports used, memory per app and more (Figure B).
Figure B
To close this view, either close the Terminal window or go back to the command line prompt by pressing Control + C to quit the top command.
How to caffeinate your Mac to keep it from turning off
When you have a long process running on your Mac (such as an export, automation or other service) that cannot be interrupted by your computer going to sleep, you can take advantage of a little known Terminal command called caffeinate:
caffeinate -u -t 3600
When this command is run, it lets you specify a length of time in seconds that you want to prevent your computer from going to sleep. The command will then start counting down the time and prevent your Mac from sleeping during that time.
You can also just run caffeinate, and it will keep your Mac from sleeping for as long as the command is running.
You can exit either caffeinate command early by pressing Control + C (or closing the Terminal window) and allowing your Mac to go to sleep per the system settings again.
How to clear the DNS cache
Have you ever been in a situation where a website updated or changed servers, but your Mac was still navigating you to the old site? This is often related to the DNS cache on your computer being out of date and not updated with the new domain resolution. Fortunately, you can easily resolve this by flushing the DNS cache on your Mac and allowing it to look up domains on the remote DNS service instead.
To do this, find your version of macOS below and run the command for your version.
macOS 10.12 (Sierra) and later
sudo killall -HUP mDNSResponder;sudo killall mDNSResponderHelper;sudo dscacheutil -flushcache
mac OS X 10.11 (El Capitan)
sudo killall -HUP mDNSResponder
These commands use the sudo keyword, which means that you will need to enter your macOS user account password before the command can execute. Type in your password when prompted and then press return. When run, these commands will flush the DNS cache on your Mac and will begin repopulating it on all subsequent domain lookups.
How to use the opendiff Terminal command to find differences between files
Have you ever wanted to find the differences between two files but resorted to downloading an app, or maybe just opened the two files side by side and eying the changes? There’s a better way to compare two files of the same type, and it’s built into every Mac–it’s the opendiff command. Simply type the following commands, putting the locations of the two files after each other, separated by a space:
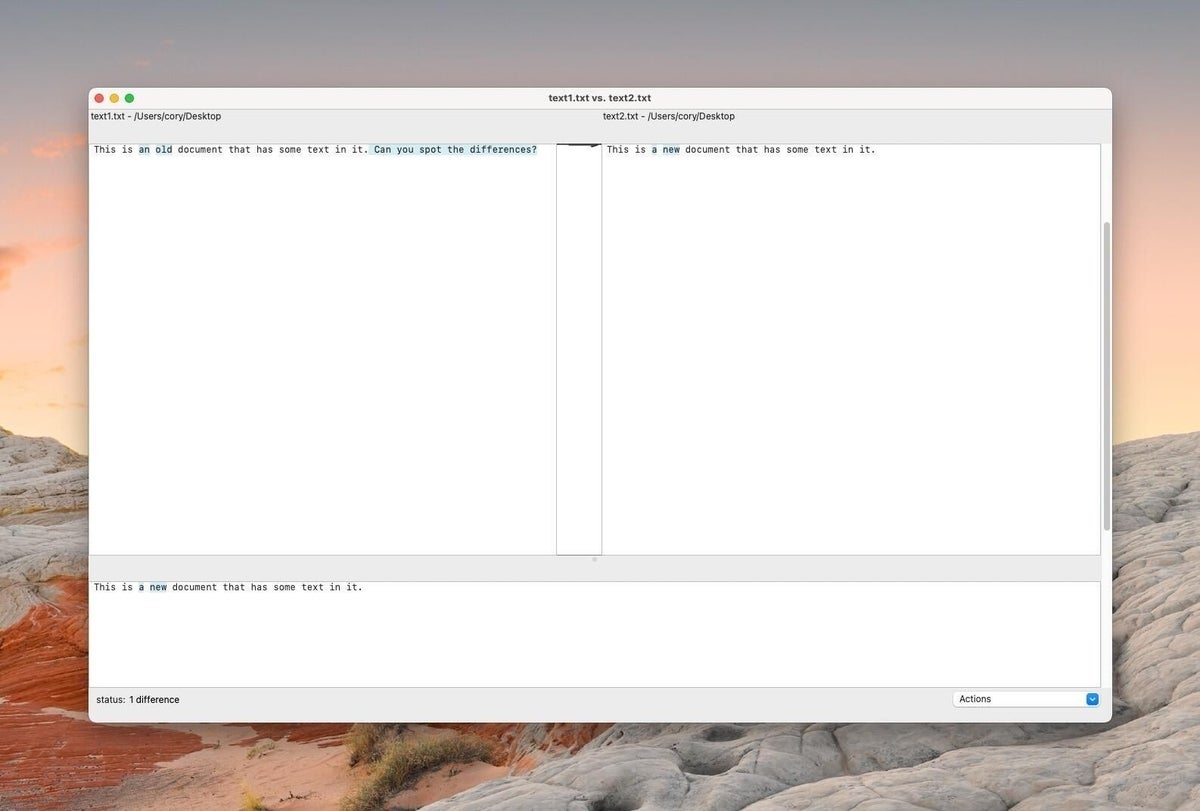
opendiff ~/Desktop/text1.txt ~/Desktop/text2.txt
In the example above, we’re diffing two text files located on the desktop, one named “text1.txt” and the other named “text2.txt.” When you run this command, your Mac will launch the FileMerge app (Figure C) with the two files opened side by side, and the differences between the two files will be highlighted. This is great for reviewing documents like contracts and other text documents.
Figure C
How to find out how long your Mac has been turned on
It’s a good idea to reboot your Mac from time to time. Because the system is so stable, we often forget how long the computer has been booted. You can figure out how long your Mac has been running nonstop with the uptime command in the Terminal by typing the following command:
uptime
This simple command will allow you to get the number of days, hours and seconds since the last time your Mac rebooted. This is great for determining if you need to restart your Mac.
How to force macOS to shut down
You might run into an issue occasionally where you cannot shut down your Mac; for instance, maybe an application or a background process has hung and will no longer successfully quit and is causing the shutdown to stall through the normal means of shutting down your Mac.
There is another option, and it involves the Terminal. Simply open the Terminal and type:
shutdown -r now
When you enter this command into the Terminal and press return, your computer will go down for a shutdown immediately. If you’re still unable to get it to reboot after entering this command, add “sudo” in front, which will require your administrator password but guarantee to shut down your Mac every time.
SEE: How to migrate to a new iPad, iPhone, or Mac (TechRepublic Premium)
How to use the Terminal command qlmanage to get a QuickLook preview
The macOS QuickLook feature provides an easy way to view images, PDFs and other documents in place in the Finder without the need to open the document’s app by pressing Space when a file is selected in the Finder.
This same QuickLook preview is also available through the Terminal on any supported file by typing this command:
qlmanage -p ~/Desktop/text.txt
This example command above opens the QuickLook window with the file passed into the command. This is great for when you’re using the command line to manage files.