


In previous articles, “Get to know File Explorer’s Ribbon toolbar in Windows 10” and “Get to know File Explorer’s Contextual tabs in Windows 10,” I told you that the Ribbon toolbar system with its Core and Contextual tabs is designed to expose close to 200 different file management commands in File Explorer. One of these commands is called Group by, and it’s found on the View tab. If you’re like most users, you probably aren’t taking advantage of the power that this command provides when it comes to sorting through the various files folders and other objects that you can display in File Explorer.
For example, when it comes to data files, no matter how organized you are, chances are pretty good that you don’t know where every document is located. Nor do you even remember every document that you have on your hard disk. Of course, Windows 10’s Search feature can help you out when you have an idea of what you are looking for, but it really can’t help you when you’re not sure.
Fortunately, you can use File Explorer’s Group by command to gain a different perspective on the data files that you have stored on your hard disk. For example, using the Group by feature, you can find data files that you never knew you had or that you’d forgotten about. It can also help you to locate and get rid of junk files that you never meant to keep and that are hogging valuable disk space.
As its name implies, the Group by command is designed to display all your files in groups, and it’s contextual! In this article, I’ll explain how the Group by command works and show you how to use it to your advantage.
It’s contextual
As I mentioned, the Group by command is contextual, which means that it will provide you with options that are appropriate for the type of object that you’ve selected, such as a location or a folder.
Documents
Let’s begin by taking a look at how the Group by command works in the Documents folder. When you click the Group by command, a drop-down menu appears that displays the Group options that are appropriate for the Documents folder (Figure A).
Figure A

In the Documents folder, the Group options include Name, Date modified, Type, Size, Date created, Authors, Tags, and Title.
As you can see, in the Documents folder, the Group options include Name, Date modified, Type, Size, Date created, Authors, Tags, and Title (the Ascending and Descending options are not always selectable, which appears to be a bug). You’ll notice, at the bottom of the Group By menu, there’s a command titled Choose columns. If you select this command, you’ll see the Choose Details dialog box (Figure B), and you’ll be able to add other column headers to the display and to the Group By menu.
Figure B

The Choose Details dialog box allows you to add other column headers to the display and to the Group By menu.
For example, you might want to investigate the different types of file you have in the Documents folder. To do so, you could choose the Group by Type option, and then select the List View (Figure C). In addition to the groups, File Explorer also tells you how many files are in each grouping. As you can see, combining the List View with the Group by command provides you with an interesting way to look at your files.
Figure C

You can investigate different types of file using the Group by Type option.
Suppose that you want open up disk space on your hard disk. To do so, you could choose the Group by Size option, select Descending, and then select the Details View (Figure D). You can now more easily find out which files are hogging up disk space.
Figure D

You can find out which files are hogging disk space if you use the Group by Size option.
If you happen to select a Group by option that doesn’t work with some of the files in your folder, you’ll see those files appear in a group titled unspecified. For instance, in my test folder, I selected Authors, and those files that don’t have that meta data appeared in the Unspecified group (Figure E).
Figure E

Files that don’t fit the Group by option you choose will appear in a group titled Unspecified.
Once you select a Group by option, you’ll see that the Group by menu contains a new command titled (None). Selecting this option basically ungroups the files and returns the display to normal.
Music
When you select the Music folder, the Group by menu contains options that apply to music files. For example, suppose that you want to find a file for a short song. You could Group by Length (Figure F).
Figure F
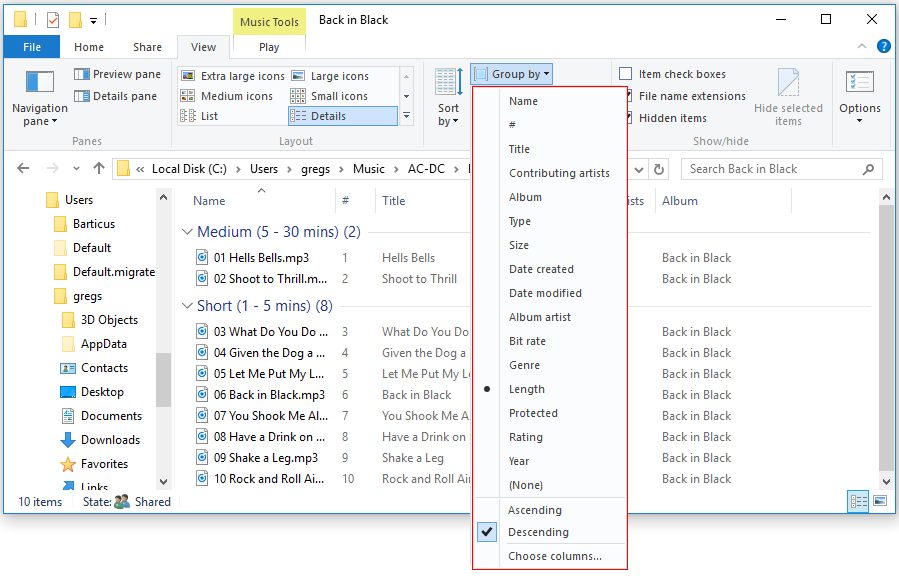
In the Music folder, the Group by menu contains options that apply to music files.
Pictures
When you select the Pictures folder, the Group by menu contains options that apply to images. For example, suppose that you want to find a file by its proportions. You could Group by Dimensions (Figure G).
Figure G

In the Pictures folder, the Group by menu contains options that apply to images.
This PC
In addition to files, the Group by command works with other objects. For example, when you select This PC, the Group by menu contains a host of options that you can use to display the items that you find in This PC. For example, suppose that you have a number of external drives connected to your computer, and you want to find out their formatted file system. Simply use Group by File System (Figure H). In addition, you can Group by other options like Total Size, Free Space, or Percent Full. This will definitely provide you with a different perspective.
Figure H

When you select This PC, you’ll find a host of useful options on the Group by menu.
Network
When you select Network, the Group by menu contains options that can be very useful in a number of situations. For instance, suppose that you want to find out what IP addresses are being used by the systems on your network. You could Group by IP Address (Figure I).
Figure I

In Network, the Group by menu provides you with options that you can use to view your network in helpful displays.
What’s your take?
Now that you know how the Group by features works, will you put it to use on your system? If so, what context sounds the most useful to you? Share your opinion in the discussion thread below.