
Visually tracking the current day in relation to the rest of your scheduled events is important. Unfortunately, today is often hard to spot in a busy calendar. To make matters worse, how Outlook highlights the current day has changed from version to version. In the earliest version, Outlook did nothing to differentiate between the current day and other days. In the most recent version, Outlook 2016 distinguishes the current day with a thick border at the top–that’s it! In this article, I’ll show you three ways to help the current day stand out in a busy calendar.
SEE: 50 time-saving tips to speed your work in Microsoft Office (TechRepublic PDF)
I’m using Outlook 2016 (desktop) on a Windows 10 64-bit system. There’s no downloadable demonstration file. For the most part, I’m using Month View, but other calendar views are relevant. To simplify the discussion, I’ll refer to the current day as today throughout this article. For 365 subscribers, only #1 works in Mail 365.
1: Jump to today
By default, Outlook 2016 distinguishes today (the 10th) with a thick border, as shown in Figure A. The boldly highlighted day (the 6th) indicates the selected day. You might expect today to receive just as much visual attention, but as you can see it doesn’t.
Figure A

The selected day is easy to discern; today isn’t.
The quickest way to find the current day in to click Today in the Go To group on the Home tab. (In Mail 365, Today is to the far right with the view options.) As you can see in Figure B, the selection highlight distinguishes today. Of course, as soon as you select another day, you lose that visual advantage.
Figure B

Today and the selected day are the same.
If you prefer keyboard shortcuts, press Ctrl+T. If that doesn’t work, press Ctrl+G, enter today in the Date control (Figure C), and click OK. Today works in Week View and Work Week View. If your workweek doesn’t include today’s day of the week, clicking Today will display it temporarily. If you have multiple calendars open, clicking Today selects the appropriate day in the active calendar.
Figure C
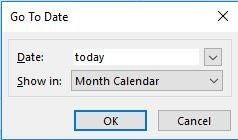
Use the Go To Date dialog.
2: Use a bland format for appointments and events
To the best of my knowledge, there’s no conditional format rule that will highlight today. All conditional formats rely on fields, so you must have an event for every day–and nobody wants to work that hard. The problem isn’t that today doesn’t stand out, it’s that everything stands out. All events and appointments use the default calendar color, unless you categorize them. Doing so might help, but it can also make for a too-busy calendar–too many colors will be distracting. Today will stand out better if other items fade a bit, and you can accomplish this by adding a conditional format that uses a bland highlight for all uncategorized events. The bland color you use will depend on your calendar’s color. The example calendar is blue, so let’s use a light gray.
SEE: Windows 10 power tips: Secret shortcuts to your favorite settings (Tech Pro Research)
To begin, click the View tab and then click View Settings in the Current View group. In the resulting dialog, click Conditional Formatting. Next, click Add and enter a meaningful name for the rule. From the Color dropdown, choose a bland or contrasting color (Figure D).
Figure D
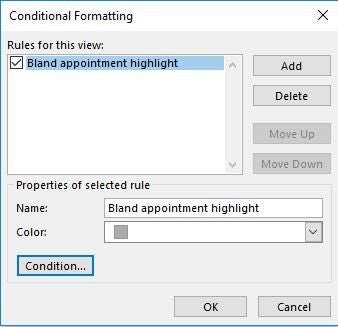
Choose a bland or contrasting color for the new rule.
At this point, click Condition (bottom-left) and then click the Advanced tab. From the Field dropdown, choose Start (Figure E). Then, from the Condition dropdown, choose Anytime (Figure F). Finally, click Add To List and click OK three times.
Figure E
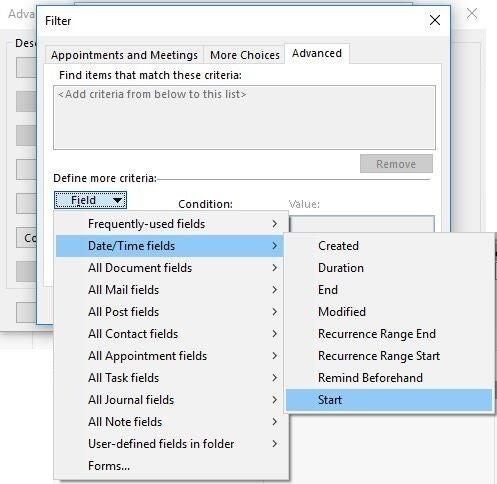
Choose the Start value.
Figure F
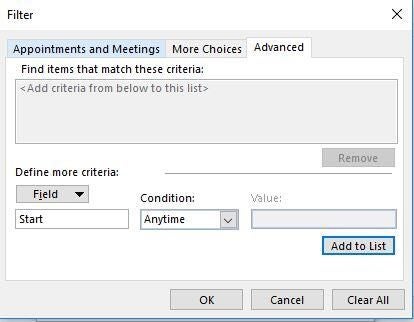
Choose a Condition value.
Thanks to the formatting rule, Outlook displays all uncategorized events in gray (the color you selected above). The thick blue border at the top of today isn’t any brighter or bigger, but it is easier to spot with most of the other events in gray. This isn’t a silver bullet by any means, but it might improve your ability to quickly find today in a busy calendar. This conditional formatting rule works in all views, not only Month View.
3: Highlight today’s appointments
There’s one more way to make today stand out if you have an appointment or event that day. You can add a conditional format that highlights that event differently on the actual day of the event–today! It’s a bit convoluted, but it works. You’ll start the same way as before. First, click the View tab and then click View Settings in the Current View group. In the resulting dialog, click Conditional Formatting. Next, click Add and enter a meaningful name for the rule. From the Color dropdown, choose a contrasting color that stands out. Then, click Move Up so this rule takes precedence over the bland color you added previously, as shown in Figure G.
Figure G
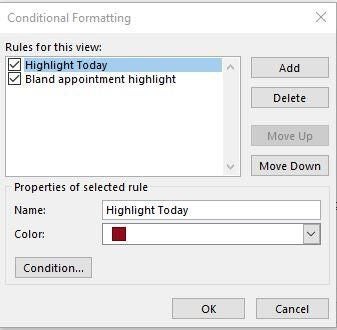
Create a new rule for today’s appointments.
To continue, click Condition. On the Appointment And Meetings tab, choose Starts and Today from the Time dropdowns, as shown in Figure H.
Figure H
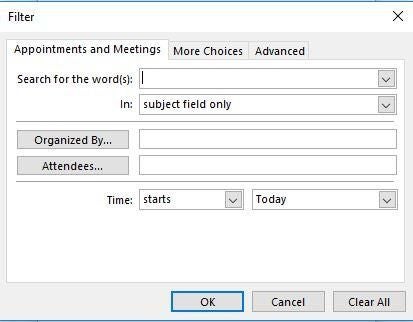
This rule will work with events and appointments that occur today.
To bypass recurring events that might interfere, click the Advanced tab. From the Field dropdown, choose Frequently Used Fields and then Recurring; doing so will automatically fill Equals and No. If that doesn’t happen, choose those values. Then, click Add To List (Figure I) and click OK three times. As you can see in Figure J, the new rule highlights today’s appointment, whereas all other uncategorized items are gray. (The green appointment on Tuesday is a previously categorized event–don’t confuse it with the blue border above today.) Regardless of the selected day, today is easy to spot. Tomorrow, this rule will highlight the appointment at 11:00 on the 11th and the appointment on the 10th will be gray.
Figure I
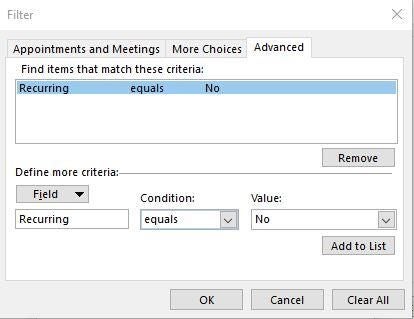
Add the new condition to the rule.
Figure J

The rule highlights only today’s events.
If this rule doesn’t work as expected, check its placement (Figure G). Outlook must apply this rule before it applies the bland highlight rule.
Send me your question about Office
I answer readers’ questions when I can, but there’s no guarantee. Don’t send files unless requested; initial requests for help that arrive with attached files will be deleted unread. You can send screenshots of your data to help clarify your question. When contacting me, be as specific as possible. For example, “Please troubleshoot my workbook and fix what’s wrong” probably won’t get a response, but “Can you tell me why this formula isn’t returning the expected results?” might. Please mention the app and version that you’re using. I’m not reimbursed by TechRepublic for my time or expertise when helping readers, nor do I ask for a fee from readers I help. You can contact me at susansalesharkins@gmail.com.
Also read…
- Microsoft Office Specialist Certification Training (TechRepublic Academy)
- Microsoft launches new Outlook.com beta; starts testing new features (ZDNet)
- Office Q&A: Placeholder formats and disappearing white space (TechRepublic)
- How to return the last value in an Excel data range (TechRepublic)
- How to use a conditional format to highlight subtotal rows in Excel (TechRepublic)

