


Templates offer a quick way to eliminate repetitive tasks. For example, if you often type the same email message, you can create a template that contains your basic message. You can add formatting, insert graphic files, and even attach a file to the template. Then, when you need to send the email, you retrieve the template instead of typing the text manually.
Creating the template is simple, but retrieving it requires several steps and in itself becomes tedious after a while. In this article, I’ll show you how to add a macro to the toolbar or ribbon interface that opens the template. At this point, you can add the email address, customize the message if necessary, and click Send. It’s much more efficient than creating the same email over and over or even retrieving a template manually.
I’m using Outlook 2013, but I’ll include instructions for 2010 and 2007 when different. (I don’t cover Outlook 2003.) There’s no downloadable demonstration file.
Create the template
The first thing you need is a template. Fortunately, they’re easy to create, but if you have one already, you can skip this section. If not, let’s create a simple email message and save it as a template file:
- In the Mail window, click New Email from the New group on the Home tab. In 2007, click New on the Standard toolbar.
- In the resulting email window, type the message, and make all changes and additions that belong to this template (Figure A). For example, I attached a Word file and inserted clip art in the signature.
Figure A
- When the email message is ready, click the File tab (Menu in 2007) and choose Save As in the left pane.
- In the resulting dialog, choose Outlook Template (*.oft) from the Save as type drop-down.
- Enter a name for the template, such as FieldTripInfo (Figure B).
Figure B
- Click Save and close the mail window. You don’t have to save it again if prompted to do so.
When you’re ready to retrieve the template, do the following:
- From the New Items drop-down (in the New group on the Home tab), choose More Items and then Choose Form (Figure C). If you’ve displayed the Developer tab, you can click it, and then click Choose Form in the Custom Forms group. In 2007, select Forms from the Tools menu, and then select Choose Form.
Figure C
- In the resulting dialog, choose User Templates in File System from the Look In drop-down (Figure D).
Figure D - Select FieldTripInfo, but don’t click Open yet. Instead, select the path above the template list and copy it to an open text editing document–or you can write it down if you like. In the next section, you’re going to appreciate this extra step.
- After copying the path, click Open.

At this point, you’re ready to complete the message: add an email address, attach the promised invoice, and finish the greeting by adding someone’s name. When you’re ready, click Send. The template works fine but retrieving it is tedious. Fortunately, you can bypass this route altogether by creating a macro.
The macro
The code in Listing A is simple. The CreateItemFromTemplate method opens the FieldTripInfo.oft file to create a new email message. (Remember to update the highlighted path when customizing this procedure for your own templates.) Notice that the path is the same as the one you copied earlier, except I’ve replaced *.oft with the template’s name.
Listing A
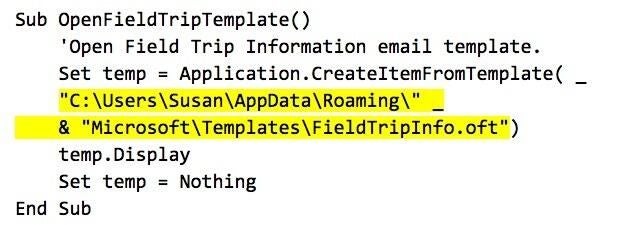
To add the code, press [Alt]+[F11] to open the Visual Basic Editor (VBE). If you’ve displayed the Developer tab, click it and choose Visual Basic from the Code group to open the VBE. Use the Project Explorer to the left to open ThisOutlookSession. Add the code to this module, as shown in Figure E. Close the VBE and return to Outlook.
Figure E

Add the template-opening procedure.
Execute from the Quick Access Toolbar
If you’re using Outlook 2010 or 2013, you can add the macro to a custom ribbon group or the Quick Access Toolbar (QAT). First, let’s add it to the QAT as follows:
- From the Customize Quick Access Toolbar drop-down, choose More Commands (Figure F).
Figure F
- Choose Macros from the Choose commands from drop-down (above the list on the left).
- Select OpenFieldTripTemplate() in the resulting list (on the left).
- Click Add to add it to the list on the right (Figure G).
Figure G
- Click OK. Clicking the new macro button on the QAT (Figure H) opens the field trip information template.
Figure H
This setup works fine if you only have one or two templates. If you have several, distinguishing between them won’t be easy. You can change the icon and displayed text, so let’s modify this one so you can see what’s available. First, repeat step 1 and 2 above. Select the macro in the right list and click Modify. In the resulting dialog, click an icon, enter a simpler name for the macro, as shown in Figure I, and click OK twice.
Figure I

Change the way the macro button looks.
The new icon and name shown in Figure J make more sense.
Figure J

The new icon is more meaningful.
Execute from the ribbon
If you have more than one template, adding the macro buttons to a custom tab might be more helpful and efficient. To accomplish this, do the following:
- Click the File tab and choose Options in the left pane.
- Choose Customize Ribbon in the left pane.
- Click New Tab in the bottom right corner of the dialog.
- Right-click the New Tab item, choose Rename, enter the name Templates (Figure K), and click OK.
Figure K
- Right-click New Group under the new Templates tab and choose Rename.
- Enter the name Email (Figure L), and click OK.
Figure L
- With the Email group selected in the new Templates tab, select Macros from the Choose commands from drop-down (to the left).
- Select OpenFieldTripTemplate() and click Add.
- Right-click the new macro in the Email group (in the list to the right), and choose Rename.
- Select the new document icon, enter Field Trip (Figure M), and click OK.
Figure M
- Click OK to return to Outlook’s mail window.
- Click the Templates tab and then click Field Trip in the Email group (Figure N) to open the template email.
Figure N
Repeat this process to add email templates to the Email group. Add new groups if you have different categories of templates.
Outlook 2007 users
If you’re using Outlook 2010, you can add the button to the toolbar as follows:
- Right-click the toolbar and choose Customize.
- In the resulting dialog, click the Commands tab.
- Select Macros in the Categories list. Then, drag and drop it to the toolbar.
- If the name is too long (they always are), you can shorten it. While you’re still in editing mode, right-click the button and enter a new name in the Name field.
- Click Close.
Use a folder
You might not want to fool with macros at all. If this is the case, you can drag templates into any Outlook folder and open them from there. Most likely, you’ll want to add a new folder instead. To do so:
- Right-click Inbox.
- Choose New Folder.
- Enter Templates as the new folder’s name.
- Click OK.
Next, click the Restore button (in the top-right corner) and resize the Outlook window to about half of your screen. Next, use Windows Explorer to find the template files using the same path you used in the code. Restore that window and resize it. Then, drag the template file(s) from Windows Explorer to the Templates folder. When you need a template, double-click the Templates folder and open the one you need.
Work smarter
Reducing or even eliminating repetitive tasks is a good goal. By using a simple macro to open an email template, you can spend less time creating email.
Send me your question about Office
I answer readers’ questions when I can, but there’s no guarantee. When contacting me, be as specific as possible. For example, “Please troubleshoot my workbook and fix what’s wrong” probably won’t get a response, but “Can you tell me why this formula isn’t returning the expected results?” might. Please mention the app and version that you’re using. I’m not reimbursed by TechRepublic for my time or expertise, nor do I ask for a fee from readers. You can contact me at susansalesharkins@gmail.com.