
If you’re the author of Microsoft Excel data that others in your organization need to view and perhaps even update, you have many options, such as sharing an Excel file or creating a list using Microsoft Lists or Microsoft SharePoint.
If all you’re after is a small part of the Excel file, sharing the entire workbook is overkill and potentially dangerous. Microsoft Lists and SharePoint are similar, but Microsoft Lists is a good choice when interacting with the list via Teams.
SharePoint lists are also a solid choice and a bit easier to implement than Microsoft Lists. Once the data is available as a SharePoint list, you can decide who can access and update the list. The only requirement is that you format the data as an Excel table.
SEE: Get the most out of Excel with these 13 courses (TechRepublic Academy)
In this tutorial, I’ll show you how to export an Excel table to a SharePoint list. I’ll also share a lot of basic information about SharePoint lists along the way.
I’m using Microsoft 365 Business Premium, which includes OneDrive for Business and SharePoint. You must have Microsoft 365 Business Premium, Standard or Basic. However, you can export from Excel to SharePoint in earlier versions through Excel 2007.
You can follow along using this Microsoft Excel demonstration file.
What lists are in SharePoint
If you’re familiar with Microsoft Lists, you’ll find that SharePoint lists are similar. They’re an easy way to share data with others in your organization when they need to track the same data.
Technically, a SharePoint list is a collection of related data in table format, similar to Microsoft Excel. From one perspective, lists are a way to share data on a SharePoint site. You can also add attachments, such as documents and images. But, lists aren’t a simple list of data. Lists can also take the form of calendars, contacts, announcements, links, surveys and more. You can even integrate lists with Microsoft Flow, Microsoft Power Apps and Power Automate.
If the data is already in Excel, you might be wondering why you might use a SharePoint list instead of sharing the Excel workbook. It’s a valid question, and here are a few things to consider when choosing between the two:
- A SharePoint list can act as a main list with the most up-to-date data. Even though you can share an Excel file, users may save it locally and reference it instead of the online version. Who’s keeping up with the different versions? That’s not a problem if everyone’s interacting with a SharePoint list instead.
- Even though you can protect parts of an Excel file, it’s still too easy for someone to get off track and change or even delete important data. In contrast, a SharePoint list contains only the relevant data, so there’s no confusion.
- You can set permissions and implement data validation to protect the data in SharePoint, which ensures the integrity of your data. These options are available in Excel, but they’ll be in addition to the workbook’s purpose. With a SharePoint list, the list is its own purpose. There’s nothing else to distract you. In addition, SharePoint lists support version history. This may or may not be enabled locally for your Excel file.
- SharePoint lists support multiple view types for the data, which you can’t easily duplicate in an Excel file.
A SharePoint list is a great way to manage data when lots of people view and edit that data regularly. Now, let’s create a SharePoint list using Excel data.
How to create a SharePoint list using Excel
Once you’ve made the decision to share Excel data as a SharePoint list, you must format the data as an Excel Table. To format the data as a table, click anywhere inside the dataset and press Ctrl + T, or choose Table from the Tables group on the Insert tab. When Excel prompts you to confirm the conversion, note the header question, and then, click OK.
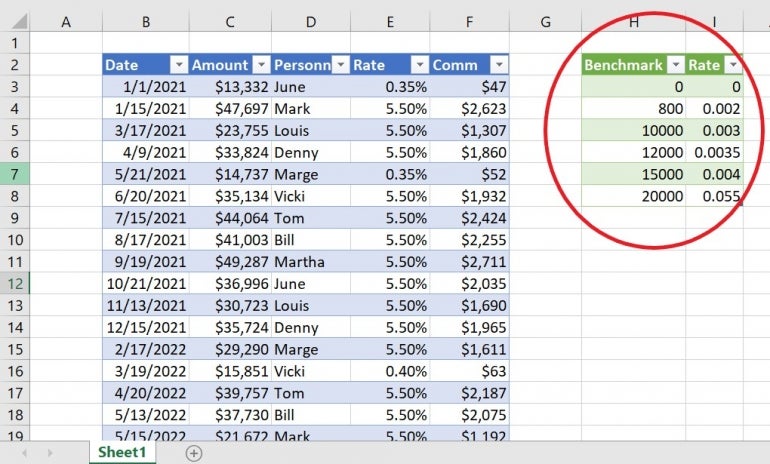
Figure A shows two table objects in the same Excel sheet. We want to create a SharePoint list of the rate table in H2:I8 because a couple of managers refer to these rates regularly. They also have permission to change them, but they all need the most up-to-date rates. This is a good example for using a SharePoint list. It’s okay for managers and even employees to see the rate table. It’s altogether another thing for those same people to see the actual sales and commission values for everyone in the organization.
Figure A
Now you’re ready to start the export:
Click inside the rate table, and in the contextual Table Design tab, click Export in the External Data Table group.
Choose Export Table To SharePoint list from the dropdown. If you’re not currently signed into your Microsoft account, the wizard will prompt you to do so at some point.
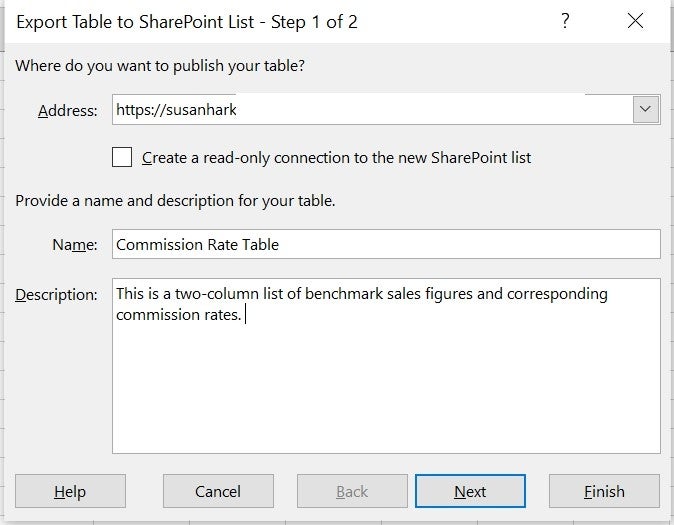
In the resulting dialog, enter the SharePoint site address. Enter the entire link, even if it’s enormously long. To find the URL, sign into your Microsoft account, and choose SharePoint from the list of apps. Then, choose the site where you plan to create the list, and copy the URL from the browser to the dialog.
Name the list and add a meaningful description (Figure B). Then, click Next.
Figure B
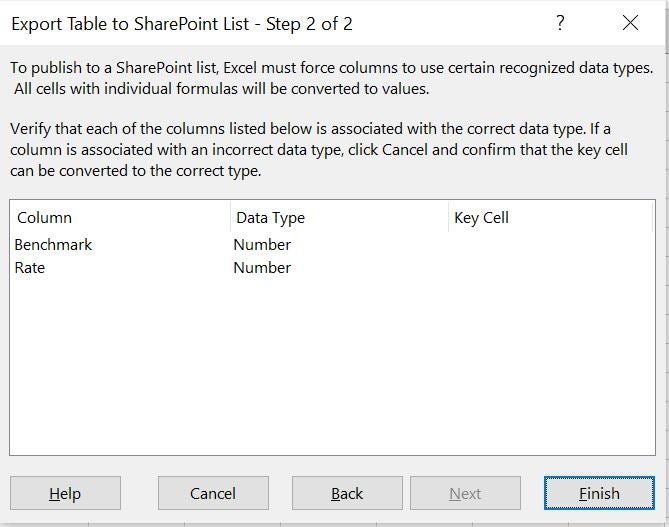
Confirm that the wizard correctly assigns the right data type to each column (Figure C), and click Finish.
Figure C
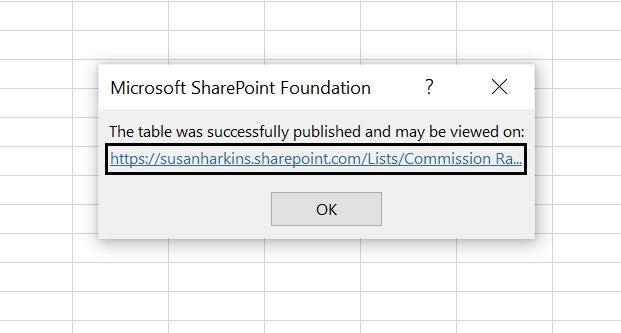
Click the link in the confirmation message shown in Figure D to access the new list. It’s a good idea to bookmark this page.
Figure D
As you can see in Figure E, the SharePoint list contains the same rate records as the Excel workbook. At this point, you can edit the new list if necessary. To share it, click the Share link in the top-right corner. You can enter individuals or groups.
Figure E
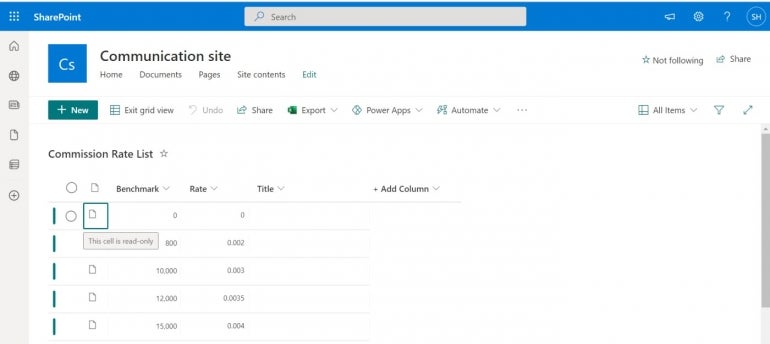
You will have full access to the data and the structure. Those you share the list with can view and edit the data. But, they can’t edit permissions or list structure.
If you’ve used Microsoft Lists, you can see how much easier the SharePoint list is to create. The wizard does everything whereas Microsoft Lists, because of the increased social interaction functionality, requires more work on your part.
Be prepared to be hooked on SharePoint lists. They’re easy to implement and provide a great deal of useful flexibility to others in your organization.
Stay tuned
The one thing missing in this scenario is a live link between the SharePoint list and the original Excel workbook. As is, someone can change the list, and that change will not update the original data. In a future article, I’ll show you how to update the original data.


