


This article is also available as a TechRepublic download.
Wireless
networks are a two-edged sword. WLANs empower employees
and guests, but they also introduce security risks.
While
a wide variety of wireless strategies and devices are implemented, one very
common solution involves deploying SonicWALL
wireless-equipped firewalls. Here’s what you need to know to configure SonicWALL wireless equipment. In
these examples, we’ll use a SonicWALL TZ 170 SP
Wireless model, one of the most frequently encountered
wireless routers in the field, although the steps will also work on other SonicWALL TZ wireless devices.
SonicWALL TZ wireless routers
SonicWALL’s TZ wireless-equipped routers include several features not
found on the non-wireless counterparts. In addition to protecting LANs with
wireless intrusion detection services, which help monitor unauthorized access
and the presence of rogue access points, a separate firewall exists for
securing and separating wireless traffic from the wired LAN.
IPSec encryption and WPA team together to secure wireless communications between
clients and the access point. Guest services can be configured, if desired, as
can HotSpot messaging. Yet another feature SonicWALL wireless-equipped routers possess is distributed
WLAN support for SonicPoint satellite access points.
SonicWALL wireless routers support both the 802.11b and 802.11g
standards. In most installations the SonicWALL device
serves as the access point for the network’s wireless clients. A traditional
UTP cable typically connects the router to the rest of the network.
To
help prevent unauthorized network access, wireless clients must be
authenticated by the SonicWALL’s User Level
Authentication. The devices also support a variety of security protocols,
including WEP, WPA and WPA-EAP.
Selecting the access point location
Selecting
a location for the wireless access point is the first step in configuring a
wireless network. SonicWALL lists several
recommendations for optimizing wireless performance:
- Place the wireless access point as close to the
network’s center as possible. Doing so helps reduce wireless signals from
persisting beyond the intended location. - Place the wireless access point in such a manner that
minimizes the number of walls and ceilings the wireless communications
must travel from the access point to intended client systems. - Attempt to locate wireless devices within each unit’s
line of site. - Wireless performance degrades whenever wireless access
points are located near large solid obstructions such as walls, filing
cabinets, elevator shafts, fire doors, large machinery and similar
objects, so avoid place access points in locations where its wireless
signals must penetrate such elements whenever possible. Even smaller
metallic objects, such as PC and server cases, monitors and other
equipment, can negatively impact wireless communications. - If building or remodeling a site, remember that metal
framing materials, UV window films, concrete and metallic-based paints all
reduce the access point’s effective operating range. - Locate access points in higher locations (in which
radio signals can avoid filing cabinets, desks, PCs and other low-lying
equipment) to help improve wireless performance. - Avoid placing access points and client systems near
microwave ovens, television monitors, radios, and other electrical
equipment that produces interference that degrades WLAN performance.
Once a
proper location is selected, the next step is to configure the router’s
wireless settings.
Configuring wireless settings
As
with other networking services, SonicWALL includes a
wizard to simplify wireless network deployment. To configure a SonicWALL wireless router using the supplied wizard:
- Log on to the SonicWALL
device as an administrator. - Select the Wireless button from the left toolbar.
- Click the Wireless Wizard button that appears at the
top right of the Wireless Status menu. - The SonicWALL Wireless
Configuration Wizard appears. Click Next to continue. - The WLAN Network Settings configuration screen
displays. Ensure the Enable WLAN box is checked to enable the wireless
LAN. Enter the IP address you wish to use for the WLAN interface and
supply the corresponding subnet mask. The default SonicWALL
WLAN IP is 172.16.31.1. (Figure A)
|
Figure A |
 |
| Ensure the Enable WLAN checkbox is selected and enter the IP address and subnet mask you wish for the access point to use. |
- Ensure the Enable Windows Networking Support between
LAN and WLAN box is checked to provide wireless clients with access to LAN
systems. - The WLAN 802.11b/g Settings menu appears. Specify the
SSID (the default is sonicwall), specify the
radio mode (802.11g only is the default) and supply a country code and
channel settings (defaults are US and AutoChannel).
Then, click Next. - The WLAN Security Settings menu appears. By default, SonicWALL’s wizard will deploy WiFiSec
VPN Security. Leave the option selected to implement a secure wireless
connection that leverages IPSec to complete wireless connections using the
SonicWALL Global VPN Client. Other options are
WEP + Stealth Mode and simple unencrypted connectivity. To ensure a more
secure connection, select WiFiSec VPN Security
and click Next. - With WiFiSec VPN selected,
the next step prompts you to specify a user name and password for an
account possessing Group VPN permission to join the network. Supply the
user name and password and click Next. - The Wireless Guest Services screen appears. If you wish
to enable guest services, ensure the option is selected and enter the
account name, password, account lifetime and session lifetime values, any
comments and click Next. - A configuration summary screen appears listing the
settings that will be implemented. Review the configuration information
carefully and, once you’ve confirmed all is proper, click the Apply
button. - The SonicWALL wizard will
apply the changes. Upon finishing, the wizard will display a
congratulatory screen. Click Finish to complete the wizard.
Editing the wireless configuration
Once
the wizard completes, you can review the wireless settings by logging on to the
router and clicking the Wireless button. The Status menu will display by
default. It reveals whether the WLAN and WiFiSec
security are enabled, displays channel information and critical IP address
data, among other items. (Figure B)
|
Figure B |
 |
| SonicWALL’s Wireless Status menu displays critical WLAN configuration information. |
To
edit or update the WLAN configuration:
- Log on to the SonicWALL
device as an administrator. - Click the Wireless button from the left navigation bar.
- Click Settings from the sub-navigation menu.
- Enter any required configuration changes. Among the
options you can edit from the Wireless | Settings menu are the device’s
role, the SSID, the radio channels used, the WLAN IP address and more.
Administrators also can disable the WLAN from this screen by removing the
checkbox from the Enable WLAN box. - Once edits and updates are complete, click the Apply
button to save the changes.
The
device’s WEP/WPA configuration, meanwhile, is administered using the WEP/WPA
Encryption menu. Select the menu from the left navigation bar to change the
authentication type, WEP key mode and change the default key.
From
the SonicWALL’sAdvanced
menu, reached by clicking Advanced from the Wireless sub-navigation menu,
administrators can disable SSID broadcasts, limit the number of maximum client
associations the access point can possess and set the unit’s transmission
strength, among other options. The Restore Default Settings button, found at
the bottom of this menu, supports returning the unit’s wireless settings to
factory presets.
Configuring MAC address filtering
To
introduce additional security, many administrators enable MAC filtering. For SonicWALL TZ
wireless devices you configure MAC filtering by:
- Logging on to the SonicWALL
router as an administrator. - Click the Wireless button.
- Click the MAC Filter List option from the left
navigation bar. - Ensure the Enable MAC Filter List checkbox is selected.
(Figure C)
|
Figure C |
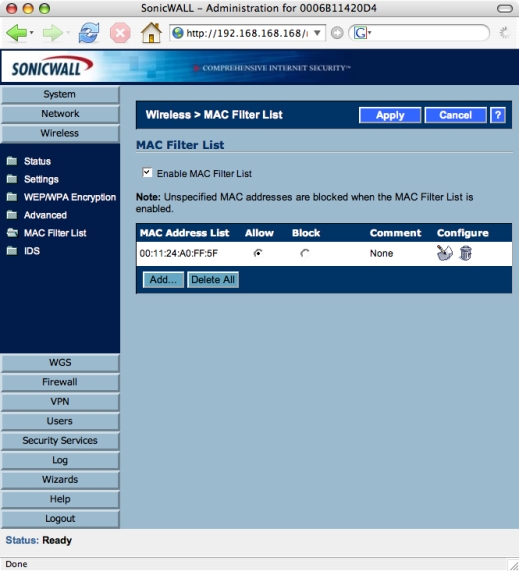 |
| Ensure the Enable MAC Filter List option is checked, and be sure to add authorized systems’ MAC addresses using the provided Add button. Alternatively, you can also block specific MAC addresses using the Block radio button. |
- Click Add and supply the MAC address for the system you
wish to provide with access to the WLAN. Once you add the MAC address,
it’ll appear within the MAC Filter List. - Confirm the MAC addresses are properly set to Allow or
Block those systems connecting to the wireless network. - Click the Apply button to store any changes you make.
Once
the WLAN is configured, administrators should leverage the SonicWALL’s
intrusion detection capabilities to monitor and protect the wireless network.
Configuring intrusion detection
Unlike
lower-end devices, SonicWALL wireless-equipped
routers can monitor intrusion attempts and even take steps to respond
appropriately when unauthorized traffic is detected. To configure Wireless
Intrusion Detection:
- Log on to the SonicWALL as an
administrator. - Click the Wireless button from the left navigation
menu. - Click IDS from the sub-menu.
- Ensure the Enable Client Null Probing Detection, Enable
Association Flood Detection and Enable Rogue Access Point detection
checkboxes are selected. - Supply the MAC addresses for any other authorized
access points using the provided Add button. - Click the Apply button to save any changes you make. (Figure D)
|
Figure D |
 |
| Wireless Intrusion Detection enables SonicWALL routers to identify, log and dynamically respond to unauthorized wireless traffic. |
The
Enable Client Null Probing feature allows the SonicWALL
device to detect and log Null Probes, such as those triggered by Netstumbler and other programs.
Associate
Flood Detection, meanwhile, monitors for wireless denial of service attacks
that attempt to overwhelm an access point with bogus traffic. Selecting the
Block Station’s MAC Address In Response To An
Association Flood allows the SonicWALL to defend
itself by logging such attacks and dynamically adding the MAC address of the
offending system to its blocked list.
Rogue
Access Point Detection works by scanning for other access points. If other
access points are identified, they’re considered rogue unless they’re
specifically added as authorized access points.
To
enable detection logs, click Log | Categories and check the WLAN IDS box found
within the Log Categories and Alerts section. The subsequent logs should then
be reviewed periodically to ensure unauthorized access attempts are not
succeeding.