


So you’re new to MySQL database administration. You’ve probably already installed MySQL (or MariaDB) and know how to log into your database prompt for work. You’re looking to use the MySQL database for your web-based tool, but can’t connect that tool to an empty database.
Networking: Must-read coverage
- Gartner releases 4 trends that will impact cloud, data centers and infrastructure in 2023
- Support for these Microsoft enterprise products ends in 2023
- Dell Technologies World 2023: Q&A on how Dell sees security at the edge
- Best VPNs for small business in 2023
The MySQL command line can be a bit daunting at first, but once you get the hang of it, it’ll become second nature.
SEE: Server deployment/migration checklist (Tech Pro Research)
I want to walk you through the following:
- Creating a database
- Creating a user
- Granting the new user access to the database
- Creating a table on the database
- Adding data to the table
It might sound like a lot, but it’s not. In fact, it’s actually quite simple. Let’s get to work. I’ll work with MySQL on Ubuntu Server 18.04.
Creating a database
The first thing to do is to create a database. I’m going to demonstrate by creating a database called TECHREPUBLIC. First gain access to the MySQL prompt with the command:
sudo mysql
Once you’re on the MySQL prompt, create the new database with the command:
create database TECHREPUBLIC;
Create a USER
Now we’re going to create a new user (named tr) and give that user permission to the new database. This is done with the command:
CREATE USER 'tr'@'localhost' identified by 'PASSWORD';
where PASSWORD is a strong password.
Next, we give tr permission to use the TECHREPUBLIC database with the command:
GRANT ALL PRIVILEGES ON TECHREPUBLIC.* TO 'tr'@'localhost' identified by 'PASSWORD';
where PASSWORD is the password created for the user in the previous command.
Now we need to change to that database with the command:
USE TECHREPUBLIC;
Create a table
Let’s create a table called MEMBERS2 with three columns:
- firstname
- lastname
The command for this will be:
CREATE TABLE IF NOT EXISTS MEMBERS2 ( task_id INT AUTO_INCREMENT, firstname VARCHAR(50), lastname VARCHAR(50), email VARCHAR(50), PRIMARY KEY (task_id) );
Add Data to the Table
Now we’ll add the following data to the MEMBERS2 table:
- Jack
- Wallen
- jack@email.org
This is done with the following command:
INSERT INTO MEMBERS2(firstname,lastname,email) VALUES ('jack','wallen','jlwallen@monkeypantz.net');
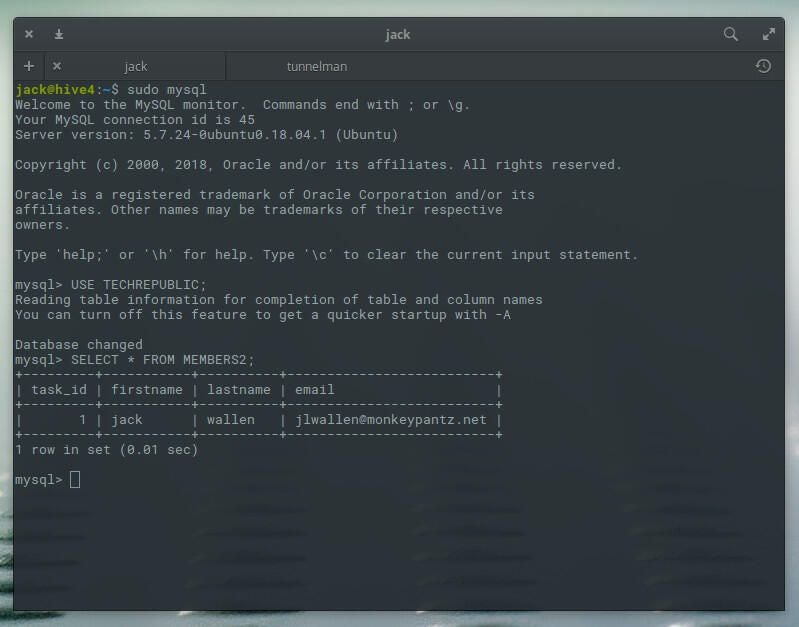
We can now view the inserted data with the command:
SELECT * FROM MEMBERS2;
You should see the data listed (Figure A).
Figure A
Continue adding data to the table in the same fashion.
And that’s all there is to creating a table and inserting data into it on MySQL. Once you have all the data necessary, your database is ready for usage by your web-based tool. Just remember to connect the tool using the MySQL we created earlier, and you’re good to go.