


Image: Docker
Docker Compose is a tool for defining and running multi-container Docker applications. In other words, if you have a need to define a service that requires more than one Docker container to function, Docker Compose might be the tool for you.
More about data centers
- Stargate Norway: OpenAI’s First AI Data Center in Europe
- AI Data Centers’ Soaring Energy Use: Who Pays for Higher Utilities Costs?
- China’s Submerged AI Data Center Could ‘Influence Global Sustainable Computing’
- Google to Power Data Centers With Nuclear Energy by 2030 in First-Of-A-Kind’ Agreement
But how do you use Docker Compose? Once you’ve installed both it and the Docker daemon, how do you deploy those containerized applications? Docker Compose depends on the docker-compose.yml file (which can, in turn, work in conjunction with the tried-and-true Dockerfile).
I’m going to break this down for you, in simplest terms, so you understand how to build your own basic Docker Compose file.
SEE: Hiring kit: Database administrator (TechRepublic Premium)
What you need
The only things you’ll need are:
- A server with a running instance of Docker and docker-compose.
- A user that belongs to the docker group.
How Docker Compose works
To put it simply: Docker Compose builds a stack of applications to run a complete service. The docker-compose.yml file is broken into sections, each section represents a single container which, when combined with the other containers, create the service. For example, you could have a docker-compose.yml file that consists of two sections:
- web – the web server portion of the application.
- db – the database server portion of the application.
Each section can be comprised of different components. And because you might need to get quite specific with the web section, you could instruct docker-compose that the web portion will be defined in the Dockerfile (we’ll hold that off for another how-to). In fact, with docker-compose, you can include multiple Dockerfiles to build very complex stacks. However, we’re going to build a rather simple stack to easily get you off the ground.
So, let’s create this docker-compose.yml file with the web and db sections. We’ll use NGINX and MySQL to create a stack that is easily used for development purposes.
The docker-compose.yml file
The first thing we must do is create a new file. We’ll create that file within a newly created directory. Issue the command mkdir ~/docker-build. Change into that newly created directory with the command cd ~/docker-build. Once inside that directory, create the new docker-compose.yml file with the command:
nano docker-compose.yml
Remember, this is a YAML file, so the formatting must be consistent (otherwise the build will fail).
The first thing to do is add the header of the file. At the top of the file, add the following:
version: '3'
This instructs Docker Compose that we’re using version 3 of the tool. The next line will instruct Docker Compose that what follows will be the services to deploy. That is defined with:
services:
So far, the file is:
version : '3'

services:
Our first section to define will be the web portion of the stack. We can do this with two simple lines:
web:

image: nginx
What the above does is instruct Docker Compose to deploy a container using the official nginx image. We’re not doing anything special for this container. It’s just basic.
Our next section will define the database. This one gets a bit more complicated, as we must configure the necessary parameters for the database to function. We begin by defining the section with;
db:
Next, we instruct Docker Compose to use the mysql image for the database with:
image:mysql
Now we define both the external and internal ports to use for the database. For this we’ll make use of the default MySQL ports and define them like so:
ports:

- "3306:3306"
Finally, we configure the database environment. The environment will be the configuration options for the database (passwords, users, database name). This section looks like:
environment:

- MYSQL_ROOT_PASSWORD=password1

- MYSQL_USER=user

- MYSQL_PASSWORD=password2

- MYSQL_DATABASE=database
Where:
- password1 is the password for the MySQL admin user.
- user is a new MySQL user.
- password2 is the password for the new MySQL user.
- database is the name of the database to be used.
Each of the above will be defined by you. Make sure to use strong, unique passwords, so to keep your stack safe.
Putting this file together looks like so:
version: '3'

services:

web:

image: nginx

db:

image: mysql

ports:

- "3306:3306"

environment:

- MYSQL_ROOT_PASSWORD=password

- MYSQL_USER=user

- MYSQL_PASSWORD=password

- MYSQL_DATABASE=demodb
Remember, the structure of the file must be consistent, so indent carefully.
Save and close that file.
Building with Docker Compose
Now that we have our docker-compose.yml file constructed, it’s time to build the application. As this is a very simple application, it will basically deploy two containers — the web server and the database. How you use those two containers depends on you. You could, of course, develop your own images to use for this (say, custom NGINX and MySQL images that seamlessly work together to create a unique service or app). In our case, we’re simply using the default images (for the sake of demonstration).
So now, to build the stack, go back to the terminal window, make sure you’re in your build directory, and issue the command:
docker-compose up
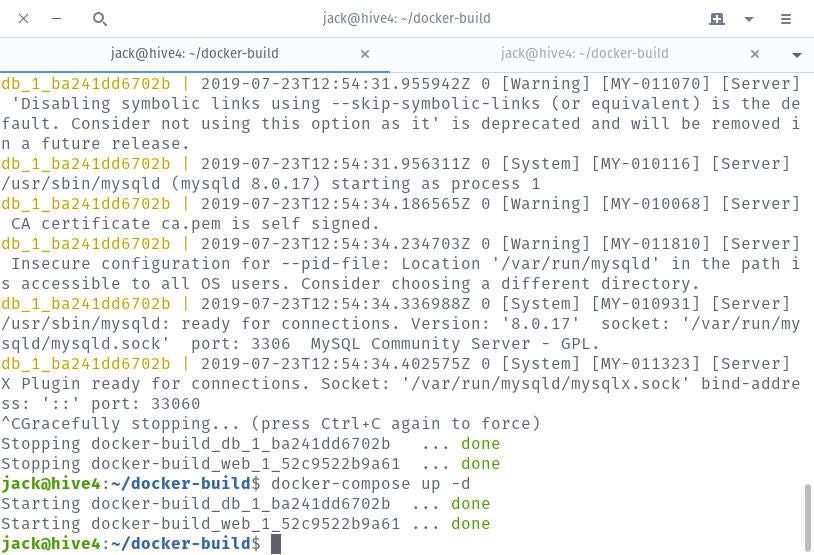
The above command will deploy both the web and db containers. If you only run that command, the containers will deploy in attached mode, so you won’t get your bash prompt returned. If you want to run them in detached mode, you’d issue the command:
docker-compose up -d
Once the run completes, you’ll see the container IDs listed (Figure A).
To make sure the containers are running, issue the command:
docker-compose ps
You will see the name of the container, the command, the state, and the ports listed (Figure B).

Congratulations, you just deployed your first container “stack” using Docker Compose. Yes, this is an incredibly simple example, but it’s one that should get you started on a very long and fulfilling journey. Next time around, we’ll create a more complicated docker-compose.yml file, one that works in conjunction with a Dockerfile.