


Redbooth might not be the first name on your tongue when you think of project management, but if you’re looking for a web-based workplace collaboration and communication platform, it’s one to definitely consider.
The moment you log into Redbooth, you’ll find it’s different from other project management tools. That’s because the focus of Redbooth is communication. That doesn’t mean it doesn’t include some of the tools with which you’re already familiar. For example, Redbooth allows you to create multiple workspaces to house your work.
SEE: Hiring kit: Project manager (TechRepublic Premium)
When you first sign up for Redbooth, you’ll find a pre-configured workspace, named Discover Redbooth (Figure A) that serves as a board to help you get up to speed with the platform.
Figure A
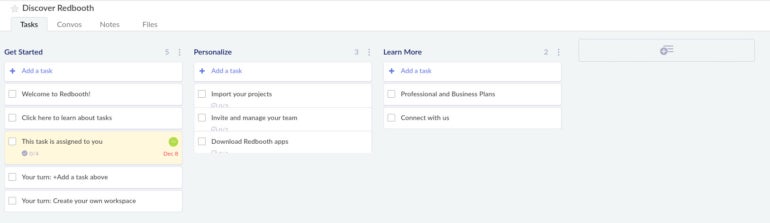
You can click through all of the items on this board to help you learn a bit about Redbooth.
You’ll quickly discover Discover Redbooth is the only Workspace you are given by default. That means you must create a new Workspace to house your actual work. Let me show you how this is done.
What you’ll need to create a Workspace in Redbooth
In order to successfully create a new Workspace in Redbooth, the only two things you’ll need are a valid Redbooth account and a web browser. You can use either a free or paid Redbooth plan, as the Workspaces features are a part of both.
How to create your first Redbooth workspace
Log in to your Redbooth account. Once logged in, click the Workspaces tab. Then, from the drop-down, click Add A Workspace (Figure B).
Figure B

In the resulting pop-up (Figure C), give the new Workspace a name, select an option color, set the Privacy to either Open or Invite Only, select a Template and click Create.
Figure C
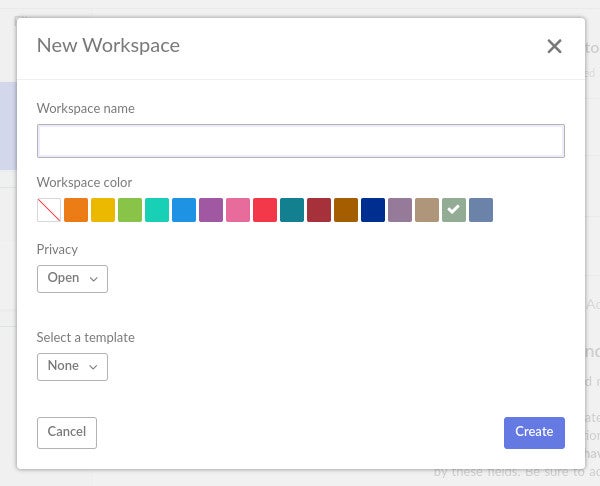
Click the Template drop-down and either search or scroll to select the one you want. Most of the templates are pretty specific: Options include Visual Design Process, Ongoing Client Care, Client End-of-Project, Client Intake, Plan An Event, Back To School, Event Planning and Get In Shape.
You will find plenty of project management-specific templates in the Redbooth template library, and you can always create a board based on a board you’ve already created. When you click the Template drop-down, you should see listed the Workspaces you already have (Figure D).
Figure D

Select the previously-created Workspace you want to use to serve as the template for the new Workspace and click Create.
Workspaces made easy
Starting out on the right foot with a well-designed Workspace makes using Redbooth a no-brainer. Once you’ve created your Workspace, you can then start filling it with all of the details, items and team members you need. Who knows — you might find Redbooth to be just the platform you’ve been looking for to empower your teams for an improved workflow.
Subscribe to TechRepublic’s How To Make Tech Work on YouTube for all the latest tech advice for business pros from Jack Wallen.