


Illustration: Andy Wolber/TechRepublic
Cloud: Must-read coverage
- CrowdStrike Outage Disrupts Microsoft Systems Worldwide
- Quick Glossary: Cloud Platform Services
- Achieving Cost Efficiency in Cloud Storage: The Role of Western Digital’s Hard Drive Portfolio
- Still Not Backing Up Microsoft 365 Data? Here’s Why That’s a Risky Move
- Verito vs. Rightworks: Which IT Provider Is Best for Your Firm?
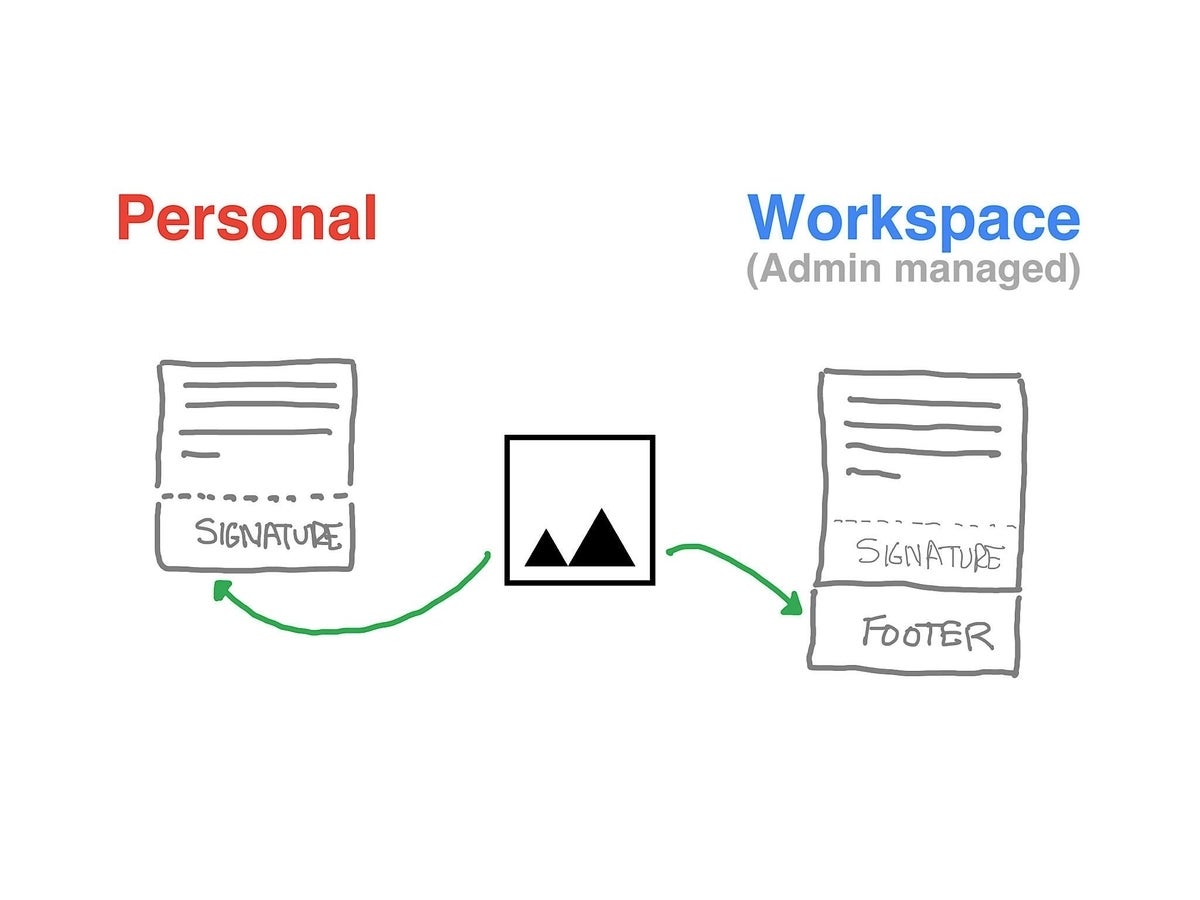
People place all sorts of images in email signatures. In organizations, the inserted image is typically a logo, an ad or a promotional image. Sometimes it’s a photo or stylized image of the sender. Images in personal email signatures often signal something about the person or the person’s interests.
SEE: Research: Video conferencing tools and cloud-based solutions dominate digital workspaces; VPN and VDI less popular with SMBs (TechRepublic Premium)
If you use Gmail, you may upload an image or insert an image from the web or Google Drive into your signature. And if you use Gmail as part of Google Workspace, an administrator can configure a signature—including an image—that appends to all outgoing email, as well. But any image an administrator includes must be available at a public web link, so the steps below describe how to get your image onto a Google Site in order to obtain a public link.
But before you add any image into your signature, let me add a note of caution. In general, I recommend people keep email signatures text-only. Text is much more accessible to people with low or no vision than an image in a signature. Also, text uses far less bandwidth than an image. (Make sure to resize and/or compress your image to appropriate dimensions and quality.) That said, there are many times when an image in a Gmail signature may be merited.
How to add an image in a personal Gmail account signature
To add, edit or manage signatures in a personal Gmail account:
- Go to Gmail in a desktop-class web browser.
- If needed, sign in to your Gmail account.
- In the upper right area, select the Sprocket (settings) | See All Settings | General (from the menu options listed across the top).
- Scroll down to the Signature section.
- Either choose the “+ Create New” button or select an existing signature.
- In the signature area to the right, enter and format any text or links you want in your signature.
- Select the Insert image option (Figure A), then navigate to the image you want.
- When finished, scroll to the bottom of the page and select the Save Changes button.
Figure A

Google Workspace admins: How to add an image in an appended Gmail footer
A Google Workspace administrator may manage email footers that append to every outbound email for an organization. In the Admin console, the important settings are at App | Google Workspace | Gmail | Compliance, select an organization (or organizational unit) from the left (if needed), then scroll to Append Footer and choose Configure (Figure B). To learn how outbound footers work in Google Workspace, read my article, How to set a Gmail signature for your organization.
Figure B
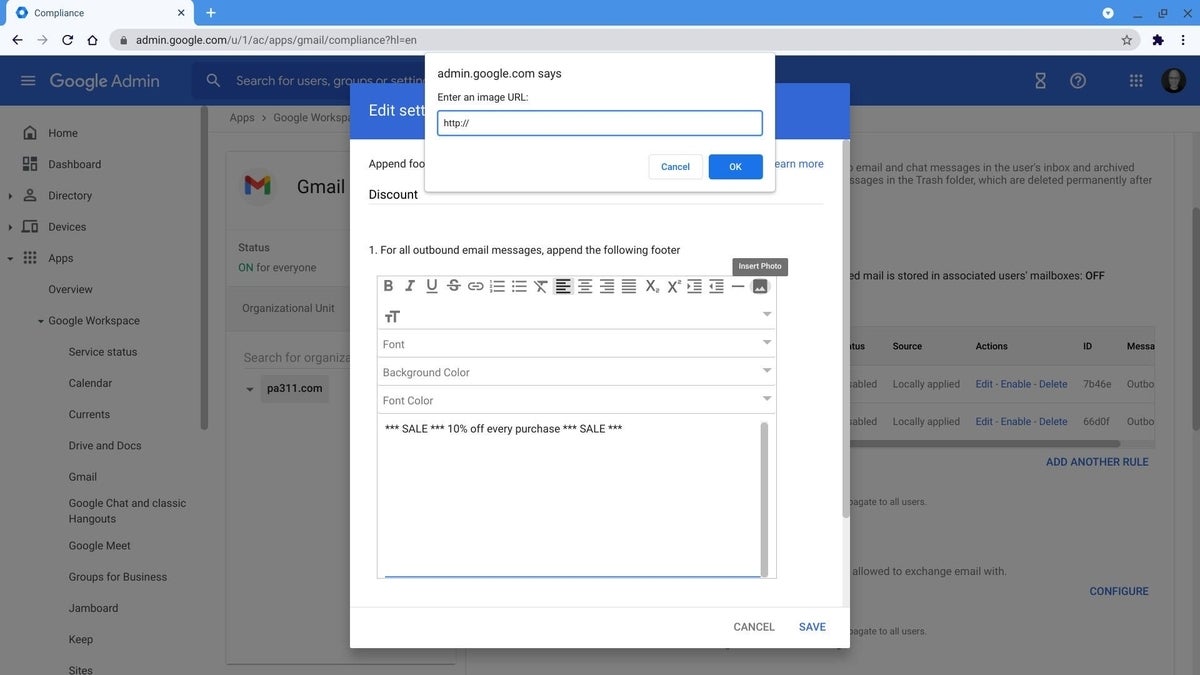
But if you try to insert an image stored on Google Drive into an outbound footer, it won’t work. You may only add an image with a public link into admin-managed appended footers (Figure B). A publicly shared image stored on Google Drive won’t work.
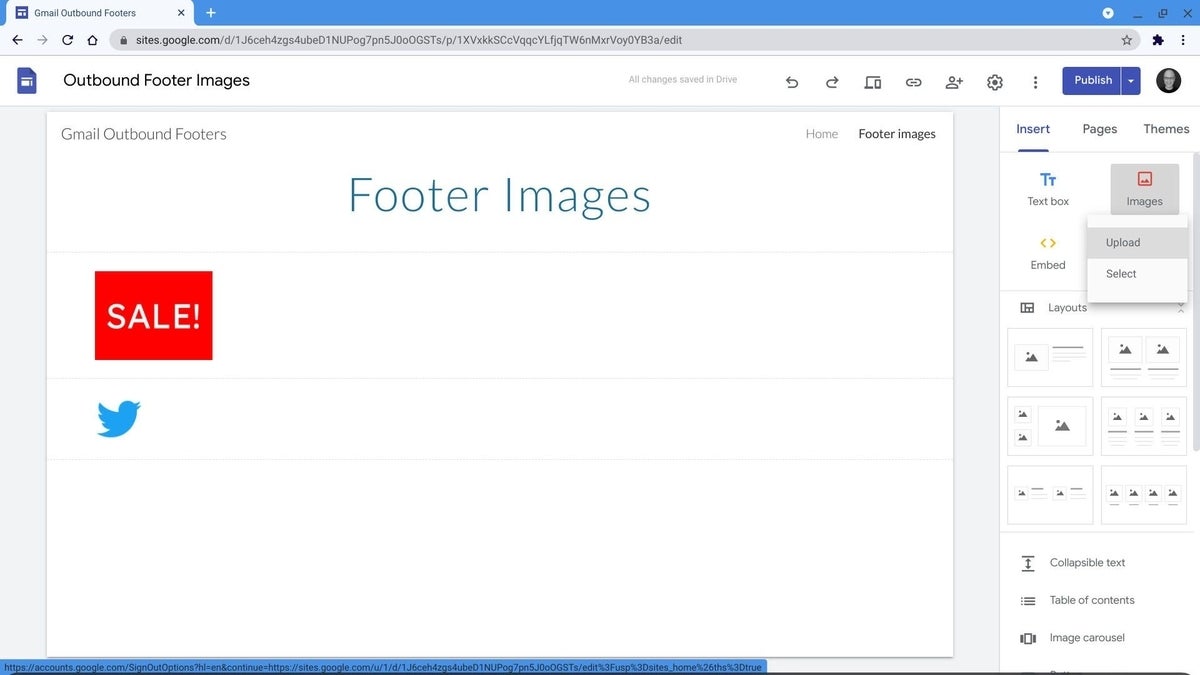
I suggest you create and maintain a Google Site where you add images, since any image stored on a Google Site page may be used in outbound footers—as long as the Site is published and public. Those last two criteria are important: The image insertion into the footer won’t work on sites that aren’t public or aren’t published yet.
To create a new Google Site dedicated to your outbound images, you might:
-
- Type site.new in a desktop-class browser.
- Edit the title for your site (e.g., Promotional Footer Images).
- Then select Insert | Images to either Upload or Select images to your site (Figure C). Alternatively, you might select Insert | Drive and then choose images stored on Google Drive to add to your Site.
Figure C
-
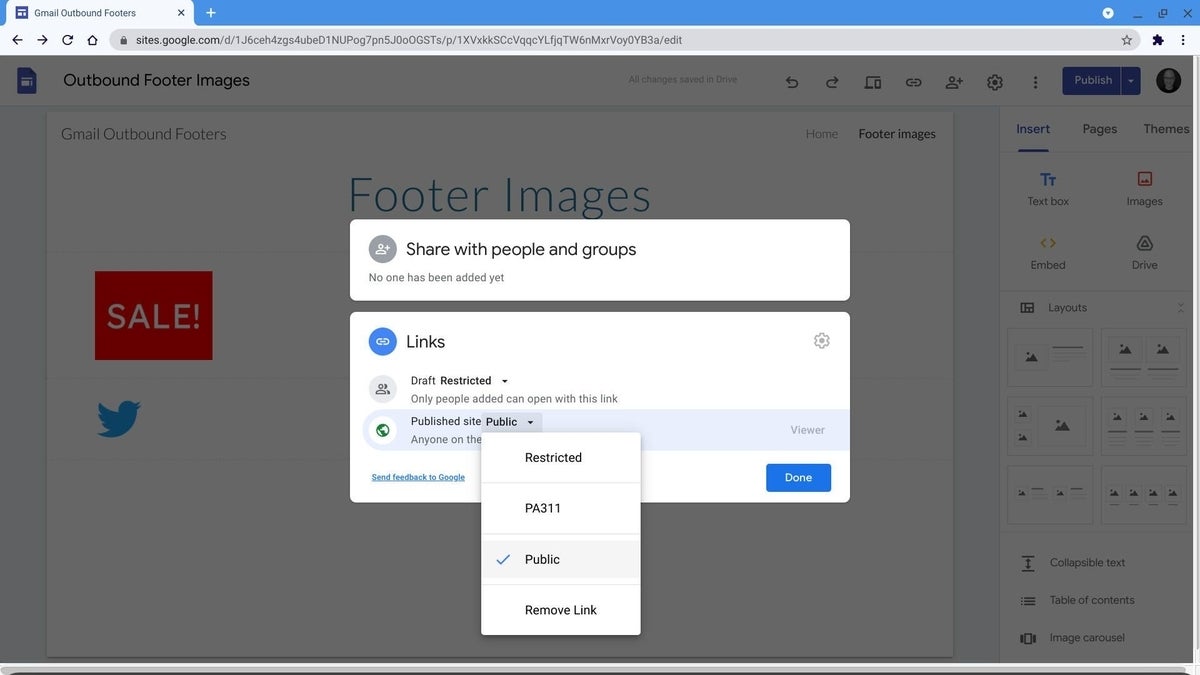
- Select Publish, then edit the web address for your site (e.g., Footers).
- Under Who Can View My Site, select Manage. Then, under Links, select Change.
- Next to the Published site option, select the drop-down and choose Public (Figure D), then select Done.
Figure D
-
- Select Done again. The box should now display Anyone under Who Can View My Site. Select Publish.
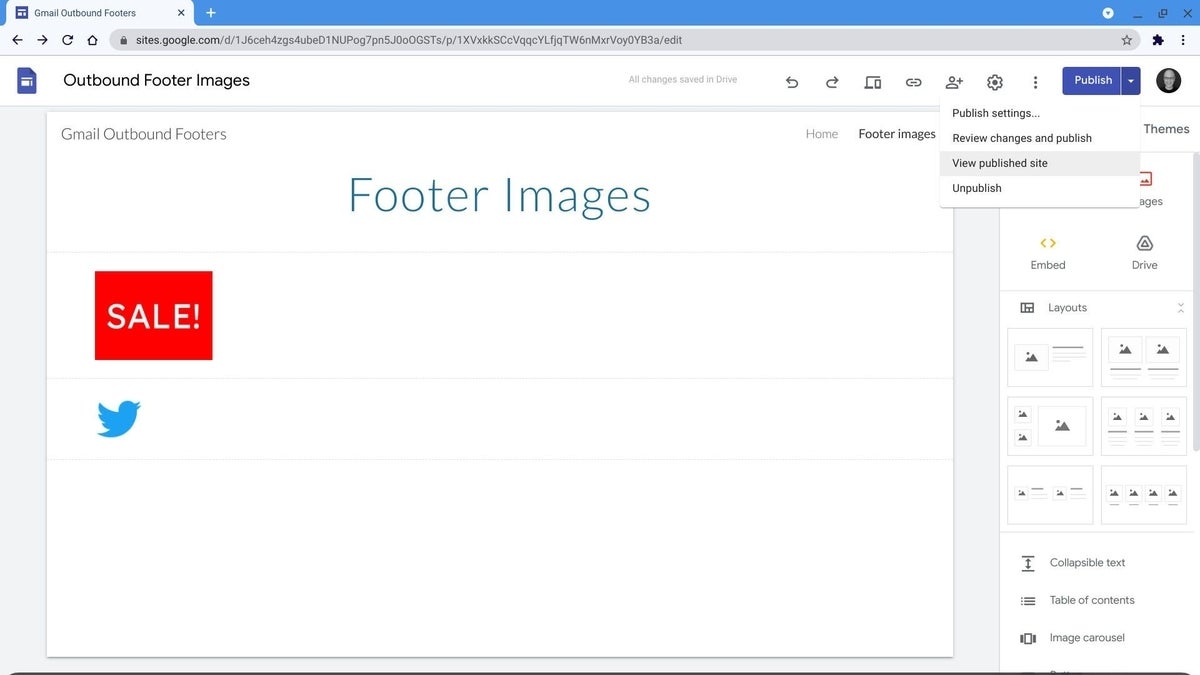
- Next, select the drop-down to the right of Publish, then choose View Published Site (Figure E). This should open the site in a new browser tab. Switch to that tab.
Figure E
- On your site, right-click on the image you want to insert into your outbound footer, then select Copy Image Address (Figure F).
Figure F

You now have the public link you need to paste into the prompt after you select the image icon in the Append Footer section of the Admin console. As an editor of the site, you can always return to the site and copy the link to the published page. Share the link with others, and they’ll be able to access the page.
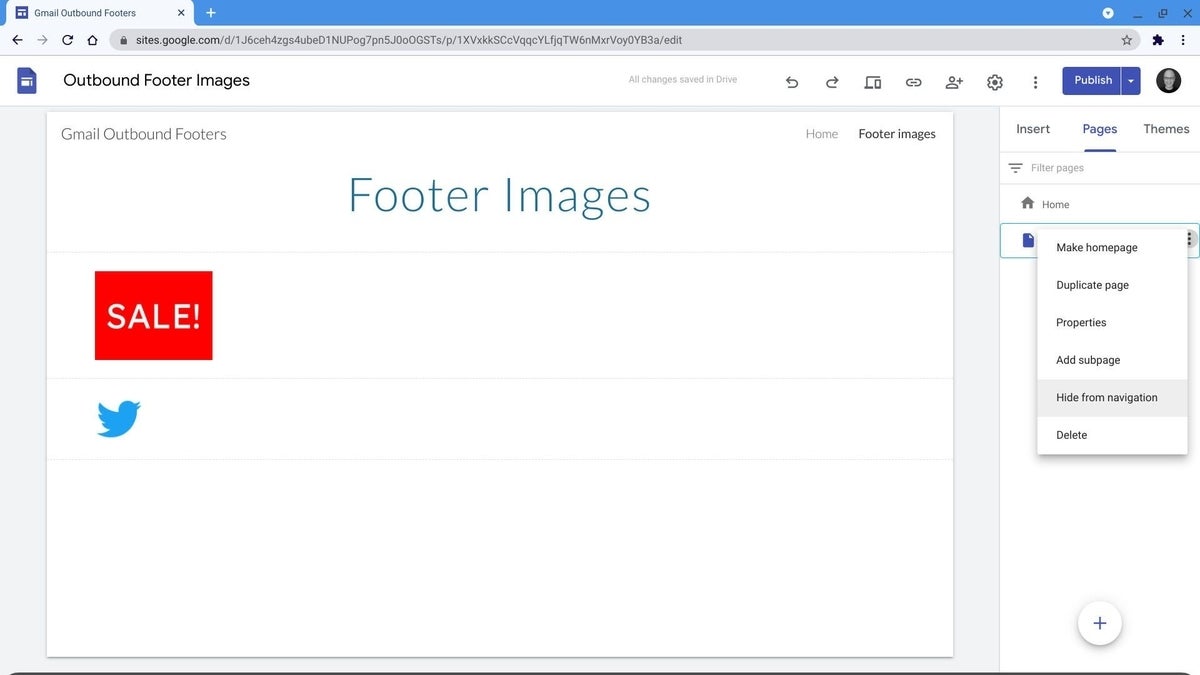
Optionally, you can take steps to make the footer page a bit less easy to find. To do this, make sure you have at least two pages on your Google Site, and that your images are not on the Home page of the site. Then, while editing your Site, select Pages, then click on the three vertical dots to the right of your Footer page name. Choose Hide from navigation (Figure G), which will remove the page from Google Site navigation menus. Since the page is omitted from the menu structure, it won’t be available for a casual site visitor to access.
Figure G
How do you use images in Gmail signatures?
Do you include standard information, such as contact or company information, in your signatures? Or do you personalize your signature with favorite images, phrases or quotes? Or do you “go minimalist” and omit the use of signatures entirely? Let me know how you use—or don’t use—images in Gmail signatures, either with a comment below or on Twitter (@awolber).