


Moving text around in a small document is easy and quite common. Whether you’re writing a business letter or the great American novel, you’ll find it easy to move small amounts of data from one area to another using cut and paste. However, when moving large chunks of content, such as entire paragraphs or sections, there are easier ways than with cut and paste. In this article, I’ll show you four simple methods for moving chunks of content from one area to another.
SEE: Software Installation Policy (TechRepublic Premium)
More about Software
- Software Installation Policy
- Five Methods to Insert a Checkmark Into Microsoft Office Products
- How to Hide and Handle Zero Values in an Excel Chart
- How to Use Section Breaks to Control Formatting in Word
I’m using Microsoft 365 on a Windows 10 64-bit system, but you can use an earlier version. For your convenience, you can download the demonstration .docx and .doc files, although not all four methods are supported by the .doc format. Word for the web doesn’t currently support any of these methods. Most of these methods rely on built-in headings — a great reason to use styles.
How to move paragraphs using arrow keys in Word
Whether you’re moving a paragraph or an entire section, you can do so quickly using a keyboard shortcut: Shift + Alt + Up/Down. When moving a paragraph, this keystroke will move the selected paragraph by paragraphs. Let’s look at a quick example; suppose you want to move the video paragraph shown in Figure A to the end of the section. To accomplish this, do the following:
-
- Select the paragraph.
- Hold down the Shift + Alt keys and press Down Arrow as many times as necessary to reach the bottom of the section. In the demonstration document, that’s 11 times.
Figure A
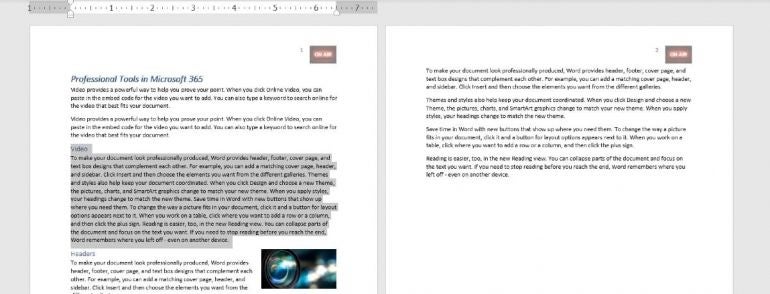
Figure B shows the paragraph in its new position, at the end of the document. Use the Up Arrow key to move a selection up by paragraphs.
Figure B

That was easy, but if your Word version uses collapsible headers, there’s an even easier way.
How to move paragraphs using collapsible headers in Word
Word’s collapsible headers were added to Word 2013, so they’ve been around for a while. If you’re not familiar with this feature, you might want to read How to use Word 2013’s collapsible headings later. For now, let’s use this feature to quickly move an entire section of the Word document to another area, as follows:
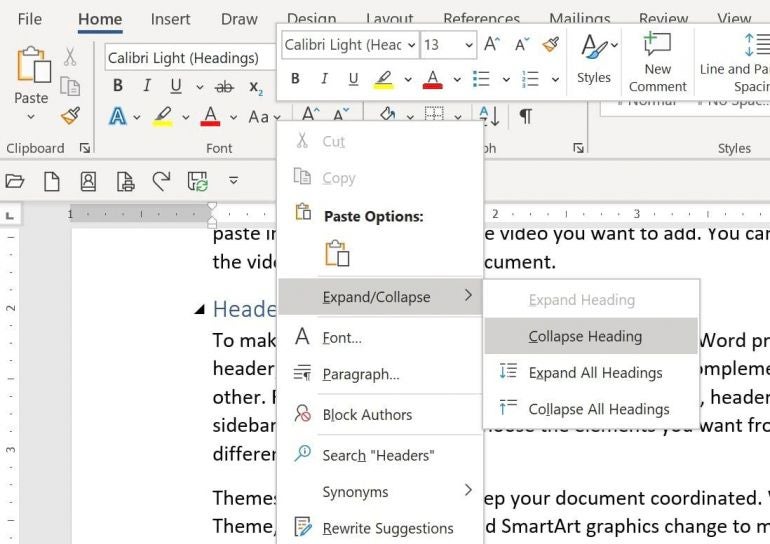
- Select the section header for the section you want to move (Headers).
- Right-click the header.
- Choose Expand/Collapse in the resulting menu, and then choose Collapse Heading (Figure C).
Figure C
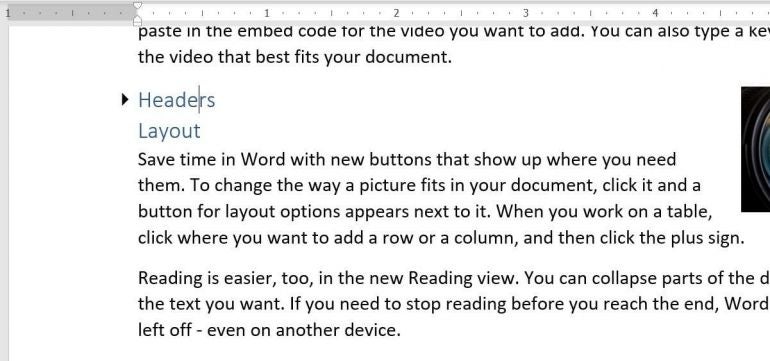
- Select the header for the collapsed section (Figure D) and press Ctrl + x to remove it from its current position.
Figure D
- Go to the end of the document and press Ctrl + v to copy that entire section.
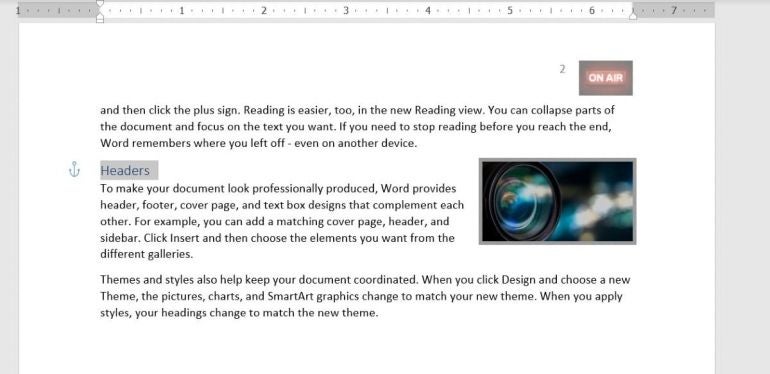
- Click the triangle to the left of the header to expand the section (Figure E).
Figure E
This technique is easy in a small Word document, but you might want to see the bigger picture.
How to use Outline View to move paragraphs in Word
Word’s collapsible headers let you move entire sections quickly. But what if you want to move paragraphs instead of sections? Outline view will let you move paragraphs or sections. To enable this view, click the View menu and then choose Outline in the Views group. In this view, look for the element symbols to the right. Simply click one to move the corresponding section or paragraph.
To demonstrate, do the following:
- Click the section symbol to the left of Layout (the section under the introduction).
- Now drag the selected section to the bottom of the document (Figure F).
Figure F

If you try to drag a section to the middle of content, you will make a mess. Always drop on top of the section you want to follow the moved selection. Remember, you can always use Ctrl + Z to undo the move and try again. Once you hit it right once, you won’t forget. Click Close Outline View to return to Normal view.
Word’s Outline view displays the content, which makes it easy to find the sections or paragraphs you want to move, but it’s also a bit busy in a larger document. When you want to remove some of the noise, use the Navigation pane.
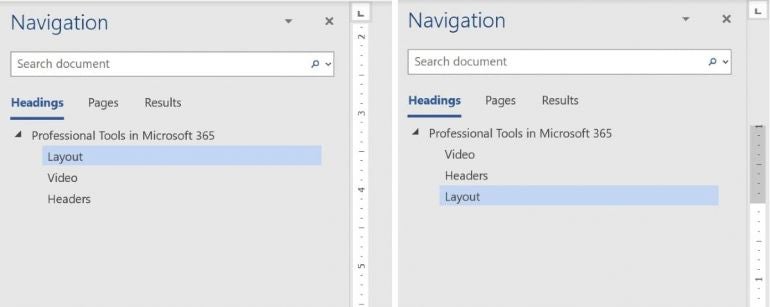
How to use the Navigation pane to move sections in Word
The Navigation pane displays the document by sections and pages. You can’t move the pages, but you can move the sections. Figure G shows the Navigation pane. To display it, click the View tab and uncheck Navigation Pane in the Show group. (You can view the Navigation pane in Word for the web, but you can’t move sections this way.)
To reposition a section, click the header and drag it. As you can see, I’ve moved the Layout section to the end of the document. If you know you want to move whole sections, the Navigation pane is much easier than Outline View.
Figure G
All four methods have value, and you’ll probably use them all, depending on the requirements at hand.