


If you have been using Windows throughout its various versions, chances are you know from firsthand experience that startup problems with previous version of the Windows operating system occurred pretty regularly. Fortunately, Microsoft has always provided us with special tools for fixing those problems. For example, in Windows NT we had the Emergency Recovery Utility, in Windows 2000 we had the Recovery Console, in Windows XP we had System Restore, in Windows 7 we had the Startup Repair Tool, and in Windows 8 we had Startup Repair.
Windows 10 comes with a similar tool, also called Startup Repair. Like its predecessors, Startup Repair is designed to intercede at the first hint of an operating system startup problem. When a problem is detected, Startup Repair will launch an automated, diagnostics-based troubleshooter that doesn’t require user intervention, and in many cases it will resuscitate an unbootable system.
If the startup problem is severe enough to prevent Startup Repair from launching on its own, you can launch it from the Windows 10 Recovery Drive. In this article, I’ll take a look at using Startup Repair from the Recovery Drive. As I do, I’ll explain how it works.
Note: In a series of future articles, I’ll continue my examination of the tools on the Recovery Drive and show you in detail how each tool works.
Running Startup Repair
Running Startup Repair from the Recovery Drive is easy. After your system boots from the Recovery Drive and you follow the Troubleshoot>Advanced options path through the menu, you’ll see the Advanced Options screen shown in Figure A. One the tools found on this screen is Startup Repair.
Figure A
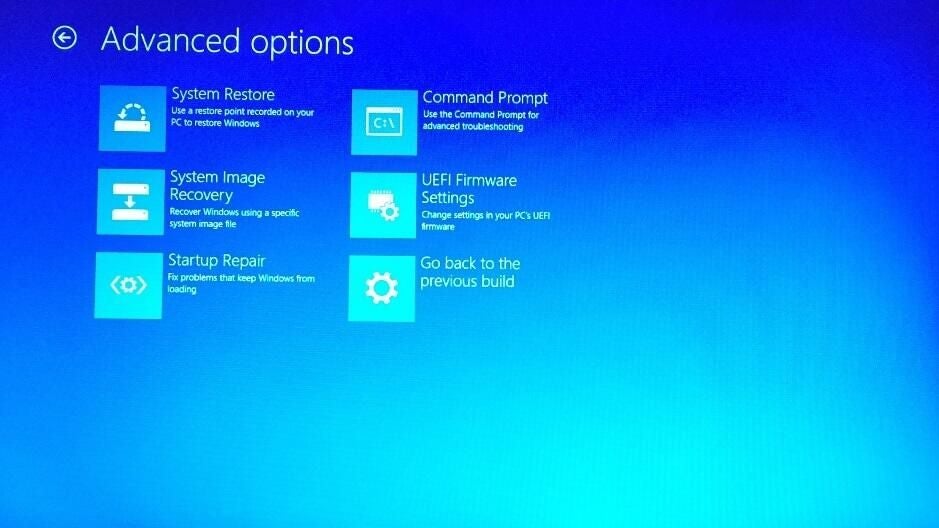
The Startup Repair tool is located in the bottom left of the Advanced Options screen.
When you select the Startup Repair option, you’ll see the screen shown in Figure B.
Figure B
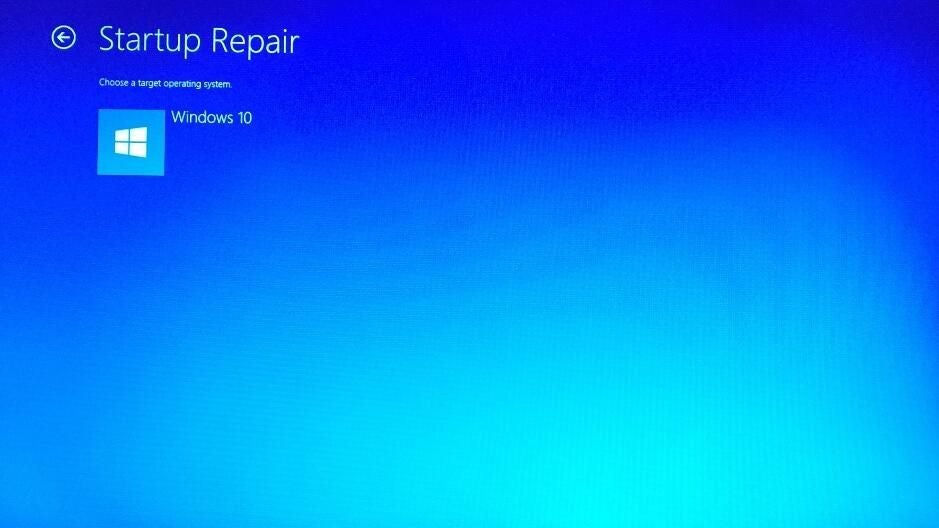
Your first line of defense when it comes to recovering a Windows 10 system that won’t start properly is the Startup Repair tool.
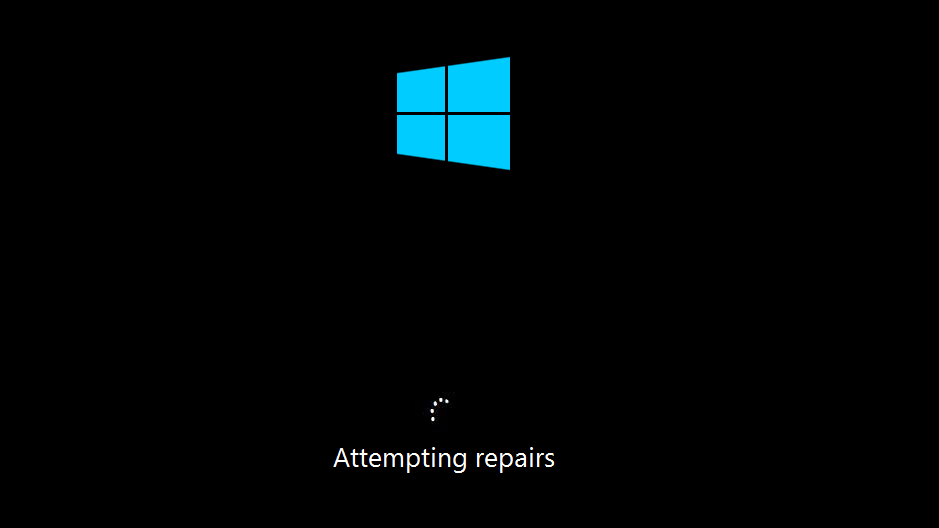
Once you launch it, Startup Repair will begin diagnosing the startup problem, displaying the screen shown in Figure C.
Figure C

In the first step of its operation, Startup Repair will diagnose the problem.
During this diagnostic phase, Startup Repair will scan your system and analyze the various settings, configuration options, and system files as it looks for corrupt files or botched configuration settings. More specifically, Startup Repair will look for the following problems:
- Missing/corrupt/incompatible drivers
- Missing/corrupt system files
- Missing/corrupt boot configuration settings
- Corrupt registry settings
- Corrupt disk metadata (master boot record, partition table, or boot sector)
- Problematic update installation
If Startup Repair detects any of these types of problems, it will automatically attempt to fix them, as shown in Figure D.
Figure D
Once Startup Repair has diagnosed your startup problem, it will attempt to repair it.
If Startup Repair can fix the problem, it will do so without any intervention. It will then restart the system and boot normally.
Severe problems
If Startup Repair can’t fix the startup problem, you’ll see a screen like the one shown in Figure E. In this situation, Startup Repair will create a log file with more information and provide you with a way to go back to the Advanced Options screen, where you can select one of the other recovery options.
Figure E
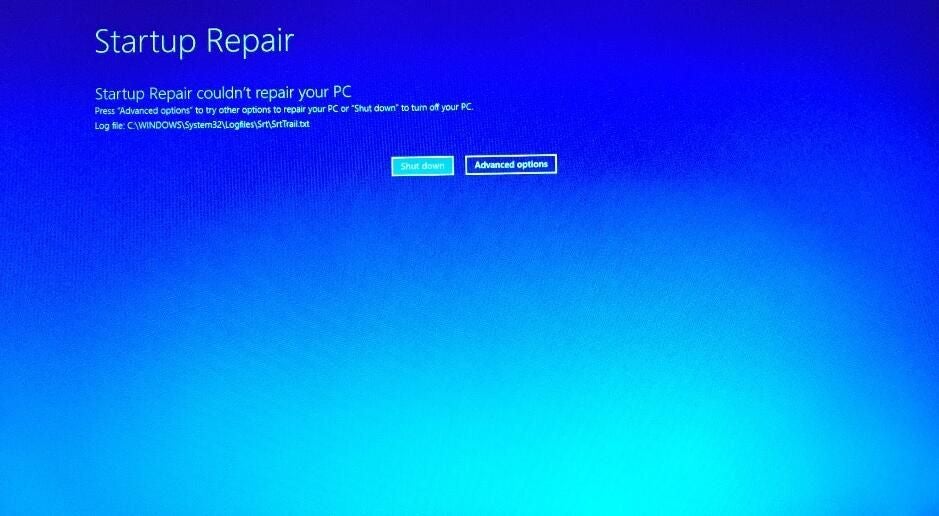
If Startup Repair can’t repair your system, it will display this screen.
Before you use one of the other recovery options, you should investigate the log file and see what details it provides. The Recovery Drive contains Notepad, so you can use it to view the log file. To begin, take note of the path and filename of the log file. Then click the Advanced Options button. When you return to the Advanced Options screen, navigate to the Command Prompt tool.
When the Command Prompt window appears, type the drive letter to change drives. In my example, the log file is on drive C. Next, use the CD command to access the folder containing the log file. Finally, type the name of Notepad’s executable file, along the name of the log file as a parameter.
This is the set of commands you would use to access the log file as shown in Figure F:
c:
cd \Windows\System32\LogFiles\Srt
notepad.exe SrtTrail.txt
Figure F
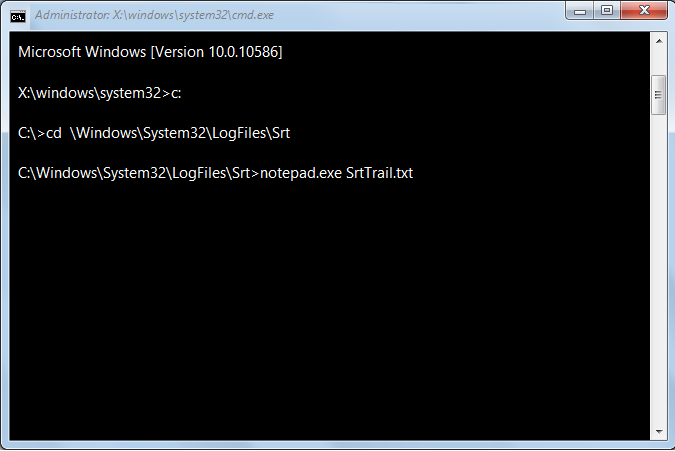
From the Command Prompt, you can launch Notepad and open the log file.
When Notepad appears, you’ll see the contents of the SrtTrail.txt log file similar to the one shown in Figure G. If you scroll to the bottom of the file, you will probably find a test that failed, which could be a good lead for further investigation.
Figure G

The SrtTrail log file contains information you can use for further troubleshooting.
If you booted the system from a USB flash drive, you can save the file from Notepad to the flash drive, remove the flash drive, take it to another PC, and print it. You now have a printed copy of the log file you can use as an aid to further troubleshooting. After you print the log file, be sure to return the flash drive to the ailing computer.
If you booted the system from an optical disc, you won’t be able to print the file, but you can scroll through it and take note of any details you think are crucial.
What’s your take?
Using the Startup Repair tool from the Recovery Drive can help you get an ailing Windows 10 system back to a bootable state. If Recovery Drive can’t fix the problem, you can use the log file as an aid for further investigation. Have you used Windows 10’s Startup Repair option? If so, did it get your system back into a bootable state? Share your thoughts in the discussion thread below.
Also read…
- Be prepared: Create a Windows 10 Recovery Drive
- Get familiar with the Windows 10 Recovery Drive… before you need it
- Which Windows editions let you use Remote Desktop Connection with multiple monitors?
- How to juggle multiple applications using Task View in Windows 10
- Manipulating Windows 10’s Start Menu