


Excel makes quick work of tracking time. With the right formatting, formula and dependent time values, you can return the hours worked for a given day, week, month and so on. If all you’re doing is tracking time, Excel is a great choice. Most of us have access via Microsoft 365 and even if you don’t, Excel for the Web is available for free.
To calculate in Excel how many hours someone has worked, you subtract the start time from the end time — the difference is the hours worked. But if the work shift spans midnight, simple subtraction won’t always cut it. In this article, you’ll see how easy it is to create an Excel worksheet that correctly calculates the hours worked for any shift.
Setting up an Excel spreadsheet to calculate time worked
Follow these steps:
- In A1, enter Time In.
- In B1, enter Time Out.
- In C1, enter Hours Worked.
- Select A2 and B2, and press Ctrl + 1 to open the Format Cells dialog box.
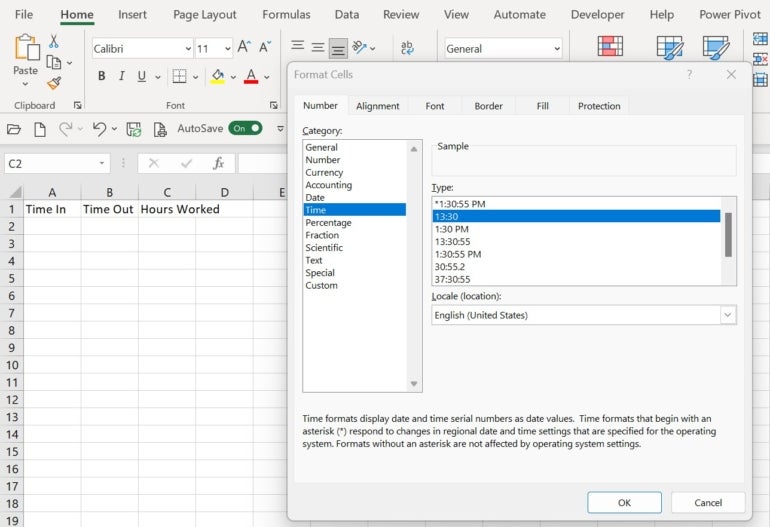
- On the Number tab, select Time from the Category list box, choose 1:30 PM from the Type list box (Figure A) and click OK.
Figure A

- Right-click C2, and select Format Cells.
- On the Number tab, select Time from the Category list box, choose 13:30 from the Type list box (Figure B) and click OK.
Figure B
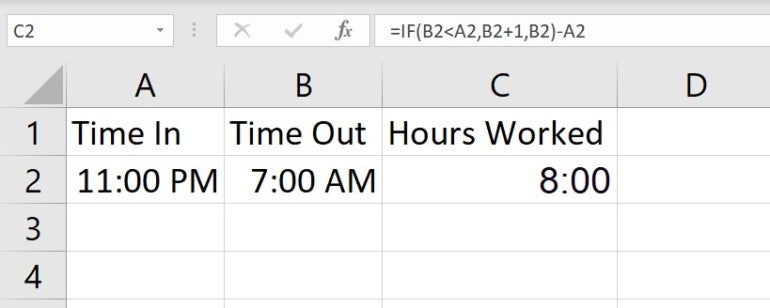
- In C2, enter the following formula:
=IF(B2<A2,B2+1,B2)-A2
When B2 and C2 are blank, this formula returns 12:00 AM. To calculate hours worked, enter valid time values into B2 and C2. For example, enter 11:00 PM as the Time In and 7:00 AM as the Time Out, and Excel will display 8, the correct number of hours worked (Figure C). Please note that you must enter a space character between the time value and PM and AM.
Figure C
This simple formula is adequate for shifts that begin and end in the same 24-hour period or that extend beyond midnight into the next day.
Pros and cons of using Excel for time tracking
As shown, the formula for tracking hours is simple in Excel. With the right formatting, everything is easy to understand and quickly achieved. If that’s all you’re doing, there’s no reason not to use Excel. There are many Excel templates for tracking time, many of which are free.
Must-read big data coverage
- What Powers Your Databases? Take This DZone Survey Today!
- New AI Data ‘Universal Translator’ From Salesforce, Snowflake, Others
- Top Tech Conferences & Events to Add to Your Calendar in 2025
- Google Releases Data Commons MCP Server to Supercharge AI Agents
SEE: Explore these Excel tips every user should know.
But that brings us to a question: Why are you tracking hours worked in Excel? If the answer is to fulfill compensation for employees, Excel isn’t the best route. The average Excel user is ill-equipped to take on payroll in Excel. You must ensure the data’s validity, protect your employee’s confidential data and comply with regulations and laws.
The reality is that knowing how to track hours in Excel and maintaining a payroll solution to compensate for those hours are two vastly different worlds. Tracking time is simple, but running a payroll isn’t.
A bonus Microsoft Excel tip
In such a simple design as the one presented above, linking to another workbook is unlikely. But with the rise of online forms and mobile apps, you might find yourself linking to multiple sources. If you’re linking to other Excel workbooks to retrieve the time in and out values, you’ve complicated your work.
From the article 10 things you should never do in Excel by Susan Harkins:
Multiple links between workbooks are hard to manage and unstable. Users forget to close files, and sometimes, they even move them. If you’re the only person working with those linked workbooks, you might not run into trouble, but if other users are reviewing and modifying them, you’re asking for trouble. If you truly need that much linking, you might consider a new design.
This bonus Excel tip is also available in the free PDF 30 things you should never do in Microsoft Office.
Editor’s note: This Excel article was first published in June 2005 and has been updated to maintain the accuracy of the information and its sources.