It’s surprising just how much you can accomplish in Microsoft PowerPoint with only a video and a bit of text. For example, you might know how to use PowerPoint’s Merge Shapes option to make transparent text. What you might not realize is that you can insert a video as the background to create a moving background behind that transparent text. It’s an easy technique to implement considering the resulting effect. In this tutorial, I’ll show you how to use a video to create a moving background.
I’m using Microsoft 365 desktop on a Windows 10 64-bit system, but you can use older versions through PowerPoint 2007. However, PowerPoint for the web won’t support this technique. For your convenience, you can download the demonstration .pptx file.
SEE: Windows, Linux, and Mac commands everyone needs to know (free PDF) (TechRepublic)
How to prepare your PowerPoint slide
This PowerPoint technique is incredibly simple, considering the “wow!” effect it produces. However, whenever contemplating a PowerPoint slide, I like to work from a simple outline. Like writing, it helps keep me on track and if something doesn’t work as expected, I have an idea where to troubleshoot.
Thanks to Microsoft PowerPoint’s sharp Merge Shapes feature, this technique requires only a small amount of setup:
- Insert the video for the slide’s background and check off a few settings.
- Create a second slide and add a rectangle shape the same size as the slide and choose a color that complements the video in the first slide.
- Enter a text box that contains your message.
- Use PowerPoint’s Merge Shapes to “cut out” the text, so you can see the slide’s background through the transparent text.
- Move the rectangle from the second slide to the first, covering the video.
It only sounds complicated. Trust me, it’s one of the easier effects you’ll use because it requires no transitions, no animations — just a video, a rectangle and a text box — to create the slide shown in Figure A. You can’t see the water moving in the figure, but if you download the demonstration files, you can run the show yourself for the full effect.
Figure A

How to insert a video in Microsoft PowerPoint
We’ll begin by inserting a video onto a blank slide. To avoid any copyright issues, we’ll use a video from Microsoft PowerPoint’s stock images, as follows:
- Insert a blank slide.
- Click the Insert tab and then click Pictures in the Images group. Choose Stock Images from the dropdown.
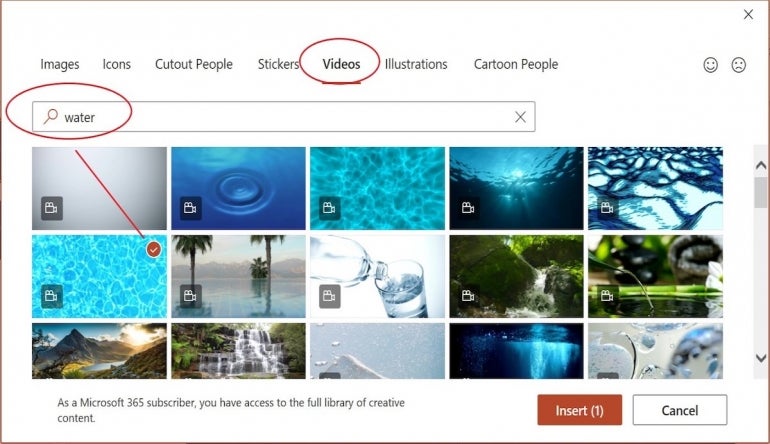
- Click the Videos tab and then enter water.
- Find the water image you want — I used the one shown in Figure B — select it, and then click Insert.
- Extend the image to the full size of the slide.
Figure B

PowerPoint does a good job of anticipating your requirements when it comes to choosing the video’s settings, but there are a few you should check:
- With the video selected, click the contextual Playback tab.
- Set Volume to Mute, if necessary.
- Set Start to Automatically, if necessary.
- Check Loop Until Stopped, if necessary.
These settings will start the video automatically when you select the slide. In addition, if the video includes any audio, the video will play silently and continue to play until you click the slide. You can make other choices when applying this to your own work.
Now it’s time to add the text that expresses your message.
How to create the slide’s text in PowerPoint
With the video inserted and playing, it’s time to add your message. My best advice is this:
- Keep the text message simple.
- Use a fat font.
To begin, add a new blank slide. Later, you’ll delete this slide, but it’s easier to work on a blank slide than on top of the water video. To add the text effect, do the following:
- Add a rectangle to the blank slide and extend it to fill the entire slide.
- Click the contextual Shape Format tab.
- In the Shape Styles group, click Shape Fill and choose a color that complements the video. I chose dark blue.
- Click the Insert tab, insert a text box and enter the following text:
It’s pool time! - Stretch the text box from the left to right margin and then click Center in the Font group on the Home tab to center the message.
- Double-click inside the text box and press Ctrl + A to select all the text.
- With the text selected, click the Home tab and assign the following font and size using the Font and Font Size controls in the Font group: Arial Black, 96.
- Select the rectangle and the text box by holding down the Shift key and clicking them both.
- Click the contextual Shape Format tab.
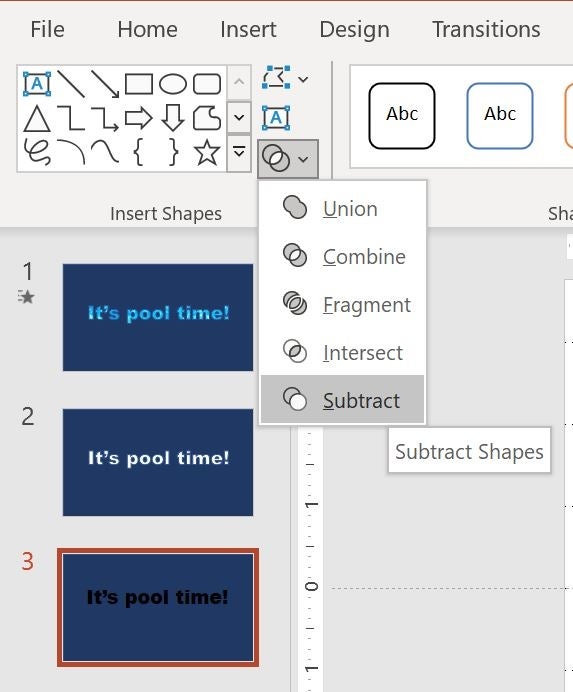
- In the Insert Shapes group, click the Merge Shapes option and choose Subtract from the dropdown (Figure C).
Figure C

At this point, we have two slides and it’s time to combine them by dragging the background shape and the text box to the video slide. Simply select the merged rectangle and text, press Ctrl + C and then move to the video slide and press Ctrl + V. Position the rectangle slide so that it fits perfectly over the video slide (Figure A).
Play the show by press F5. Because the video starts immediately, you don’t have to do a thing to see the gentle rippling sunlit water through the message, It’s pool time!
I hope you agree that this simple technique is easy to implement, especially considering its impact!


