


In most spreadsheets, blank rows are undesirable. Microsoft Excel uses blanks to determine data ranges, and a blank row in the wrong place will inhibit many built-in features. Fortunately, there’s an easy way to remove blank rows from a data range in Excel — but this technique can potentially destroy data, so you must be careful.
In this Excel tutorial, I’ll show you a quick and easy way to delete blank cells, which you might think of as rows, in the middle of a dataset without accidentally deleting adjacent data. Throughout the article, I use the term “row” to describe adjacent blank cells within the dataset.
I use Microsoft 365 on a Windows 11 64-bit system, but you can use earlier versions. Excel for the web supports this easy technique.
Step 1: Select blank cells in Excel
Once you realize that your dataset has blank rows (cells), you’ll probably want to delete them. The first step is to select the blank rows, which is a tedious process if done manually. Fortunately, you don’t have to.
To select all the blank rows in a dataset:
- Select the data range A3:E14 — or your own data range if you’re using a different dataset.
- Press F5.
- In the resulting Go To dialog box, click Special.
- Click the Blanks option, and then click OK. Doing so selects the blank cells in the selected range. In this case, that’s A7:E7 and A10:E10.

Excel’s Go To feature lets you quickly select all the blank rows in the selection. Now, you’re ready to delete those rows. Don’t do anything to deselect the selection.
SEE: Explore these Excel tips every user should master.
Step 2: Delete blank rows in Excel
Now, you’re ready to delete the selected cells. Until now, I’ve used the term rows, but deleting the actual rows will delete everything in that entire row, not only the selected range. This includes data that might be off-screen.
To delete the selected cells — not rows — click Delete (not the dropdown) in the Cells group on the Home tab. This should delete only the selected cells. But if you don’t get the desired results, press Ctrl + Z to undo the delete, and then try the following:
- With the blank rows 7 and 10 still selected, click the Delete dropdown in the Cells group on the Home tab, and then choose Delete Cells.
- In the next dialog, click Shift Cells Up.
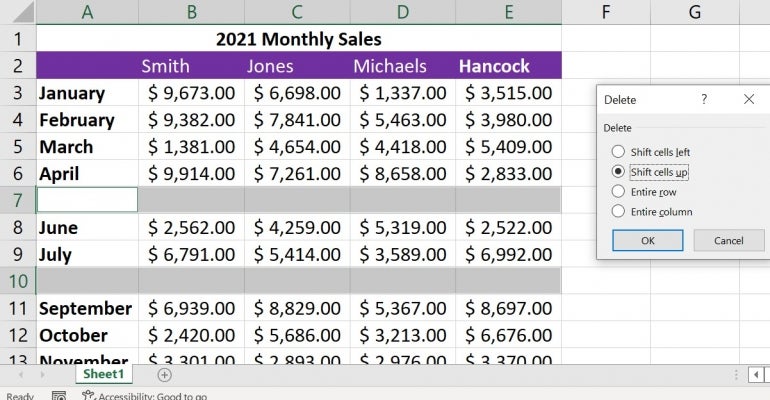
- Click OK.
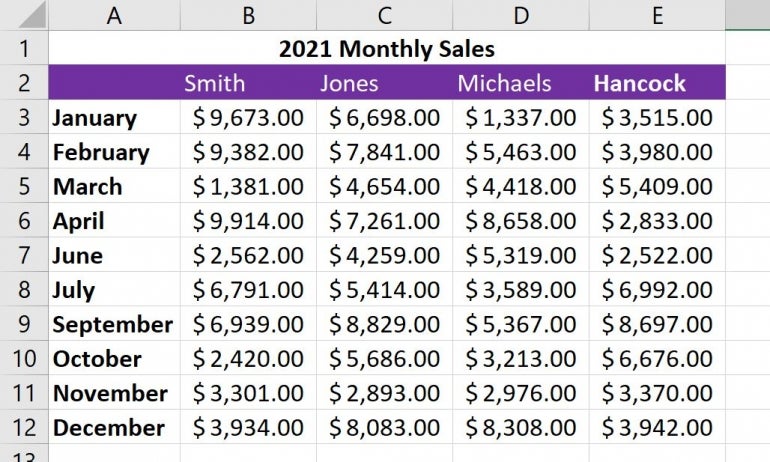
Excel will then delete the blank cells from the selected data range.
SEE: Learn how to parse time values in Microsoft Excel.
Choosing Delete Cells removes only the blank cells in the selected range. If you choose Delete Sheet Rows in step two, you could potentially destroy data to the right. Choose carefully when using this option to delete blank rows when you really want to delete only the blank cells. It’s easy to think about rows and choose the wrong option.
In such a small dataset, you could easily delete each row individually, but imagine doing so if you have dozens or even hundreds of records to review for blank cells. This method will save you time and effort, removing the possibility of missing blanks.
More about Software
- Best Free VPNs
- Best Free CRM Software
- Best Free Accounting Software
- Best Free Project Management Software
How to avoid disaster when deleting rows in Excel
Deleting rows, whether blank or not, can be hazardous. For instance, if you have data off-screen and out of sight, you won’t realize you’re deleting it when you remove the empty cells or rows right before you. Also, watch out for hidden rows that could be inadvertently deleted.
In addition, many built-in features don’t work as expected when encountering blank rows. Let’s suppose you want to convert the example dataset to a Table object, so you click inside the dataset and press Ctrl + T. It just so happens that you click D5, expecting Excel to select the full dataset. However, it won’t. Excel selects the contiguous rows adjacent to the clicked cell, D5, which happens to be A3:E6 — a partial selection.
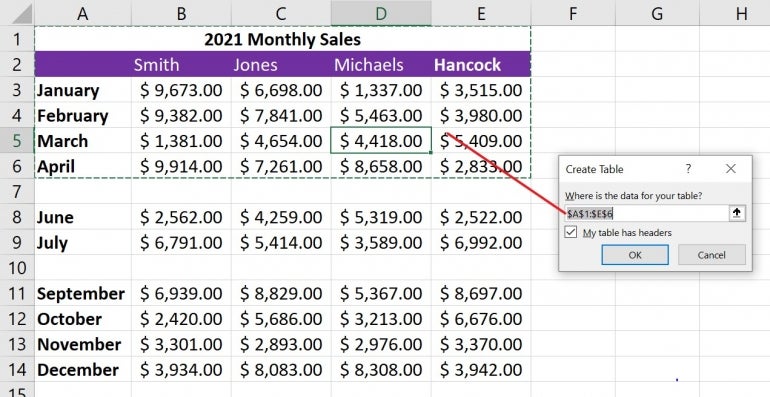
If you’re fortunate, you’ll notice that Excel doesn’t specify the entire data range. If you fail to notice, you won’t get the results you expect when using Table features. You must delete blank rows to use many of Excel’s built-in features.
Can I also use keyboard shortcuts to delete blank rows in Excel?
Fortunately, there is a way to delete blank rows using a combination of keyboard shortcuts. Instead of following the steps above, you can do some of the work with your keyboard. Here’s how to do it:
- Use Ctrl + A to select all data to avoid manually highlighting the range containing blank rows.
- Open the Go To dialog using Ctrl + G, then hit Alt + S to select Special.
- You must select Blanks and press Enter in the Go To Special dialog box.
- Press Ctrl + – with the blank cells highlighted to achieve the required deletion.
Is using filters another good way to delete blank rows in Excel?
Filters are another way to achieve the same aim in Excel. Here is how to use filters to delete blank rows:
- Click the Filter dropdown arrow in a column of your dataset where some rows are blank.
- In the Filter menu, deselect all options by unchecking Select All, then check only Blanks.
- Click OK to apply the Filter, displaying only rows with blank cells in that column.
- Highlight the rows by dragging your mouse down or pressing Shift and selecting rows.
- Right-click on any selected row and choose Delete Row, or press Ctrl + 1 and choose Entire Row.
Be sure to choose a column where a blank cell means the entire row is irrelevant. As always, a good rule of thumb is to back up your data by saving a copy first before deleting rows.