


I have, on a number of occasions, run into an issue where I am unable to log into an instance of Nextcloud because the server hosting the service changed the IP address. When this happens, the trusted domain issue appears, and there’s no way (without a quick re-configure) to log in.
Networking: Must-read coverage
- Gartner releases 4 trends that will impact cloud, data centers and infrastructure in 2023
- Support for these Microsoft enterprise products ends in 2023
- Dell Technologies World 2023: Q&A on how Dell sees security at the edge
- Best VPNs for small business in 2023
What is a trust domain? For Nextcloud, a trusted domain is a way to prevent Host Header Poisoning.
See: Network security policy (Tech Pro Research)
What is Host Header Poisoning? In most cases, developers trust an HTTP Host header value and use it to do things like generate links, import scripts, and even generate password resets. The problem is that the HTTP Host header can be controlled by an attacker and exploited using web-cache poisoning and/or abusing alternative channels like password reset emails. Because of this, the Nextcloud developers added the trusted domain feature. So, if you do something like move your Nextcloud server to a different IP address, you’ll see the feature in action. In other words, you won’t be able to log in.
What do you do?
You configure a new trusted domain. I’m going to show you how. I’ll demonstrate on Nextcloud 13 hosted on Ubuntu 18.04. I will assume you’ve installed Nextcloud into the /var/www/html/nextcloud directory.
Adding a new trusted domain
Log into (or Secure Shell into) your server hosting Nextcloud. Open the necessary configuration file with the command:
sudo nano /var/www/html/nextcloud/config/config.php
In that file, you should see the line:
0 => IP_1
Where IP_1 is the original IP address of your Nextcloud server.
Add a new line below, like so:
1 => IP_2
Where IP_2 is the new IP address of the Nextcloud server.
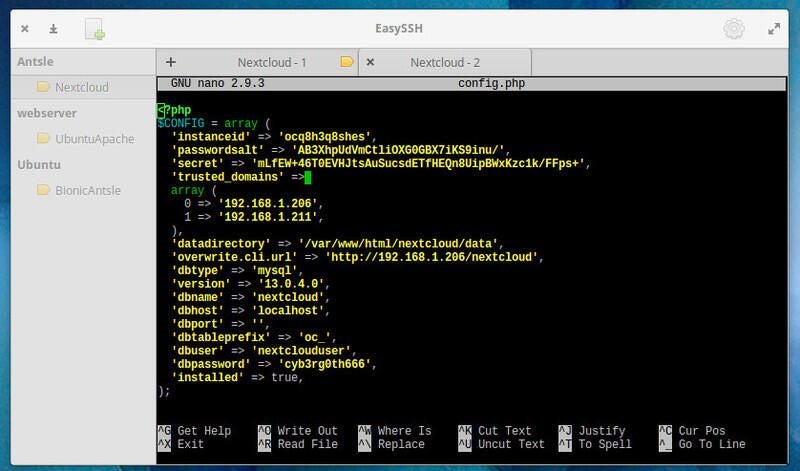
The end result should have both old and new IP addresses listed (Figure A).
Figure A
NOTE: If you installed Nextcloud via snap packages, the configuration file will be found in the /var/snap/nextcloud/current/nextcloud/config directory.
Ready to log in
After you save and close the config.php file, you should now be able to go back to your Nextcloud instance without the Trusted Domain issue preventing logins. There’s no need to restart Nextcloud or the hosting server. That’s all there is to resolving this particular issue. Just remember, if you change the IP address of your server again, you’ll need to add the new address to the config.php file.
Your Nextcloud server is back and ready to work.