
You don’t need web design or developer skills to solicit a bit of information using online forms. The process is simple, but most people don’t realize these options are available. If you have a subscription to Office 365, you can put Microsoft Forms to work without a specialized skillset. After creating the form, you simply share a link. Recipients can then use the link to access the form using a PC, laptop, or even a mobile device. In this article, I’ll introduce you to 365 Microsoft Forms.
I’m using Edge and OneDrive for Business with an Office 365 subscription (2016) on a Windows 10 (64-bit) operating system. There’s no downloadable demonstration file. If you don’t have a 365 subscription, consider using Google Docs, but there are no instructions for Google Docs in this article.
SEE: Comparison chart: Office suites (Tech Pro Research)
Planning
You’ll want to start with a good plan: What are your needs? What data types do you need to store? How do you want to present choices? These are questions you’ll want to answer up front. In our example, we’ll create a simple form that recipients can use to report volunteer hours. They’ll answer the following questions:
- Last Name: text
- First Name: text
- Date Volunteered: date
- Description: text
- Category: option
- Hours: text
- Complete: yes/no
Keep in mind that Microsoft Forms is a simple–limited–feature, so don’t plan anything too complex.
Creating
Creating a quick form is easy using Microsoft Forms, but you need an Office 365 account. To get started, use your browser to navigate to Microsoft Forms at http://forms.microsoft.com. If you’re not logged in already, you’ll need to sign in using your Office 365 credentials. Once in, click My forms (Figure A) and then click New Form.
Figure A
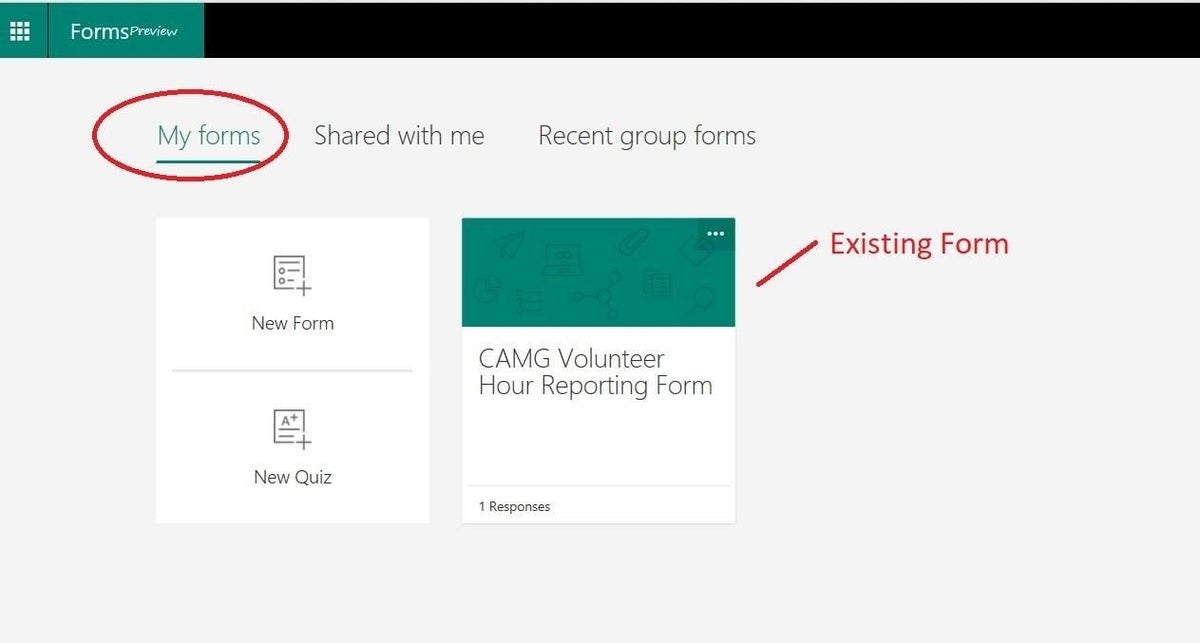
Click New Form to open a blank form.
First, give the form a meaningful name, up to 90 characters by clicking the Untitled form. You can also enter a subtitle for the form, which can contain up to 1,000 characters. Clicking + Add question (Figure B) will display the options shown in Figure C. If you click More, you’ll see two more options: Ranking and Likert. (Microsoft Forms uses the term question, instead of control or field, and I’ll follow suit.)
Figure B

Give the form a meaningful name.
Figure C
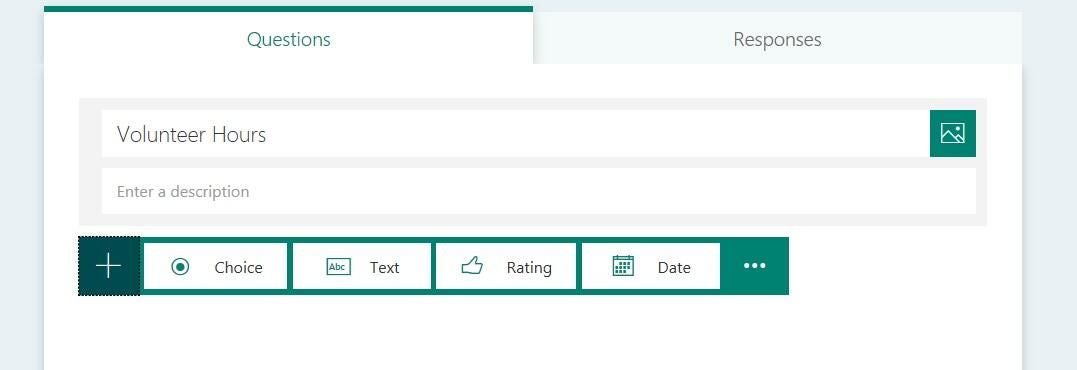
You have six question type options.
Click Text and enter a question or description of the data you want users to enter. In this case, enter Last Name as shown in Figure D. Click Required to force users to enter a value for this question. Also note the Long Answer option. Text questions can handle up to 4,000 characters (including spaces). If you click the Long Answer, the answer question will grow to display the longer entries. Create a second text question for first names. Next, click Add question to enter both a Date Volunteered and a Description question.
Figure D
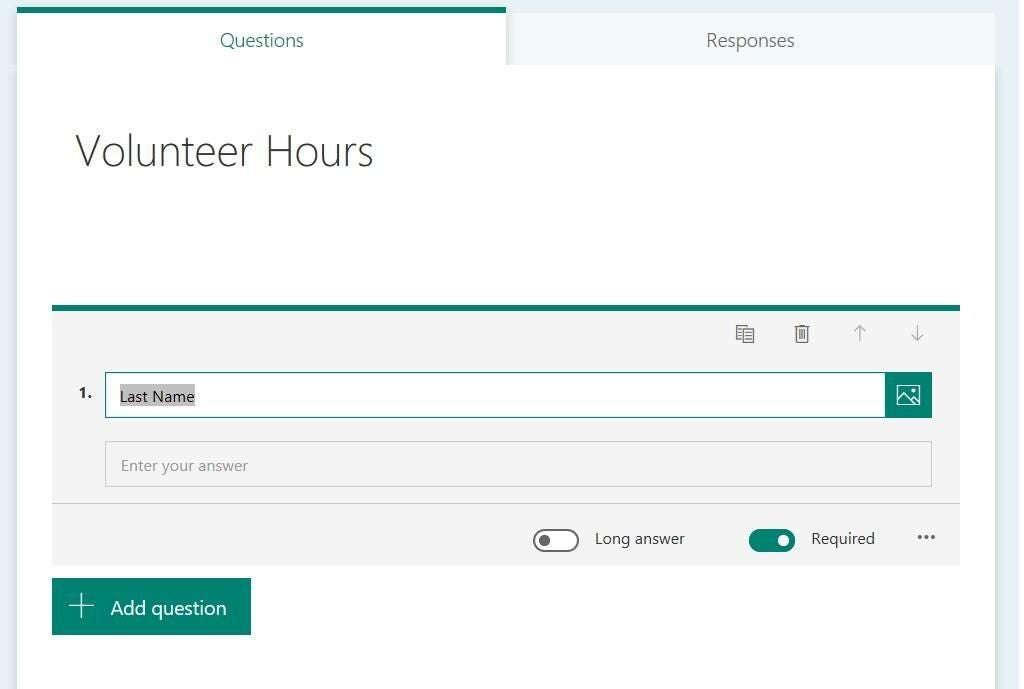
Create the last name question.
The next question has options. Click Add question as before and then click Choice. Enter Category and then enter options as shown in Figure E. Click Add option to add more.
Figure E
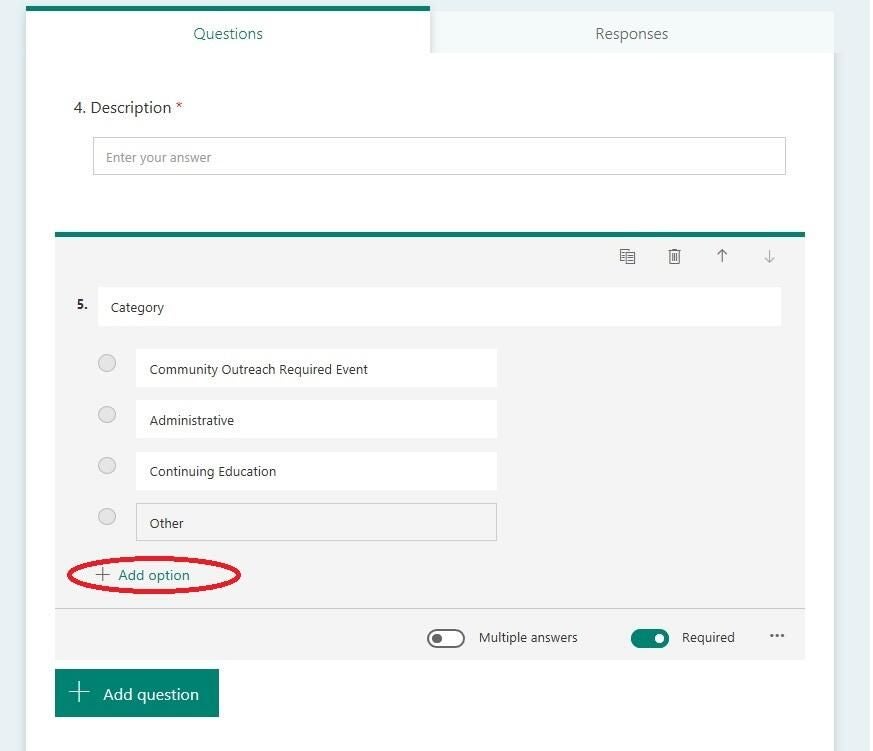
Add a question that lists specific options.
You’re almost done. Add the Hours question. Finally, the Complete question is a yes/no question. Microsoft Forms doesn’t offer a yes/no type, so use the choice type.
To preview the form, click Preview in the top-right corner. Figure F shows the simple form. Scroll down to see all the questions and the Submit button. Click Mobile to see how the form will render on mobile devices.
Figure F
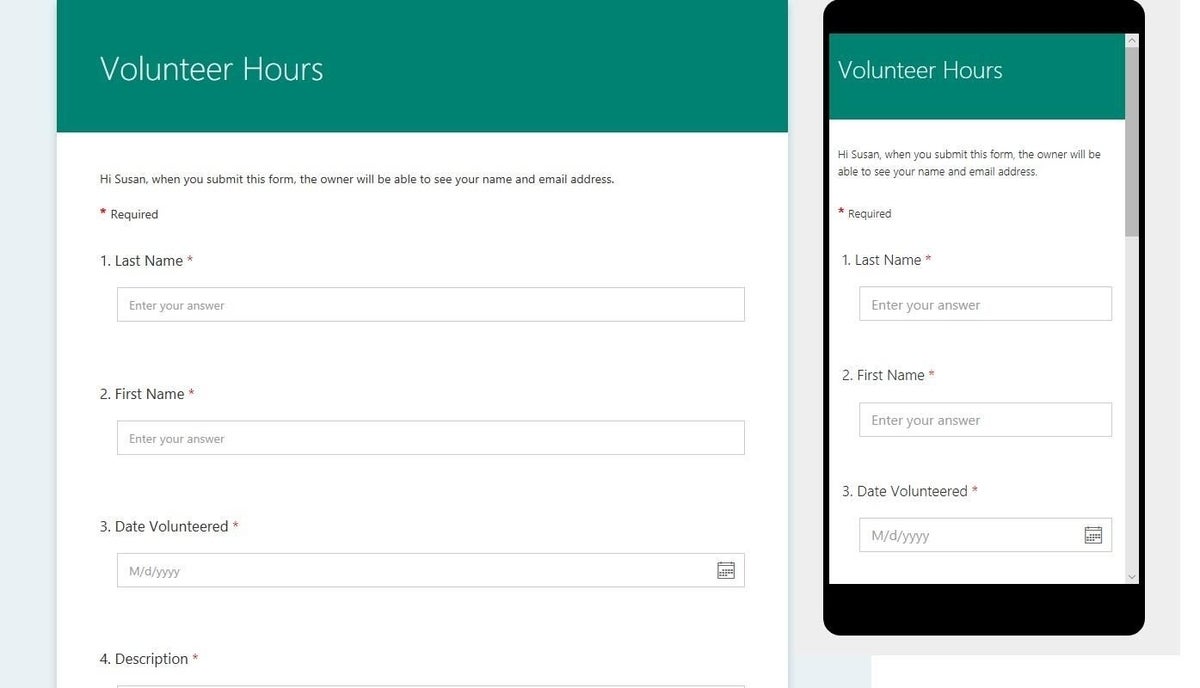
Preview the form.
At this point, you might want to make a few modifications. To delete a question, click it and then click the Delete question option (the trash icon). To the right of Delete question, you can click Move question up or Move question down to reorder questions. Click More options (the ellipses button in the bottom-right corner) to access two more options: Subtitle and Restrictions.
Use Subtitle when you need to display a screen tip or further clarify the question’s purpose. Use Restrictions to set a few limits on input values. For instance, edit the Hours question to reject anything other than a numerical digit. Click More options and choose Restrictions. Doing so displays a new dropdown; Number is the default. Go ahead and click the dropdown so you can see the different types of restrictions shown in Figure G that you can apply. Moving on, you might want to add a theme, as shown in Figure H. Simply click Theme (top-right) and select one of the pre-defined theme options. (Themes aren’t visible on mobile devices.)
Figure G
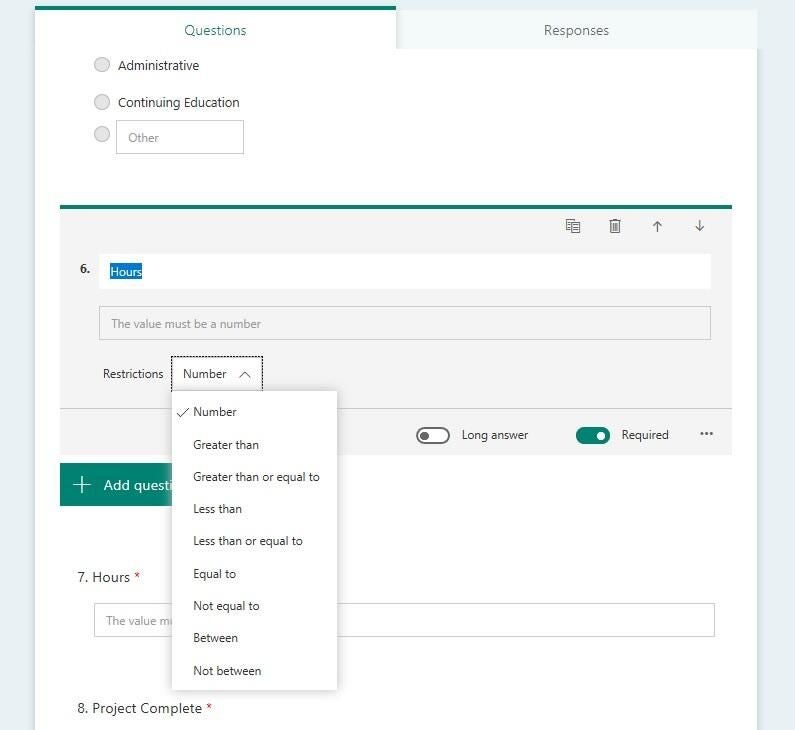
Restrict the input.
Figure H

Add a theme.
Sharing
You might have noticed the Responses tab. If you click it (in design view), you’ll see that there are no responses to your online form. That’s because you haven’t shared it yet. To share the form, click Share (top-right in Preview).
Your form’s purpose will determine the type of sharing restrictions you use. Before you share the form, click More options, and choose Settings. The options are self-explanatory, but you should know about them, and how to access them. You can share the form with anyone or limit it to people in your organization. You can also put a time limit on responses. The Shuffle option will reorder questions randomly for each respondent.
For our example, send a link to the form in an email to yourself. You could paste the link in a shared area, send a QR-code, or embed the form into a blog or web page. All are quite simple to implement. For now, click Share to get started. By default, only people in your organization can submit responses to your form. Click the dropdown and choose Anyone with the link can respond. This is probably the least secure sharing option, so be sure you’re comfortable with this choice.
Click Email to launch Outlook (or your default mail client) and confirm the action. Microsoft Forms fills in the subject and body. You can change whatever you like, but don’t modify the link. Enter recipients; as you can see in Figure I, I’m sending it to myself. Send the link to yourself. When it arrives, click the link to access the form as a respondent. Be sure to enter data so you can see the response in Microsoft Forms (later).
Figure I

Send the link to your form in an email message.
Shorten the link
Now, the link is ridiculously long, and that’s likely to cause recipients trouble. You can improve the link in one of two ways. You can enclose the long link in <> brackets. Even if the link wraps in the mail window, a click will recognize the entire link. It’s reliable, but it won’t always work. You could instead use TinyURL to create a much shorter link. Instead of clicking Mail as you did earlier, click Link and then Copy. Next, visit tinyurl.com, click inside the Enter a long URL to make tiny control, and press Ctrl+v, and click the Make TinyURL! button. Then, click Copy to clipboard, return to Outlook, and paste the new link. It sounds convoluted, but it’s simple.
After testing the form a bit, you might want to make changes. For instance, I added a new Category, Work Detail and a new Project Complete option, Ongoing. To make changes, sign into Microsoft Forms and open your Volunteer Hours form. In Forms Preview, you can make any changes you like, working with the form as you did before.
SEE: 30 things you should never do in Microsoft Office (free PDF) (TechRepublic)
Using the responses
To see responses, return to Microsoft Forms and open the Volunteer Forms. Click the Responses tab; Figure J shows one response. Click the Open in Excel link to download the data as an Excel file so you can analyze and report on the data you collect via your online form.
Figure J
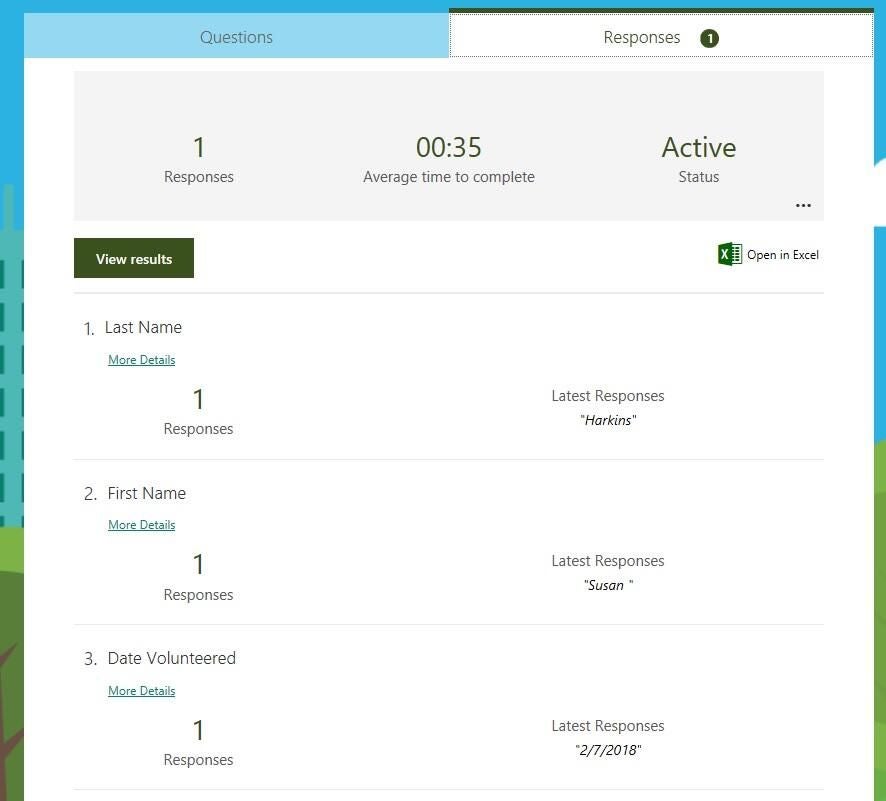
You can view responses and download them as an Excel file.
Wrapping up
For better or worse, you must be a 365 subscriber to use Microsoft Forms. They’re extremely easy to create and share, but it comes at a price. The question options are limited, and you can’t automate the process any further using code or script. On the plus side, you can create a data entry form, survey, or even a quiz that will display the correct answer after the respondent finishes, with little effort and time. Nor do you need any specialized training to tackle this neat feature.
Stay tuned because over the next few months, we’ll look at more online form options.
Send me your question about Office
I answer readers’ questions when I can, but there’s no guarantee. Don’t send files unless requested; initial requests for help that arrive with attached files will be deleted unread. You can send screenshots of your data to help clarify your question. When contacting me, be as specific as possible. For example, “Please troubleshoot my workbook and fix what’s wrong” probably won’t get a response, but “Can you tell me why this formula isn’t returning the expected results?” might. Please mention the app and version that you’re using. I’m not reimbursed by TechRepublic for my time or expertise when helping readers, nor do I ask for a fee from readers I help. You can contact me at susansalesharkins@gmail.com.
See also…
- Office Q&A: Adding custom headers to Word’s Headers gallery (TechRepublic)
- How to use the Windows Tags property to manage Office files (TechRepublic)
- Four ways to specify dates using Excel data validation (TechRepublic)

