If you’re a stickler for data security (and you should be), you know how important it is to lock down the data on your servers. Although you might be content with your firewall and the other, sundry turnkey solutions you have in place, that is no reason to leave data exposed. This includes the data on your Nextcloud server.
Out of the box, Nextcloud servers encrypt remote data (such as from Dropbox and Google), but your local storage is saved sans encryption. To some users, that is unacceptable. Fortunately, the developers of Nextcloud make it possible to enable server-side encryption. Even though the encryption does increase the file size by 35%, this should be a must-have for anyone concerned about security.
Let’s walk through the steps of enabling server-side encryption. For this fairly simple process, you’ll need administrator credentials for your Nextcloud account. Note: Once you enable server-side encryption, you cannot disable it from within the Nextcloud admin dashboard (however, it is possible using the occ command). This means you must ensure that users’ encryption keys are regularly backed up. If an encryption key is lost (for whatever reason), that user’s data cannot be accessed.
For your convenience, encryption keys are stored in these locations:
- Individual user keys: /var/www/nextcloud/data/USER/files_encryption
- All other keys: /var/www/nextcloud/files_encryption
If you open a terminal window and change to your /var/www/nextcloud/data/ directory, you’ll notice the files_encryption file doesn’t exist. To generate those keys, we must enable encryption.
SEE: Three ways encryption can safeguard your cloud files (Tech Pro Research)
Enabling encryption
- Log into your Nextcloud dashboard as the administrator.
- Click the Apps drop-down (upper left corner).
- Click Not Enabled in the left navigation.
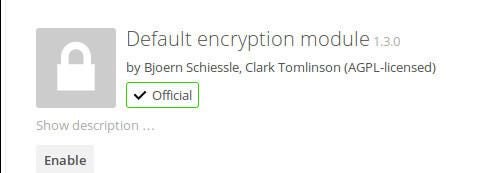
- Locate the listing for Default Encryption Module (Figure A).
- Click the Enable button, and the module will be ready to go.
Figure A

Enabling the Default Encryption Module.
- Click the Username drop-down in the upper-right corner and click Admin.
- In the Admin section, click Server-side Encryption in the left navigation.
- Click Enable Server-side Encryption (Figure B).
Figure B

Enabling server-side encryption on Nextcloud 10.
A warning will appear that you should definitely read. This is gist of the warning:
- Once enabled, all files will be encrypted.
- Encryption alone does not guarantee security of the system.
- Encryption always increases file size.
- Back up your data as well as your encryption keys.
If you’re okay with those warnings, click the Enable Encryption button.
Log out of Nextcloud and log back in–your keys will be initiated, and server-side encryption will be enabled. If you go back to the command line and check out /var/www/nextcloud/data and /var/www/nextcloud/data/USER (USER is an actual Nextcloud user), you’ll see the files_encrypted key file.
Disabling encryption
If you need to disable encryption, there’s only one way to do so. Before you do, make certain you have backups of all the files_encrypted files for all users and the system.
Here are the steps to disable encryption.
- Open a terminal window.
- Change to the Nextcloud directory with the command cd /var/www/nextcloud.
- Gain admin privileges, either with the command sudo su or su.
- Switch the Nextcloud single user mode to on with the command sudo -u www-data ./occ maintenance:singleuser –on.
- Disable encryption with the command sudo -u www-data ./occ encryption:disable.
- Turn off single user mode with the command sudo -u www-data ./occ maintenance:singleuser –off.
Rest easy
As long as you have solid security on your network, and the server hosting Nextcloud is secure, after enabling server-side encryption, you can rest easy(ish) that your data is safe.
Always remember to do regular backups, and be vigilant about monitoring logs and running updates.