


Google Sheets gives you considerable control over how your pages print, regardless of whether your sheet contains tables from Bard, customer data or financial analysis. You can choose to print everything in your workbook, your current sheet or a selected group of cells. Google Sheets even allows you to adjust many layout, scaling and formatting options for your print area.
Printing options are available in both browser and app versions of Google Sheets. In this tutorial, we’ll walk through how to set your print area in Google Sheets and answer some other questions that might arise during this process.
Before getting started
Before you perform any of the steps below, you must first open your selected Google Sheet on your browser or the Google Sheets mobile app to check that you have the right permissions to print. If you only have Commenter or Viewer access to the Sheet, you might not be able to print, download or copy the Sheet since a Sheet owner or editor has the option to disable these features. For more details on Sheet sharing controls, see How to share Google Docs, Sheets and Slides.
How to set print area in Google Sheets
To display print settings in Google Sheets, select File | Print in a Sheet from a desktop-class web browser. You’ll adjust print setting options in Sheets after — not before — you choose the Print menu option. This sequence differs from both Google Docs and Google Slides, which both provide a File | Page setup option. It also differs from Google Drawings, which uses File | Print settings and preview.
SEE: Get master-level training on Google Workspace with this bundle from TechRepublic Academy.
Adjust Google Sheets print settings in a browser
In a desktop-class browser, such as Chrome, Firefox or Safari, you can adjust several print options. Follow these steps to adjust Google Sheet print settings in a browser:
1. To print a specific portion of your Sheet, select the cells you want to print by clicking and holding your cursor in one corner cell of your desired print area and then dragging your cursor to select adjacent cells (Figure A).
Figure A
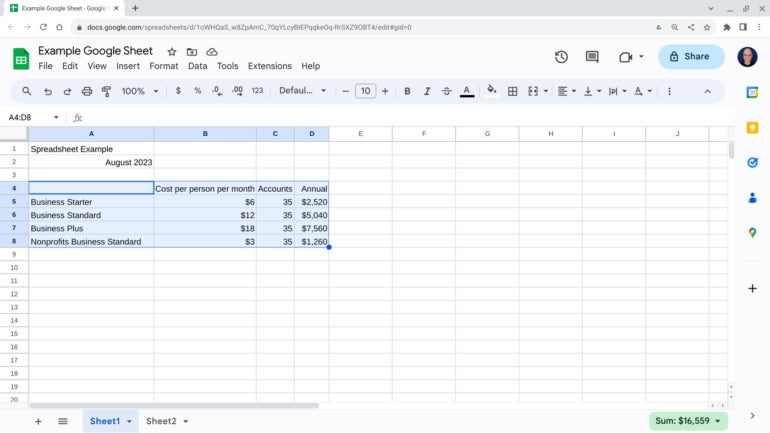
Note: If you want to print either the entire Workbook or the current Sheet, skip this step and continue to the next step.
2. Choose File | Print. Alternatively, you can press Ctrl + P or select the printer icon displayed to the right of the Redo right arrow.
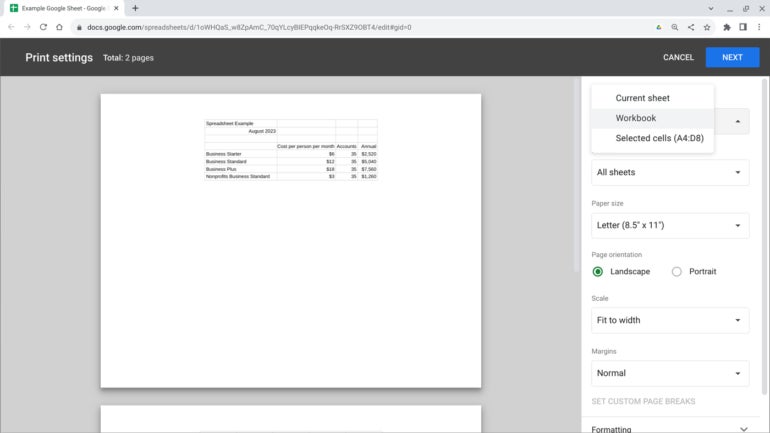
3. On the print preview screen, you can adjust the following items:
- Print area: Current sheet, workbook or selected cells.
- Paper size: Choose from a variety of preset sizes or enter a custom size.
- Page orientation: Landscape or portrait.
- Scale: Fit to width, height, or page, or enter a custom percentage.
- Margins: Normal, narrow, or wide, or enter a custom size.
- Page breaks
- Formatting: Add gridlines or notes; adjust page order; choose horizontal (center, left or right) and/or vertical (top, middle or bottom) alignment options.
- Headers and footers: Page numbers, title, name, date, time, etc.
As you adjust each setting, the display adjusts to reflect your selected options. Change as many of the settings above until the print preview matches the output you desire (Figure B).
Figure B
4. Select Next at the upper right corner.
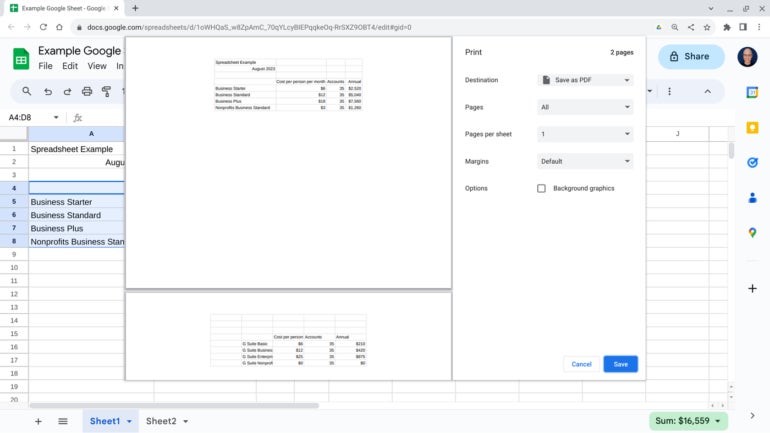
5. Modify any of the following options as necessary:
- Destination: Select a printer, or choose Save as PDF or Save to Google Drive as PDF.
- Pages: All, or specify specific pages to print.
- Pages per sheet: Choose 1, 2, 4, 6, 9 or 16.
- Margins: Default, none, minimum or custom.
- Option box to print Background graphics.
6. Either select Print or Save, depending on your options and system (Figure C). In some circumstances, you might save your Sheet as a PDF first and then open your PDF and print it.
Figure C
How do I print header rows for each Google Sheets page?
Freezing header rows can help keep your Google Sheet organized and make it easier for you to use, especially when you are working with a large amount of data covering several rows. With this approach, you won’t have to scroll up or flip through several pages to check headers.
SEE: Explore these Google Docs tips for advanced users.
The following steps will allow you to print header rows for each Google Sheets page in a browser-based version of the application:
1. Open the Google Sheets file that you want to print.
2. Click View | Freeze, and then select the header row option, which is typically row 1. The Freeze option will display the top row even when you scroll down. There are other header row options available, which you may select as appropriate. These vary based on your cursor location.
Best business software
- Blackpoint Cyber vs. Arctic Wolf: Which MDR Solution is Right for You?
- SS&C Intralinks DealCentre AI vs. Datasite: Which platform is built for the future of dealmaking?
- Unified by Design: The Smart Stack Advantage of NinjaOne and Microsoft Intune
- Still Not Backing Up Microsoft 365 Data? Here’s Why That’s a Risky Move
- Verito vs. Rightworks: Which IT Provider Is Best for Your Firm?
3. Click File at the top left, and then click Print. This will open the Print Preview window to show you how your Google Sheet will appear when printed.
4. Click on Headers & Footers in the right column.
5. Scroll down to select Repeat Frozen Rows.
Users can also repeat more than one row at the top of the page. They can select to repeat more rows through the options in the Freeze menu. Additionally, you can add page numbers through the Edit Custom Fields tab.
How do I change print margins in Google Sheets?
Margins are the unused white space between the content and the edges of a printed page. Google Sheets offers the option for you to change the size of your print margins.
SEE: Here’s how to change the header margins in Microsoft Word.
Although the default settings work for most use cases, you might occasionally need to adjust the margins to modify the Sheet’s appearance. You can even change the scale of the pages to fine-tune how you want the sheet to appear when printed.
To get to the Margin and Scale settings, click File | Print.
Margin settings
- Normal: Default setting.
- Wide: Increasing the margins will create more white space around the edges. This will result in less space for the content on the page.
- Narrow: Decreasing the margins will allow for more content space, meaning fewer pages when printing, though less white space.
- Custom Numbers: You can enter a custom size for the margins based on how you want the page to print.
Scale settings
- Normal: Default setting.
- Fit to Width: This setting will compress cells to fit all columns on a single page. This setting is ideal when you print many rows with only a few columns.
- Fit to Height: Content will be compressed as needed to fit all rows on a single page. This setting is ideal when you want to print many columns with only a few rows.
- Fit to Page: This setting will fit the content of the worksheet or your selected content to fill one page. You can use this setting to get better data visibility if you have smaller data ranges.
- Custom Numbers: You can enter a customer number for scale settings as well.
How to print from Google Sheets app
You can print from the Google Sheets mobile app on either Android or iOS devices:
1. For Android devices, tap the three-vertical dot menu in the upper right. On iOS, tap the three-horizontal dot menu in the upper-right (Figure D).
Figure D
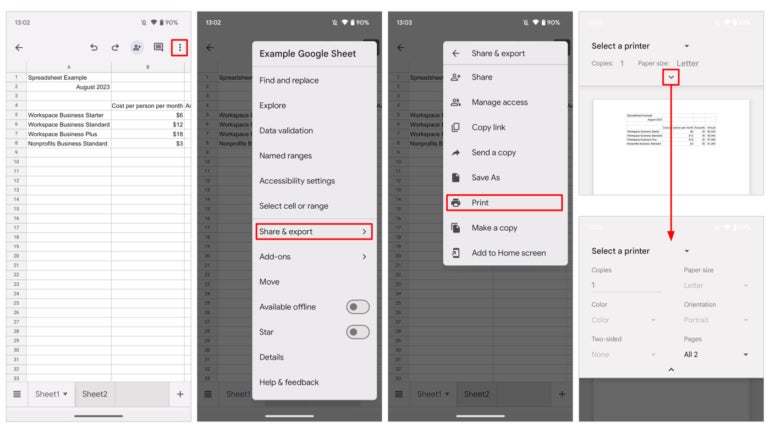
2. Tap Share & Export.
3. Tap Print.
4. Next, select your printer and adjust the number of copies.
Depending on your platform and/or printer, you may be able to adjust additional options. For example, on Android, you can tap the down arrow to adjust options. These might include paper size, paper orientation, specific pages to print, color versus black and white printing, or two-sided printing.
How to modify Google Sheets mobile app print options
When you print from the Google Sheets mobile app on Android, iOS or iPadOS, you have access to fewer settings and controls than you do when you print a Google Sheet from a desktop-class browser. As of August 2023, you cannot select specific cells to print.
For Android, within the Google Sheets mobile app, you may make adjustments to:
- Device (Printer or Save as PDF).
- Number of copies.
- Color versus Black and white.
- Two-sided (if supported by printer).
- Paper size (if supported by printer).
- Orientation (portrait or landscape).
- Pages selected to print.
Learning resources for Google Sheets users
Google Sheets has many straightforward features, but for more sophisticated use cases and projects, shortcuts and tips make a huge difference. You may not even need to print at all now that you may use Google Sheets as a data source for mail merge in Gmail.
To use Google Sheets more productively and efficiently, these learning resources from our Google tutorial library are especially helpful:
- How to wrap text in Google Sheets (TechRepublic)
- How to use People Chips in Google Sheets (TechRepublic)
- How Google Sheets smart chips let you pack more into cells (TechRepublic)
- Master reporting automation with Google Sheets (TechRepublic Academy)
- Top 5 Google Sheets shortcuts (TechRepublic)
- How to edit a drop-down list in Google Sheets (TechRepublic)
- How to use google Sheets data in Microsoft Power BI (TechRepublic)
These tutorials cover a variety of business projects and specific goals. However, they may not be what you need to boost your overall expertise in Google Sheets. For additional tips and training, this Google Sheets and Microsoft Excel certification course from TechRepublic Academy is a great resource.
Read next: Explore this side-by-side analysis of Google Workspace vs. Microsoft 365.