
Word’s mail merge feature has been around for a long time but recent versions are much easier to use. You can use the mail merge feature to generate multiple documents at once. For instance, you might generate a batch of letters, forms, emails, or even labels using mail merge. Anytime most of the text is the same but it requires a bit of personalization, consider using mail merge. You’ll save time.
In this article, we’ll work through a simple example that inserts detailed information stored in Excel into a Word merge document. First, we’ll look at the required documents. Then, we’ll work through the merge to generate the final documents.
I’m using Office 365 (desktop) Word and Excel on a Windows 10 64-bit system. This feature isn’t available in the online versions. You can work with your own files or download the demonstration .xlsx and .docx files.
SEE: Server deployment/migration checklist (Tech Pro Research)
The pieces
To start, you need two components: The template document and the information document. The template will be a Word document that repeats most everything but a few details. Those details will be in the information document, and it will be different for each merged document.
For instance, you might send a welcome letter to new club members. The body of the letter is a Word document–the template. The recipients, their addresses, the types of memberships, and so on will be unique to each letter. The information document is often an Excel workbook. Figure A shows a simple welcome letter in a Word document and a short list of new members in an Excel file.
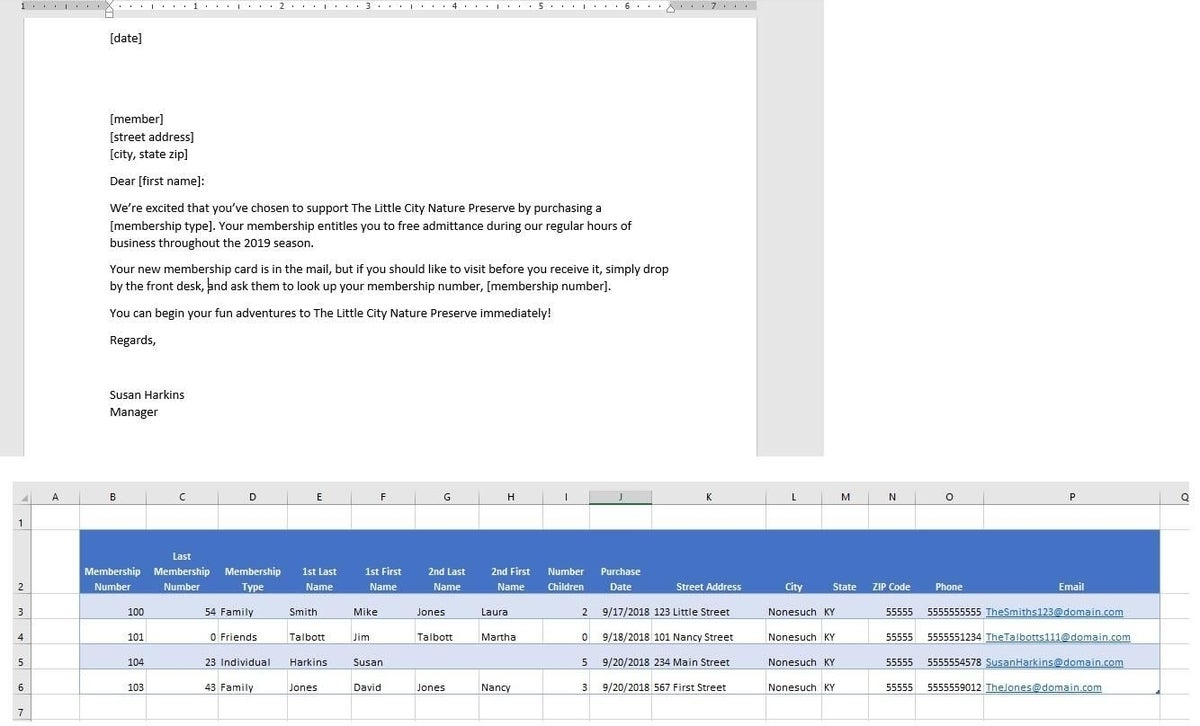
The Word template has a number of textual placeholders, denoted by the [] characters–member’s name, address, and membership type. These are a visual clue to you that you need to merge fields to display the personalized data. (The placeholders mean nothing to Word, and you can use any visual clue you want.) When setting up the merge, you’ll replace those with the merge fields that are mapped to the Excel fields, accordingly. The merge will generate four new membership letters ready to put in the mail. You might think that it would be faster to type four letters, but it isn’t. In addition, you can reuse the template every time you want to print new membership letters. Also, consider that a mail merge can handle hundreds of finished pages. We’re working with a short list to simplify the example.
Before creating the Word template from scratch, look for an existing template. Word offers a number of templates for a variety of purposes. In addition, if this were a large mailing, you might need to sort the detail records for some reason. For instance, if you want to take advantage of bulk mail rate, you’d want to sort the Excel records by ZIP Code before starting the merge.
The date
The first thing we want to replace is the text placeholder for the letter’s date. This isn’t part of the merge task, but it’s something you’ll need to deal with in most merges. You can type the manual date, but if you plan to reuse the template, there’s a better alternative–insert a date field. The quickest way to do so is to select the [date] placeholder and press Alt+Shift+d. However, you can’t control the format. If you want more control, delete the [date] placeholder, and then do the following:
- Click the Insert menu and then click Insert Date and Time in the Text group.
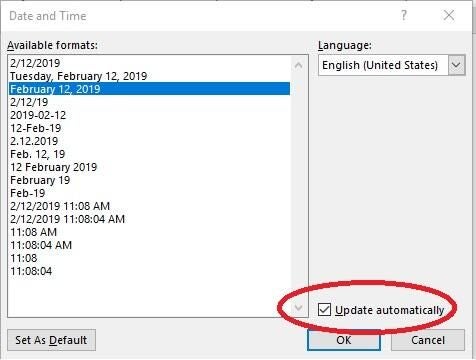
- In the resulting dialog, select a format (Figure B). Be sure to check the Update automatically option.
- Click OK, and Word will display the current date where the [date] placeholder was.
Start the merge
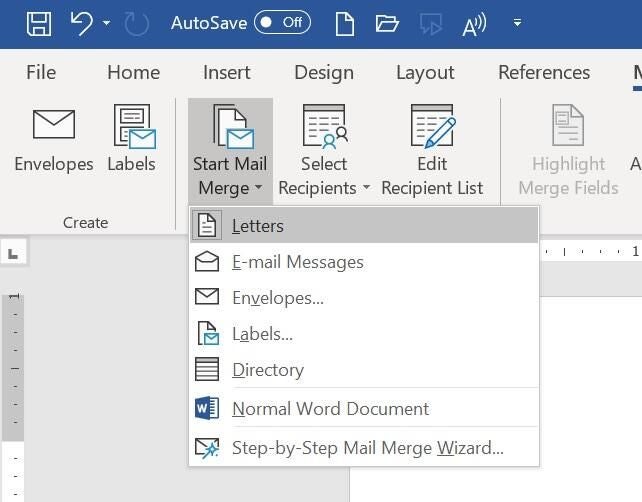
The next step is to start the merge by clicking the Mailings tab. In the Start Mail Merge group, click the Start Mail Merge option and choose Letters. There are several options as shown in Figure C. It’s a good idea to note the different options. You can use this feature to do a lot more than just print a few form letters.
Next, click Select Recipients and identify the Excel new members workbook that contains all of the details about each new member as follows:
- After clicking Select Recipients, choose Use an Existing List from the dropdown.
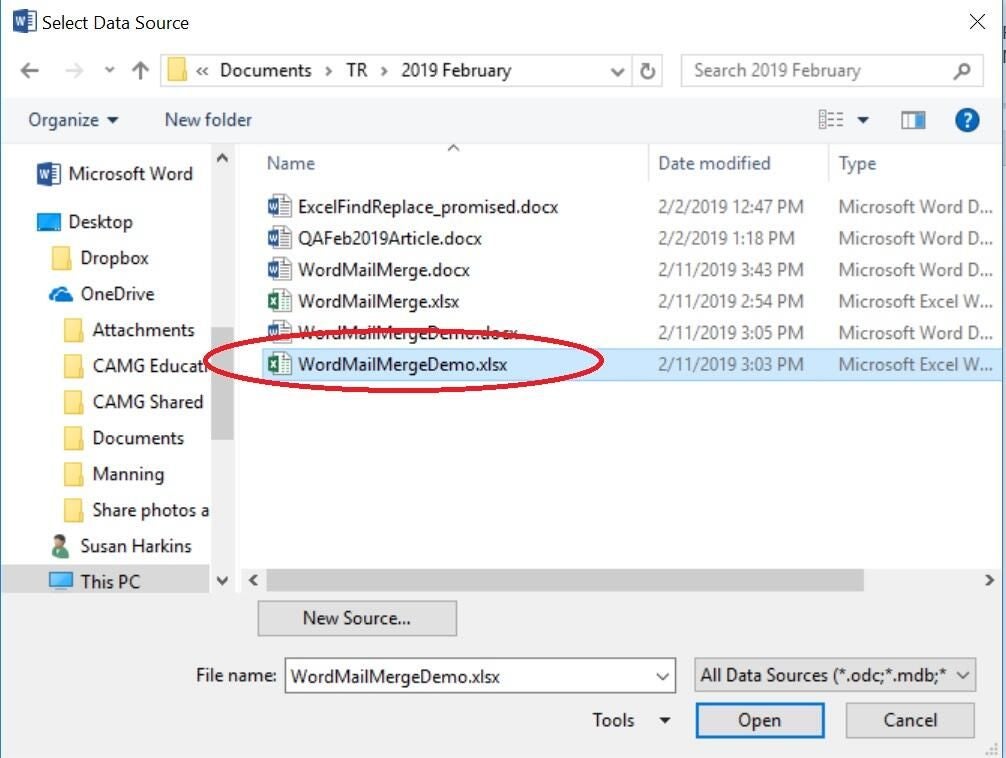
- Use the resulting dialog to locate and then select your details file. In this case, it’s an Excel workbook (Figure D).
- Click Open. Identify the appropriate sheet and click OK in the second dialog. Excel correctly notes that the data range (a Table object in this case) has headers (This is an option you might have to uncheck.).
Mapping the fields
Word knows where the details are coming from. Now, you need to tell Word where to insert those details within the template document. Before you can do so, you must map placeholders to specific fields in the details Excel file. In this case, we’re talking about a set of predefined placeholders, and not the text placeholders you typed when you created your template document.
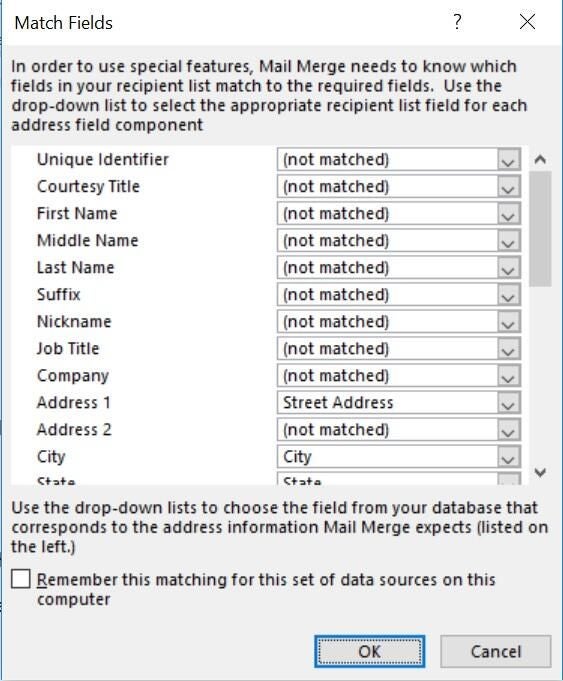
To start mapping, click Match Fields in the Write & Insert Fields group. As you can see in Figure E, Word is able to match a few for you because the names–City, State, and ZIP–match. You’ll notice that Word has a long list of possible fields, and our document has only a few text placeholders. Don’t worry about the fields with no matching placeholder; you can completely ignore those.
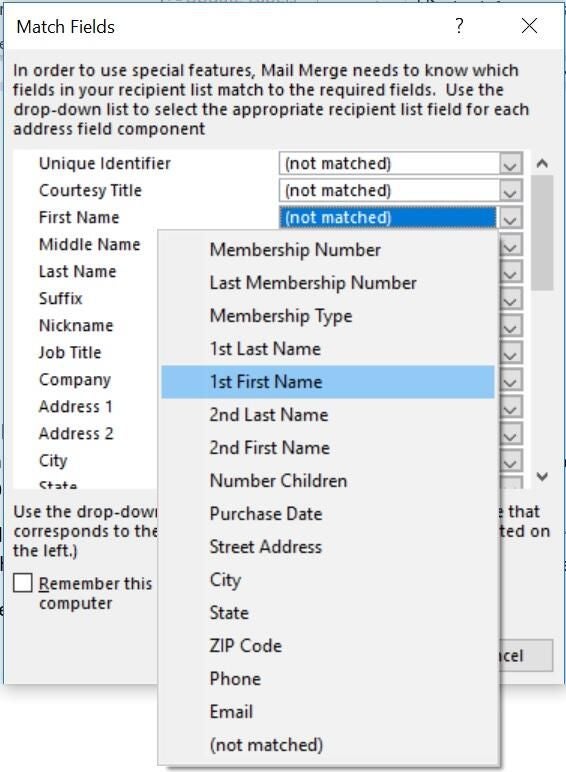
Let’s match what we can. From the First Name dropdown, choose 1st First Name. From the Last Name dropdown, choose 1st Last Name (Figure F).
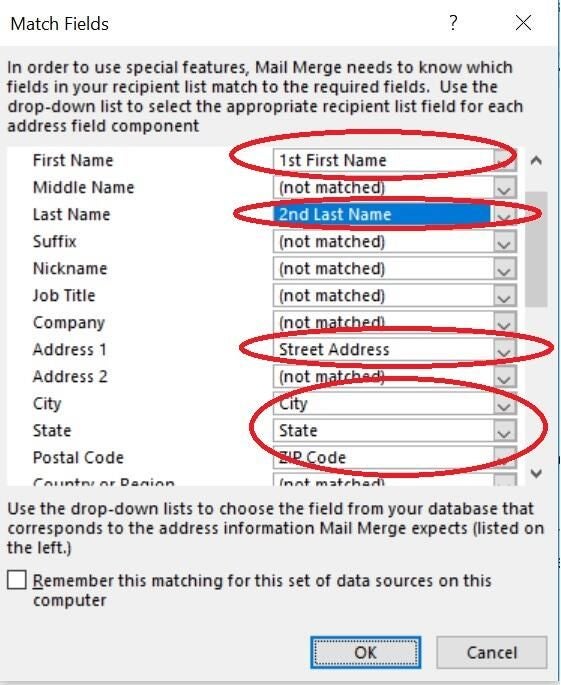
Using Figure G as a guideline, map the last name fields. Word matched City, State, and Postal Code for you.
Insert merge fields
With the fields mapped, you’re ready to start inserting merge fields into the actual document to replace the text placeholders you added when you created the template. Let’s start with [member]:
- Select [member].
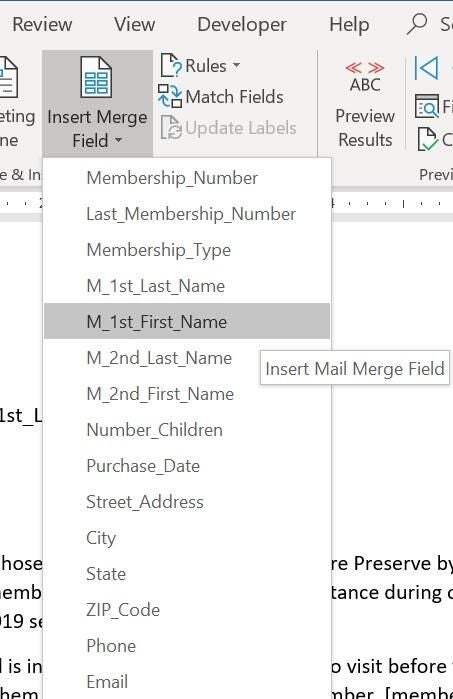
- Click Insert Merge Field in the Write & Insert Fields group and choose M_1st_First_Name field from the resulting list (Figure H). This dropdown lists all the fields from the Excel sheet.
- Hit the spacebar to insert a space between the first and last names.
- Then, repeat step 2 to insert the M_1st_Last_Name field.
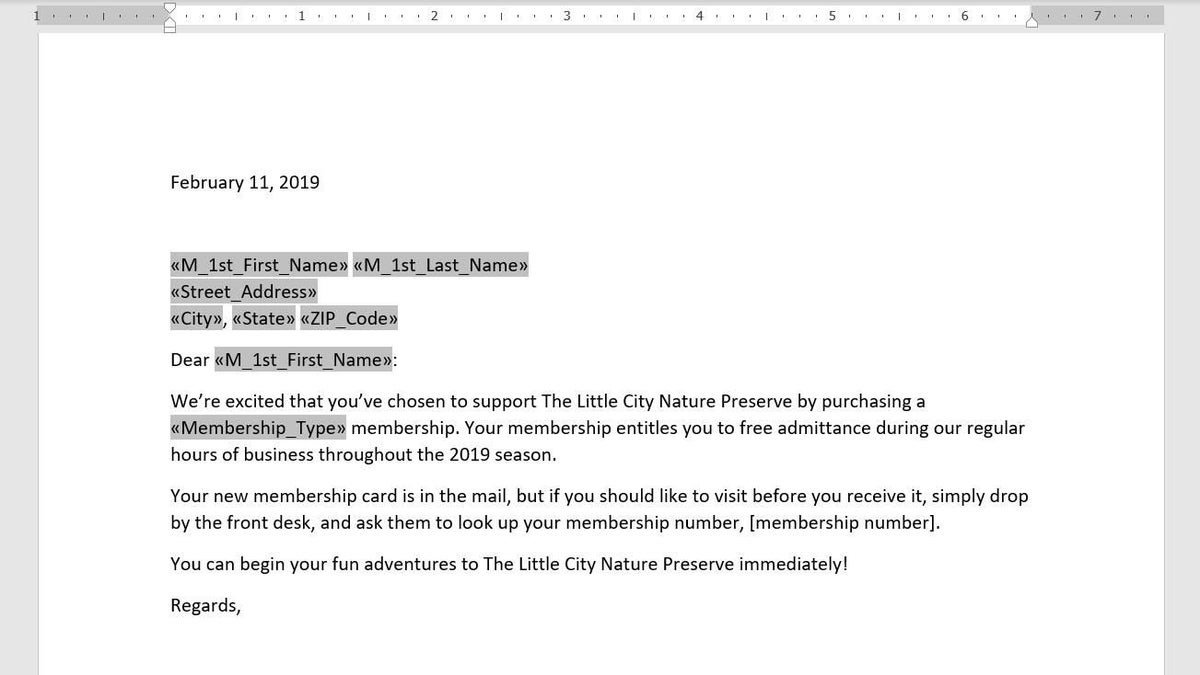
Continue replacing the text placeholders with the street address, city, state, and ZIP code merge fields. Remember to insert spaces and punctuation. Don’t forget to replace the [membership type] text placeholder with the Membership_Type field. Figure I shows all of the inserted merge fields. Notice that after inserting the Membership_Type merge field, I added the word membership. That was a simple error made when creating the template–see how easy it is to fix? You can edit the template document as you would any other document.
With all the merge fields in place, you’re ready to merge. Before you do though, click Preview Results in the Preview Results group. Doing so allows you to review the merge before you actually commit it to files. Once you’re satisfied that all is in place, click Finish & Merge in the Finish group. You can save the results so that you can edit or use later. Choose Edit Individual Documents, and then click OK to confirm the actual records. Figure J shows the first of four new member letters, ready to print.
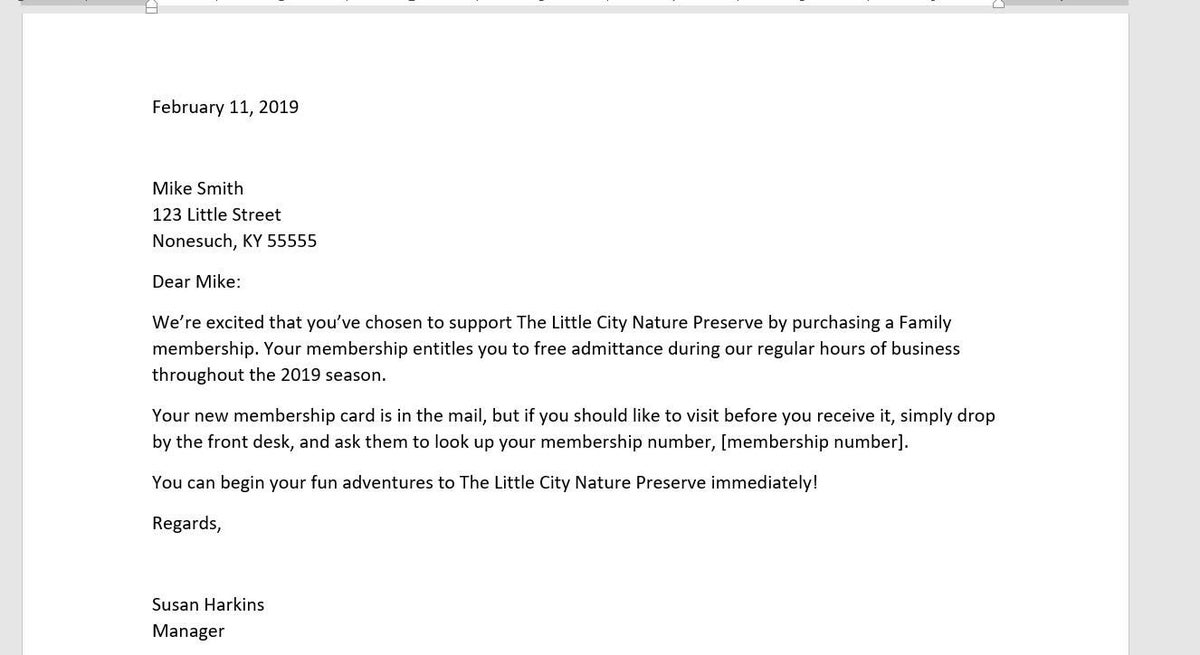
Oops! We forgot to replace the [membership number] placeholder. No problem–simply access the Word template document, replace it using the instructions above and rerun the merge. (Imagine if you had to fix that in every document.)
A few tips
Save the template as a template file (.dotx) for future use–you don’t have to start over from scratch. Although we didn’t actually print our letters, you’ll often send your merge results to the printer. Be sure your letterhead or label sheets are ready to go. When using an email merge, send the file to yourself first so that you can see what the message actually looks like; you want to see what your recipients will see. You might make adjustments based on what you see.
Stay tuned
This is a simple merge example, but the feature offers much more. In a subsequent article, I’ll show you how to generate conditional merges.
Send me your question about Office
I answer readers’ questions when I can, but there’s no guarantee. Don’t send files unless requested; initial requests for help that arrive with attached files will be deleted unread. You can send screenshots of your data to help clarify your question. When contacting me, be as specific as possible. For example, “Please troubleshoot my workbook and fix what’s wrong” probably won’t get a response, but “Can you tell me why this formula isn’t returning the expected results?” might. Please mention the app and version that you’re using. I’m not reimbursed by TechRepublic for my time or expertise when helping readers, nor do I ask for a fee from readers I help. You can contact me at susansalesharkins@gmail.com.
See also
- Office Q&A: How to use a macro to set Find defaults (TechRepublic)
- How to use Office Picture Layout options to quickly arrange pictures (TechRepublic)
- How to use Excel’s find feature to highlight or delete matching values (TechRepublic)
- Office Q&A: How to share Outlook 365 contacts (TechRepublic)
- Office Q&A: How to anchor image files in Microsoft Word (TechRepublic)
- 20 pro tips to make Windows 10 work the way you want (TechRepublic download)
- Microsoft Office 365 for business: Everything you need to know (ZDNet)
- Programming languages and developer career resources coverage (TechRepublic on Flipboard)

