


Everyone loves Outlook–until they hate it. You can be grateful for its broad reach and still be frustrated by its inflexible tools and options. More than any other Office application, working quicker in Outlook has special meaning for users. The sooner you’re done, the better you feel. In this article, I’ll show you 10 ways to streamline some common Outlook tasks.
- More about Software
- 1: Attach a file the easy way
- 2: Create a new item with existing content
- 3: Never write the same email twice
- 4: Quickly apply multiple flags
- 5: Send cc’s packing
- 6: Never lose another email
- 7: Access Outlook items… without Outlook
- 8: Clean up
- 9: Use Quick Steps to move messages
- 10: Open separate windows
- Also read…
More about Software
- Software Installation Policy
- Five Methods to Insert a Checkmark Into Microsoft Office Products
- How to Hide and Handle Zero Values in an Excel Chart
- How to Use Section Breaks to Control Formatting in Word
I’m using Outlook 2016 (desktop) on a Windows 10 64-bit system, but most of these will work in older versions. There’s no demonstration file.
Note: This article is also available in the free PDF 50 time-saving tips to speed your work in Microsoft Office.
1: Attach a file the easy way
Attaching a file to an email can mean a lot of clicking through your folder hierarchy. Fortunately, there are several ways to avoid the labyrinth–at least, most of the time. First, if you’re using Outlook 2016 and you’ve had the file open recently, you can choose that file from the Attach File dropdown shown in Figure A.
Figure A
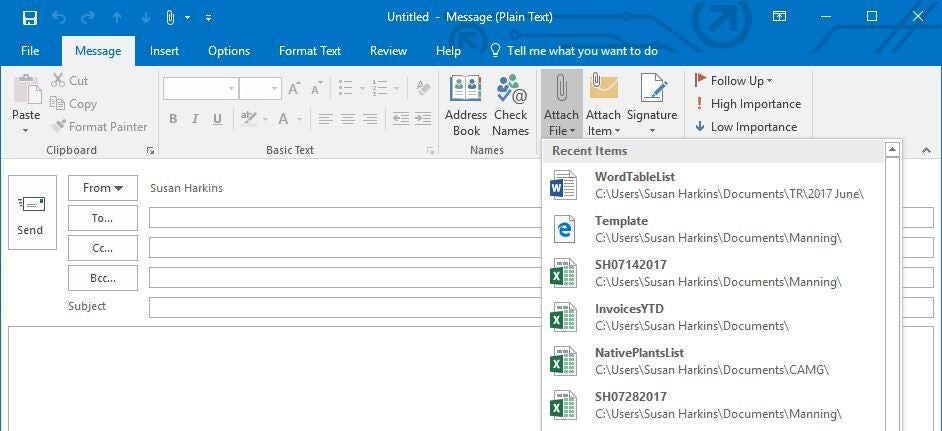
Use the Attach File dropdown to quickly attach a recently opened file to an email message.
The second way is to use Windows Explorer. Simply right-click the file, choose Send To, and select Mail Recipient, as shown in Figure B. Windows will open a new email message with the selected file attached, whether Outlook is open or not.
Figure B
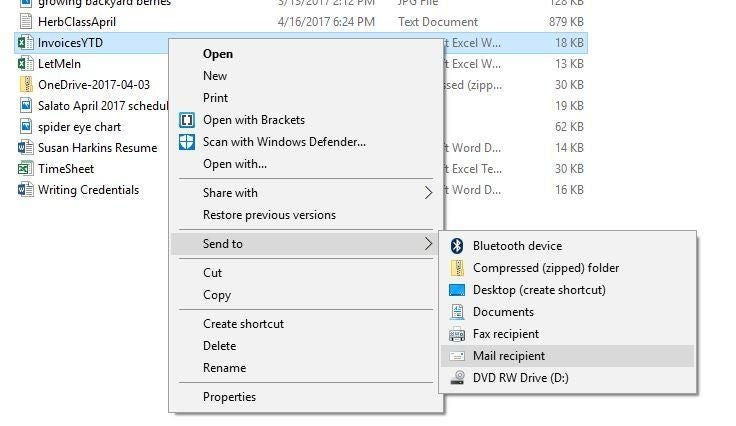
Use Windows Explorer to attach a file.
There’s a third way: If Outlook isn’t maximized, you can drag the file from Windows Explorer to the Inbox to open a new email message with the file attached. With Outlook maximized, drag the file to the Taskbar icon, which will display Outlook. At this point, simply drag the file to the Inbox.
2: Create a new item with existing content
By copying content to the Clipboard, you can bypass the New item route. For instance, say you want to create a new email message using content in a Word document. Start by pressing Ctrl+C to copy that content to the Clipboard. Then in Outlook, choose the Mail window and press Ctrl+V. Outlook will open a new email message with the copied content in the body of the message. This works with other items as well. To create an appointment, open the Calendar; to create a contact, open People, and so on.
This works differently if you’re starting with an Outlook item. For instance, If you have appointment info in an email, drag that email to the Calendar icon to open a new appointment window, complete with the email’s content. Drag an email to People to create a new contact using the sender’s information. Drag any item to an icon and see what happens–you might discover a great shortcut.
SEE: Build your Excel skills with these 10 power tips (TechRepublic PDF)
3: Never write the same email twice
If you routinely send the same message, you might type it as needed or copy the content from a note. You can save a bit of time by creating a template that contains the content. You can include formatting, images, tables, and even attach a file to the template.
To create the template, open a new message and enter and format all the desired content. Before sending each time, you can edit the content, so include everything you might need in the template and delete unnecessary parts later.
When the message is complete, click the File tab and choose Save As. In the resulting dialog, choose Outlook Template from the Save As Type, enter a filename, as shown in Figure C, and click Save. Outlook knows where to save the template file for easy access later; I don’t recommend changing the default location unless you have a specific reason for doing so.
Figure C
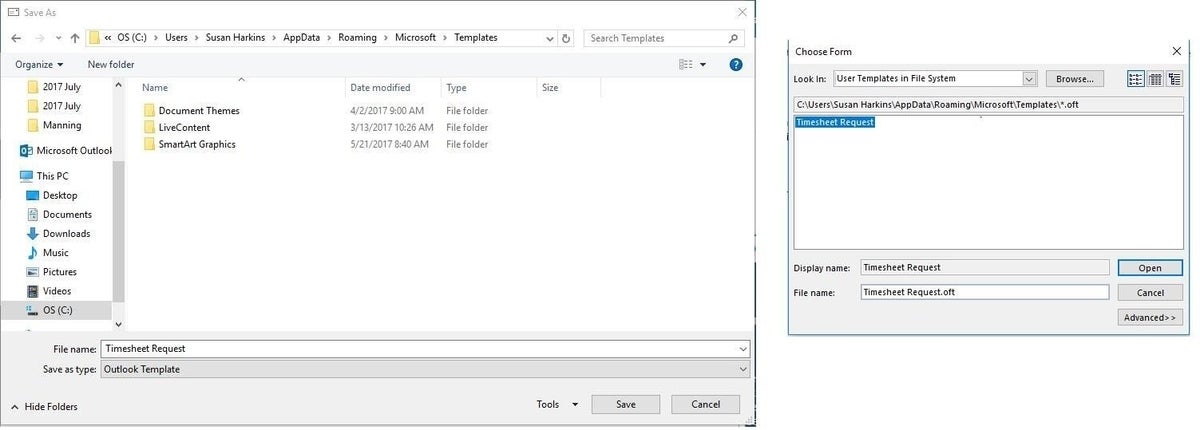
Save an email message as a template.
To use the template, click the Home tab and then choose More Items from the New Items dropdown (in the New group). Next, select Choose Form. In the resulting dialog, choose User Templates In File System from the Look In dropdown to open the default user templates folder. Select the template and click Open. Make any changes you want, identify the recipients, and send. Outlook won’t save any changes you make to the template at this point. To learn how to combine templates with macros to make them even more efficient, read Combine Outlook templates with macros to eliminate repetitive tasks.
4: Quickly apply multiple flags
You can flag or unflag several messages at the same time. Simply create a multi-message selection by holding down the Shift or Ctrl key while clicking the messages you want to flag. With all the messages selected, press Insert. Doing so will add or remove flags, accordingly.
5: Send cc’s packing
Senders sometimes cc us on mail when they want to keep us in the loop. For better or worse, these messages are often a lower priority and unnecessarily crowd the Inbox, which is distracting. You can set up a rule to move all emails for which you’re a cc recipient and not a To recipient so you can deal with them later.
First, create a new folder by right-clicking your account node and choosing New Folder. Enter a new name, such as Inbox–cc. To set up the rule, do the following:
- Click the Home tab and choose Create Rule from the Rules dropdown (in the Move group). If Outlook disables this option, select a different folder–one with messages.
- In the resulting dialog, click Advanced Options.
- In the Step 1 list, select Where My Name Is Not In The To Bo . You might also want to select Where My Name Is In The Cc Box. Then, click Next. Including both might be overkill, but if you receive lots of mail from lists, you’ll want to also check the second option. Otherwise, that mail will also be moved to the Inbox–cc folder.
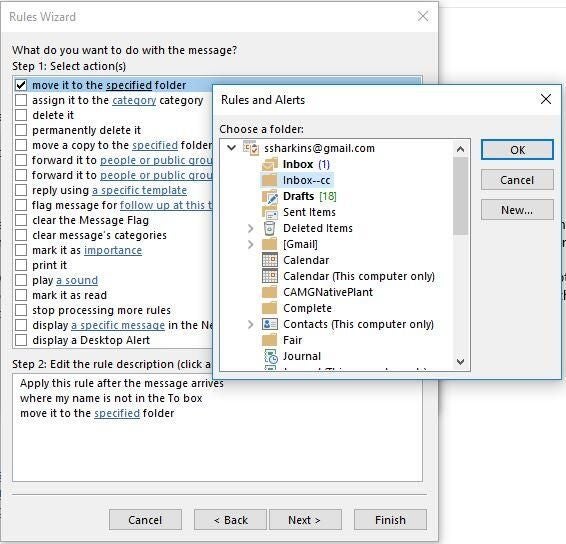
- In the next list, check Move It To The Specified Folder.
- In the lower pane, click the specified link, select the new folder where you want to store these messages (Figure D), and click OK.
- Click Next twice and enter a meaningful name for the new rule–or not–the default option name is often adequate.
- If you want to move existing messages immediately, check the Run This Rule Now On Messages Already In Inbox option.
- Click Finish.
Figure D
Choose the folder.
Outlook will automatically bypass your Inbox and move emails that include you as a cc recipient and not a To recipient into the new folder. The result is an Inbox with fewer low-priority messages to wade through.
6: Never lose another email
Do you spend time searching for important messages? You might try using a search string or sorting by a column, but ultimately, there’s a quicker and much easier way–search folders. Create a search folder by right-clicking Search Folder (at the bottom of the folder list) and choosing New Search Folder. Then, enter the appropriate criteria to identify the emails you need quick access to. You might use dates, project names, or your boss’s name. The search folder contains shortcuts to all messages that meet the criteria you specified. No more searching–everything’s right where you need it. For a great real-world example, read Filter for all sent and received mail on the current day in Office Q&A: Three ways to search for messages in Outlook.
7: Access Outlook items… without Outlook
The only way I can work uninterrupted is to close Outlook, which leaves me a tad vulnerable. By dragging items to the Desktop, I have quick access to them. Simply restore Outlook and drag an email, appointment, note, item, contact–any Outlook item–to the Desktop. When you need to review its contents, double-click it to see its contents without opening Outlook. I love this one.
SEE: Microsoft launches new Outlook.com beta; starts testing new features (ZDNet)
8: Clean up
This tip’s easy to implement but often ignored. Outlook’s Clean Up option quickly deletes redundant messages from a conversation, a folder, or a folder and its subfolders. Running this feature is a fast way to delete unnecessary messages from your Inbox and folders by deleting messages that are quoted in subsequent messages. To use this feature, choose any of its options from the Clean Up dropdown in the Delete group on the Home tab. Click the Settings button to customize this option to meet your needs.
9: Use Quick Steps to move messages
If you often move multiples messages to the same folder, Quick Steps might be quicker and certainly will be more accurate than dragging. It’s easy to drop messages into the wrong folder. You can easily create a Quick Step that moves selected messages to a previously specified folder. To demonstrate, let’s create a Quick Step that moves messages to the Fair folder:
- Click the Quick Steps launcher.
- In the resulting dialog, choose Move To Folder from the New dropdown.
- Enter a name and then choose the Fair folder from the Move To Folder dropdown. If the folder isn’t visible, click Other Folder to display a full list of folders. Choose Fair and then click OK.
- To assign a shortcut to the Quick Step, click Options. From the Shortcut Key dropdown, select a keystroke combination (Figure E) and click Save.
- Click OK to return to Outlook.
Figure E
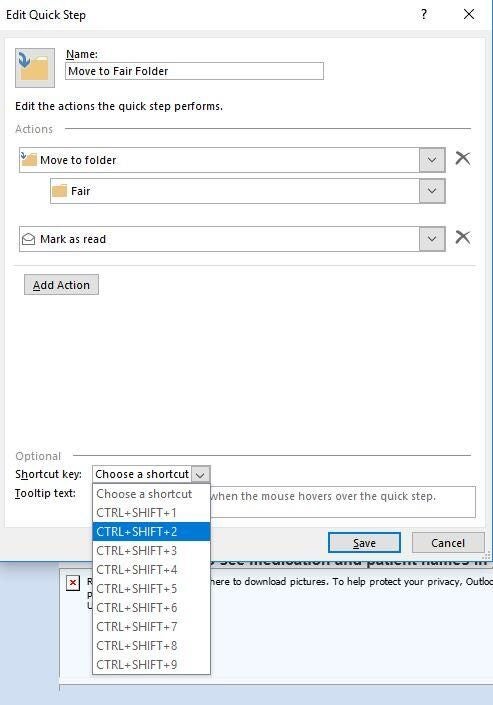
Assign a keystroke combination.
To use the Quick Step, select the messages you want to move to the Fair folder. Then, click Move To Fair in the Quick Steps gallery (Figure F) or press Ctrl+Shift+2. You can use Quick Steps with most common repetitive tasks. Pressing Ctrl+Z will undo most Quick Steps.
Figure F

Click Quick Steps.
10: Open separate windows
If you switch between windows (and folders) a lot, you might find it faster to work with each as its own instance. Doing so can reduce the need to hit the Navigation pane to go back and forth between windows. To open any Outlook window separately, right-click its shortcut in the Navigation pane and choose Open In New Window. You can open any Outlook window separately–and that’s what makes this tip so valuable. It’s possible to work with several windows and use the Taskbar to move back and forth between them, returning you to the spot where you were last working in that window. I usually drag new windows to another monitor. To close a window, simply the Close button (X) in the right corner of that window’s title bar.
Send me your question about Office
I answer readers’ questions when I can, but there’s no guarantee. Don’t send files unless requested; initial requests for help that arrive with attached files will be deleted unread. You can send screenshots of your data to help clarify your question. When contacting me, be as specific as possible. For example, “Please troubleshoot my workbook and fix what’s wrong” probably won’t get a response, but “Can you tell me why this formula isn’t returning the expected results?” might. Please mention the app and version that you’re using. I’m not reimbursed by TechRepublic for my time or expertise when helping readers, nor do I ask for a fee from readers I help. You can contact me at susansalesharkins@gmail.com.
Also read…
- 10 time-saving tips to speed your work in Word (TechRepublic)
- How to reset a recurring task in Outlook (TechRepublic)
- Office Q&A: Reclaim old options and quickly find related messages (TechRepublic)
- Microsoft Office Specialist Certification Training (TechRepublic Academy)