Word styles present a bit of a conundrum for users. They’re powerful but a bit mysterious, so users tend to avoid them. The truth is, if you’re using Word for anything, you’re implementing styles, whether you realize it or not. So, it makes good sense to expand on that foundation. Once you master styles, you’ll love them (or not, but you’ll definitely take advantage of them!) In this article, I’ll show you five easy ways to control styles, so you can put them to good use.
I’m using Word 2016 (desktop) on a Windows 10 64-bit system. Styles have always been around, and although you can implement them in older versions, the step-by-step instructions will differ. There’s no demonstration file; you won’t need one. The browser edition supports existing styles. You can change styles, but you can’t create custom styles in the browser.
1. Start over
Despite the best of intentions, a document can become overwhelmed by direct formatting and modified styles. This is especially true when a document has gone through several different users, each making the document their own by modifying styles and adding direct formatting.
Formats comes in two levels: direct and styles. Direct formatting is a manually applied format, such as clicking the Bold or Italics button. You apply numerous attributes at once using a style. It’s important to understand the differences between the two when removing them.
You can remove direct formatting by selecting only that content and pressing Ctrl+Space or choosing Clear All Formatting in the Font group. If the content has an applied style (other than Normal), neither route will remove the style. If you select an entire paragraph or the entire document, both Ctrl+Space and Clear All Formatting will remove all direct formatting and remove all formatting leaving only plain text.
SEE: 20 quick Windows tips for power users (free PDF) (TechRepublic)
2. Modify the built-in styles
Styles may streamline formatting tasks, but the built-in styles won’t always be adequate. It’s easy enough to create a custom style, but that presents a problem–many Word features, such as the table of contents, depend on the built-in styles. For example, if you assign a custom style to headings, you’ll have to work extra hard to get Word to recognize those headings when generating a table of content.
Fortunately, you can modify built-ins in one of two ways. First, the long way:
- Click the Home tab, right-click the style you want to modify in the Style Gallery, and then choose Modify.
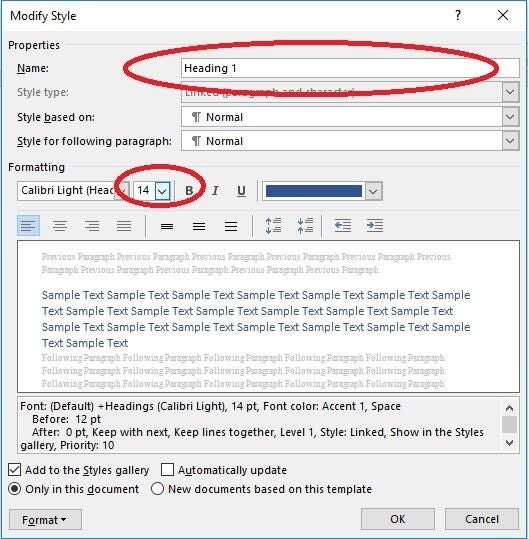
- In the Modify Style dialog, change style attributes. For instance, in Figure A, I changed Heading 1’s font size (I made it smaller; it was 16). You’ll find more formatting options by clicking the Format button in the bottom-left corner.
- After making all the changes you want to the style, click the New documents based on this template option (at the bottom) if you want all new documents to share this modified built-in style. If, on the other hand, the changes are meant for only the current document, retain the default option of Only in this document.
- Click OK.
Figure A

Change a built-in style’s attributes.
Using Undo immediately (or pressing Ctrl+z) works when modifying styles. In addition, instances of the styled content will update immediately in the current document.
A quicker way to modify a style is to apply the formatting to content in a document. Then, select the newly formatted content, right-click the (selected) style in the Style Gallery, and choose Update style to Match Selection from the dropdown list, as shown in Figure B. As before, the update is immediate in the existing document. However, this route doesn’t modify the underlying template.
Figure B

Use selected content to modify an existing style.
3. Create a custom style
If Word feature integration isn’t a consideration, you can quickly create custom styles from formatted content. It works with character and paragraph styles. Simply format the text or paragraph. Then select it, and do the following:
- Click the Home tab.
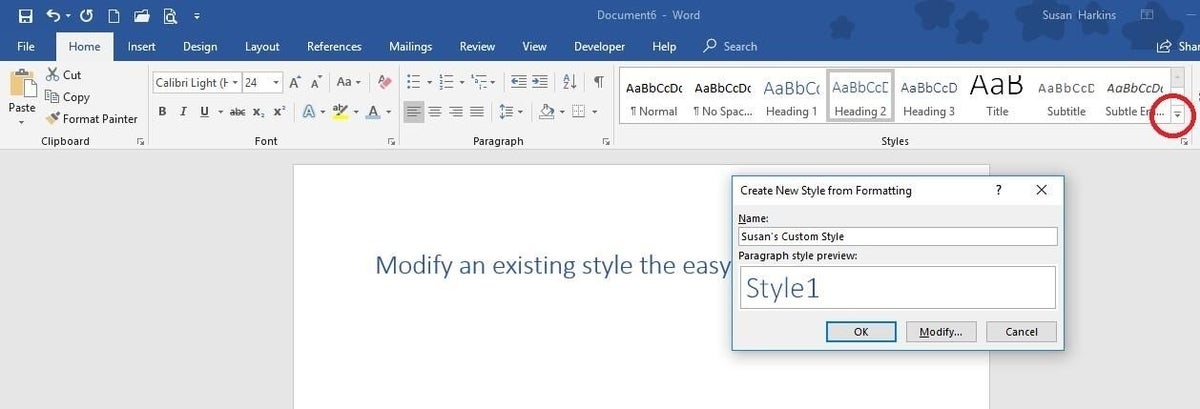
- Click the Style Gallery’s More button (circled in Figure C) and choose Create a Style.
- Enter a name for the new style (Figure C).
- Click OK.
Figure C

Create a custom style.
4. Use styles in other documents
You won’t have to modify an existing style or create a custom style if it already exists in another document. You can copy it from the other document using the Organizer. To launch the Organizer, click the More button in the Styles Gallery to open the Styles pane. Then, click Manage Styles (the third button in the row at the bottom). In the resulting dialog, click Import/Export. It’s buried deep. If the Developer tab is visible, click Document Templates in the Templates group and click Organizer in the bottom-left corner. There’s a shortcut, but it’s not intuitive: Alt+l+u+o.
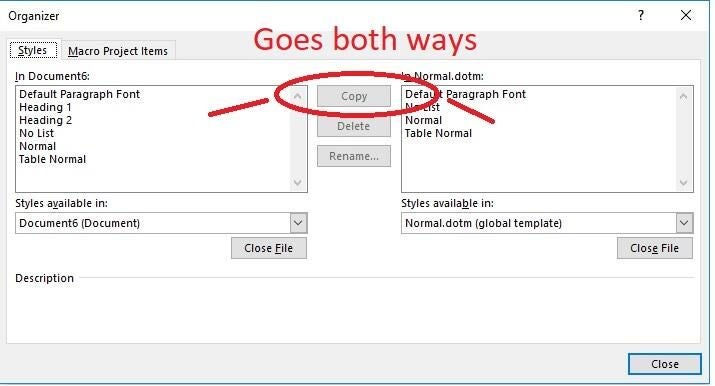
On the Styles tab, you’ll see two list of styles, as shown in Figure D. Either side can display styles from the current document or the underlying template, so be careful. If the style you’re looking for isn’t available, click Close File and then open the document that contains the styles you want to copy.
Figure D

Use the Organizer to add styles from other documents and templates.
When you find the style you want to copy, select it, and click Copy. It makes no difference whether you’re copying from the open document to the template or vice versa. That’s where some users lose their way. This feature is flexible enough to handle either request.
If the destination file contains a style with the same name, Word will warn you. You can replace the existing style, or you can rename the style you are copying and retain both in the destination file.
It’s important to note that both lists display only the styles currently in use. Many styles aren’t used. You can delete a style, but the next time you open the document, it will be back; this action isn’t permanent.
SEE: 10 all-purpose keyboard shortcuts to boost your Word efficiency (free PDF) (TechRepublic)
5. Quick style overview
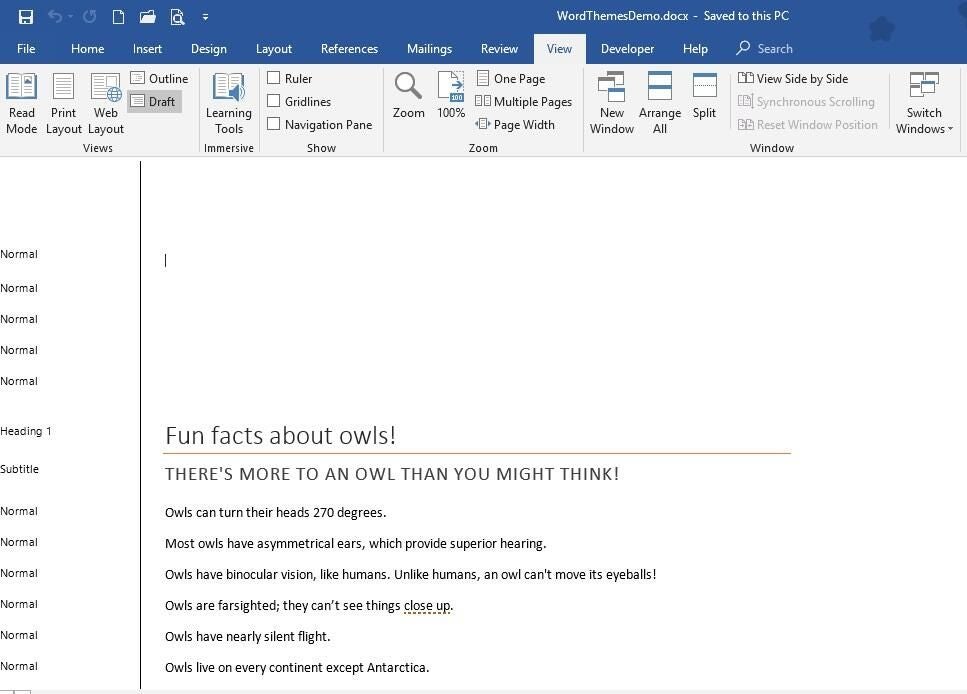
For a quick view of the styles in use, click the View menu and choose Outline or Draft in the Views group. Doing so will display the paragraph styles in use to the left, as show in Figure E. If you don’t see that pane, do the following to display it:
- Click the File tab and choose Options from the left pane.
- Select Advanced in the left pane.
- In the Display Options section, find the Style area pane with in both Draft and Outline views option and enter a value such as 1 or 1.5.
Figure E

Display styles in use to the left of the document.
Send me your question about Office
I answer readers’ questions when I can, but there’s no guarantee. Don’t send files unless requested; initial requests for help that arrive with attached files will be deleted unread. You can send screenshots of your data to help clarify your question. When contacting me, be as specific as possible. For example, “Please troubleshoot my workbook and fix what’s wrong” probably won’t get a response, but “Can you tell me why this formula isn’t returning the expected results?” might. Please mention the app and version that you’re using. I’m not reimbursed by TechRepublic for my time or expertise when helping readers, nor do I ask for a fee from readers I help. You can contact me at susansalesharkins@gmail.com.

