


Image: 200dgr/Shutterstock
Must-read Windows coverage
- CrowdStrike Outage Disrupts Microsoft Systems Worldwide
- 10 Best Project Management Software for Windows in 2024
- Windows 10 Extended Security Updates Promised for Small Businesses and Home Users
- Securing Windows Policy
Many apps use a timestamp to determine when a record is entered or a project is completed. They’re common and useful when you need to know when something happens. There are a few ways to get the job done, but be careful. There’s an easy way, a bad way, and then an automated way. In this article, we’ll review all three and you can decide whether to use the easy way or to automate. You’ll also learn why you don’t want to use the bad way—a method that, off the top of your head probably sounds workable, but isn’t.
SEE: 69 Excel tips every user should master (TechRepublic)
I’m using Microsoft 365 on a Windows 10 64-bit system, but you can use earlier versions. The online version won’t support the macro. You can download the demonstration .xlxs, .cls, and .xls files or work with your own data.
What’s a timestamp
It’s not easy to define the term timestamp because its definition depends on its use. Simply put, it’s the current date and time used to identify when something happens. That might be the time the record was entered, the time a project was completed and so on.
Use the built-in shortcut keys
If you’re familiar with Excel, you probably know that you can use a couple of shortcuts to enter both the time and date:
- Date: Ctrl + ;
- Time: Ctrl + Shift + ;
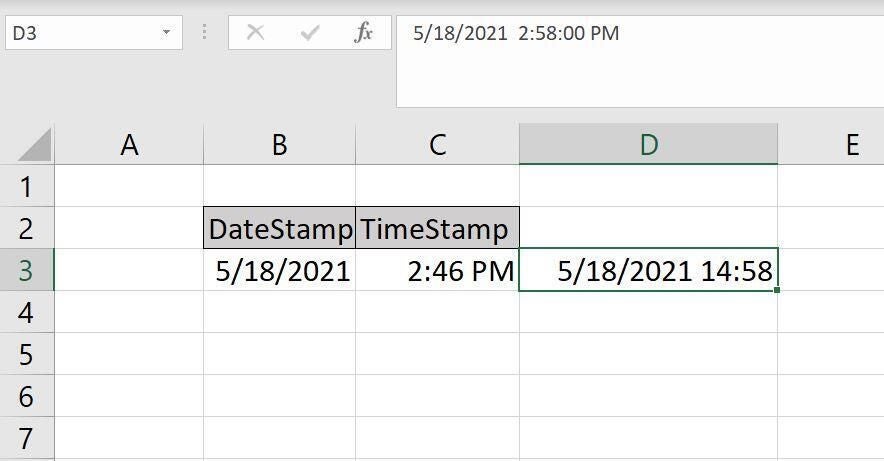
If you want both values in the same cell, you can still use these shortcuts. Enter the first and without pressing Enter—while still in edit mode—enter a space and then press the second shortcut. The result is a custom format that displays the date and time. Figure A shows the result of using these shortcuts. Not only does Excel enter the date and time, but it also formats the cells for display purposes.
Figure A
There’s nothing wrong with using the shortcut keys—they work, and if you don’t mind the keystrokes, this is an easy solution. The downside of course is that you must remember to run the keystrokes. Combining the two into one cell probably isn’t a good idea either unless your users are especially competent; they might not remember to use both, and they might be inconsistent with the delimiter that separates the two values.
SEE: Windows 10: Lists of vocal commands for speech recognition and dictation (free PDF) (TechRepublic)
I prefer the easiest solution usually, and keystrokes might work for you. On the other hand, it’s probably not a great solution to pass on to users.
Why NOW() and TODAY() won’t work as a timestamp in Excel
Some of you might think the NOW() and TODAY() functions will get the job done, but they won’t—not easily. NOW() returns the current date and time and what it displays depends on the format. TODAY() displays the current day.
Perfect right? No. They are volatile functions. That means both functions will update every time the sheet calculates, so they’re far from perfect. You could convert the results to static values, but that’s a lot of work—far too much work.
How to use a macro for a timestamp in Excel
The surest way to get a correct timestamp that remains correct and consistent is to use a macro, or rather a user-defined function. The code is simple. The larger issue is when to run it. For our purposes, we’ll add the macro to the Quick Access Toolbar. The user simply clicks it when ready to add the timestamp.
SEE: Microsoft may launch Windows 10 desktop-as-a-service this summer (TechRepublic)
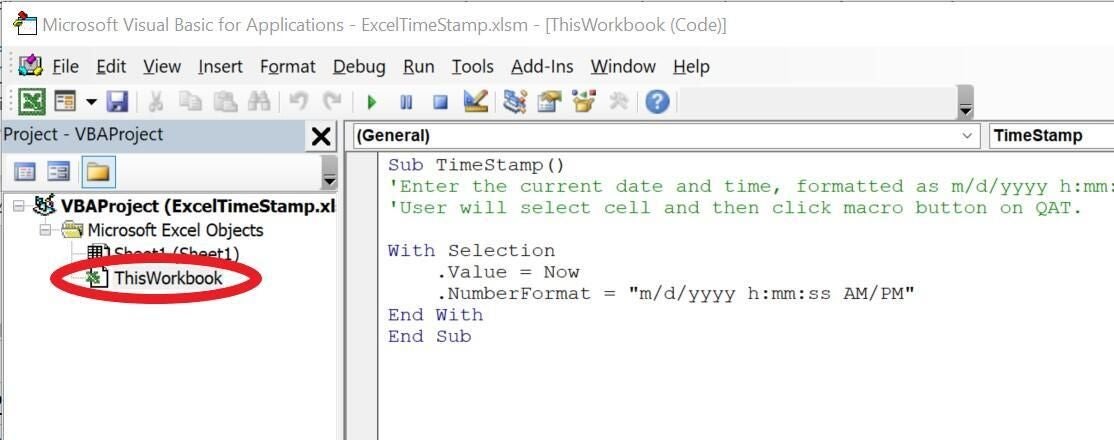
The sub procedure in Listing A is short and sweet. Using the selected cell—which rests in the hands of the user—this code enters a formatted NOW() function that displays the date and time. Depending on your needs, you might choose to use TODAY() or format the cell differently.
Listing A
Sub TimeStamp()
‘Enter the current date and time, formatted as m/d/yyyy h:mm:ss AM/PM.
‘User will select cell and then click macro button on QAT.
With Selection
.Value = Now
.NumberFormat = “m/d/yyyy h:mm:ss AM/PM”
End With
End Sub
To enter the macro, do the following:
- Press Alt + F11 to open the Visual Basic Editor.
- In the Project Editor (to the left), select the ThisWorkbook module.
- Enter the code into the module (Figure B). Don’t paste the code from this web page into the module because it won’t work. You can import the .cls file included in the download or enter the code manually. You can also paste the code into a text editor and then copy into the module—it should work. The problem is phantom web characters that get pasted along with the plain text.
- Return to Excel and save the workbook as a macro-enabled macro. If you’re using a menu version, you can skip this step.
Figure B
Let’s run the procedure from the Developer tab, just to make sure it works. To do so, click the Developer tab, and do the following:
- Click the cell where you want to enter the timestamp.
- On the Developer tab, click Macros in the Code group.
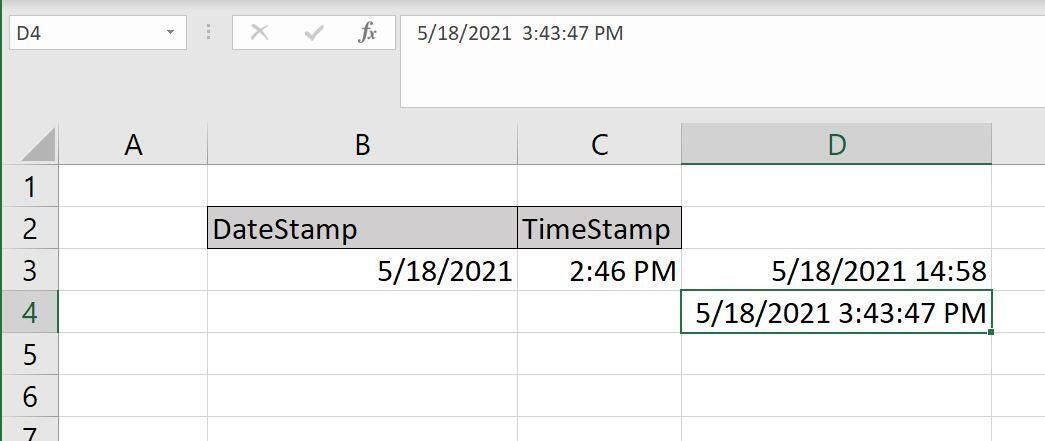
- In the resulting dialog, choose the procedure in the Macro name control (Figure C), and then click Run. Figure D shows the resulting timestamp.
Figure C
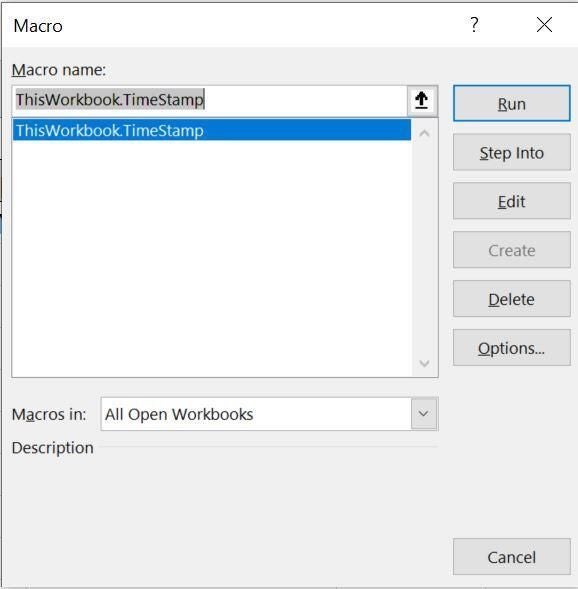
Figure D
You don’t want to run the procedure that way every time you want to enter a timestamp, so let’s automate that process a bit. Specifically, we’ll add the procedure to the QAT so all you must do is select the cell, click the button on the QAT and continue your work. (The menu version doesn’t support the QAT, but you could assign a shortcut keystroke.)
To add the macro to the QAT, do the following:
- Click the QAT dropdown (the arrow to the right of the QAT) and choose More Commands.
- From the Choose Commands From dropdown, choose Macros.
- There’s only one in the demonstration workbook, but if you’re working with your own file, be sure to select the correct macro: ThisWorkbook.TimeStamp.
- Click Add to move it to the QAT list to the right (Figure E).
- Click OK to return to the sheet. You will see the macro icon on the QAT (Figure F).
Figure E
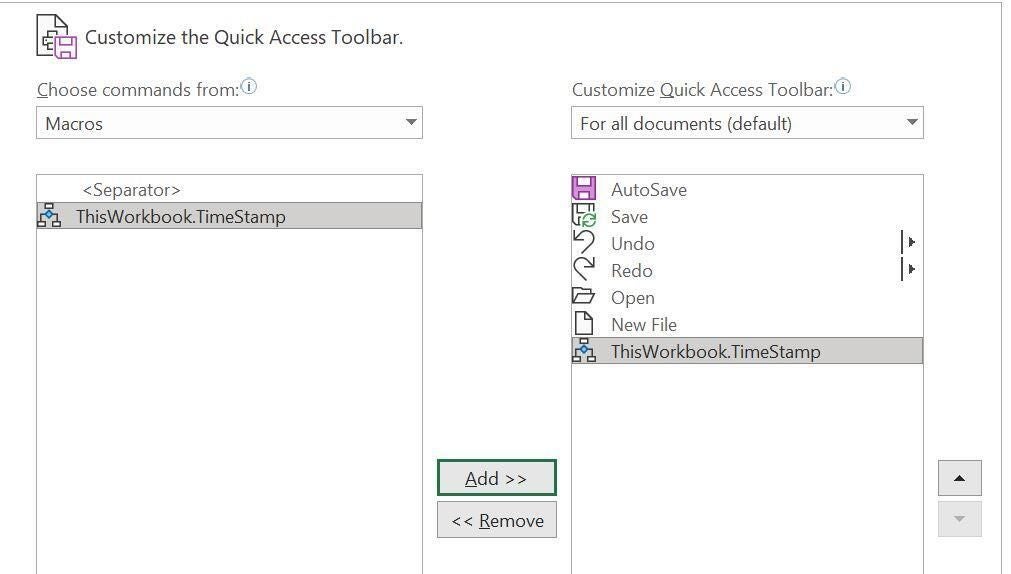
Figure F

You’re done! Select any cell and click the macro icon on the QAT to enter a timestamp. You might consider adding the user’s name, change the format or enter only the date. If you’re encouraged, you might create a parameter-driven procedure that lets the user choose these elements on the fly. As is, this is a solution that users won’t mind using and will return consistent values.