Image: iStock/scyther5
The article How to prevent text from wrapping in a Word document shows you how to use two non-breaking characters to keep words together on the same line in Microsoft Word. It’s also common to keep lines together on the same page. For instance, you wouldn’t want a heading separated from the first paragraph in a new section by a page break. There are two easy ways to keep content that should remain together on the same page; in this article, we’ll review both.
SEE: 69 Excel tips every user should master (TechRepublic)
I’m using Microsoft 365 on a Windows 10 64-bit system, but you can use older versions. You can work with your own document or download the demonstration .docx and .doc files. These two methods aren’t appropriate for the browser.
How to keep lines together on the same page manually in Word
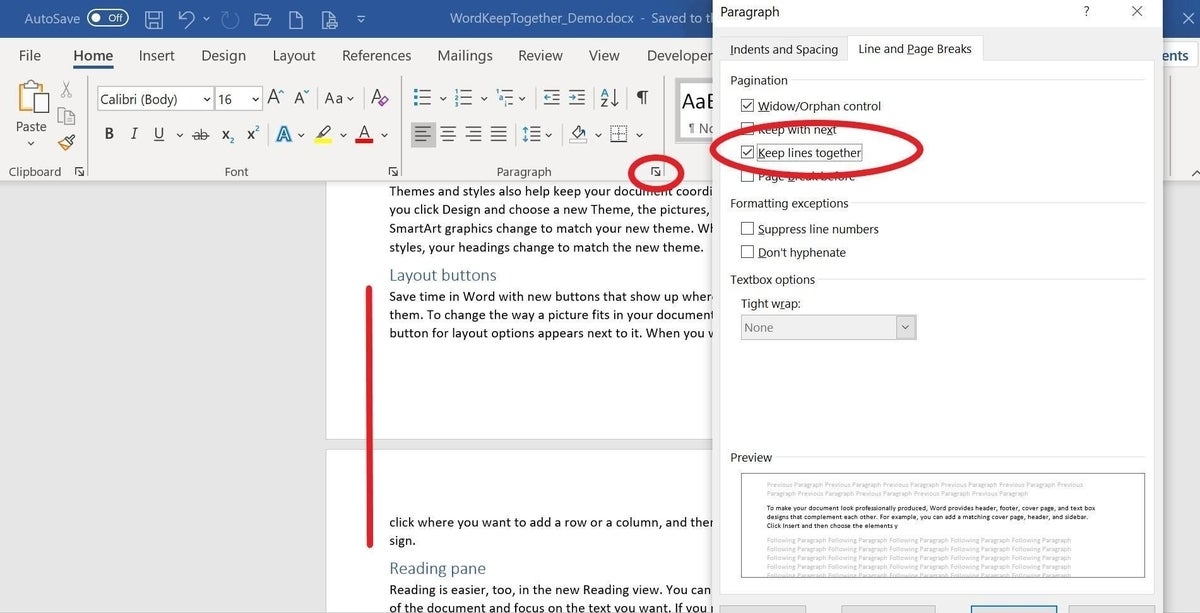
If you run into a situation where you want a paragraph or a few lines to stay together, you can manually apply a property that will keep them together. Figure A shows a paragraph that breaks across two pages. It isn’t terrible, and you often see a page break in the middle of a paragraph. However, sometimes you want the entire paragraph to stay together, even if doing so means forcing the entire paragraph to the next page. You might be tempted to press Enter to force the entire paragraph to the next page, but don’t. That adds unnecessary hard returns, and they might have formatting consequences later. To apply the right fix, do the following:
- Click anywhere inside the paragraph that you want to keep together.
- Click the Home tab and click the Paragraph group’s dialog launcher.
- Click the Line and Page Breaks tab.
- Check the Keep Lines Together option (Figure A). Use the Keep With Next option to keep two paragraphs together.
- Click OK.
Figure A

In this case, Word forces the entire paragraph to the next page, as shown in Figure B. Usually, this will be the result.
Figure B

This property works when you want to apply a quick fix to a single instance. You could also use it to keep the header with the paragraph. When you need a solution that works throughout the document, use a style.
How to keep lines together on the same page by creating a style in Word
Using a style, you can quickly apply the Keep Lines Together setting to all paragraphs in the document. It’s easier than you might think. In most cases, you’ll be using the Normal style (if not, you’ll need to adjust these instructions to select the right style):
- In the Styles group (on the Home tab), right-click Normal in the Styles gallery and choose Modify.
- In the resulting dialog, click the Format button in the bottom-left corner.
- From the resulting list, click Paragraph. Now, you’re in the same dialog you were in the first section.
- Check the Keep Lines Together option.
- Click OK twice.
Every paragraph using the Normal style will now stay together regardless of what you add or delete. If a paragraph is broken between two pages and it fails to update, use the Format Painter to copy the Normal paragraph style to that paragraph; it should update immediately. It’s an odd behavior that I believe has to do with the paragraph mark position, but to be honest, I don’t really know why this happens. You can also use a style to keep headers with paragraphs together by applying the Keep With Next option to your heading style.
SEE: Windows 10: Lists of vocal commands for speech recognition and dictation (free PDF) (TechRepublic)
Once your document is in good shape, if you find that keeping a heading and the entire paragraph together leaves too much white space at the bottom of the page, you can, if you like, remove the Keep Lines Together option for that one paragraph.
Stay tuned
Documents contain lots of elements that you might want to remain together on the same page. In a future article, I’ll show you how to keep figures and captions together.

