Word’s numbered list feature is easy to use but modifying the results isn’t always as intuitive as you might like. As is often the case with Office, knowing the right setting to use and where to find it is the key. In this article, we’ll take a basic look at Word’s numbering feature and then move on to two common problems–indents and alignment–that are easy to solve if you know where to look and how to alter the setting to get the results you want.
It’s important to remember that the numbered list settings might not be what you expect because Word applies the last numbering style selected. Keep this in mind as you work through the examples, and don’t worry if your settings don’t match those in the article. The concepts are the same even if your settings don’t match mine.
I’m using Word 2016 (desktop) on a Windows 10 64-bit system, but this article applies to earlier versions. 365’s browser edition displays numbered lists and offers a few basic settings. However, you can’t apply either option discussed in this article using the browser. For your convenience, you can download the sample demonstration .docx or .doc file.
The basics
Adding a numbered list is simple, and often you won’t need to alter a thing. There are two ways to add a numbered list. You can use the Numbering option as a simple toggle as follows:
- Position the cursor where you want to start your list.
- Click the Numbering option in the Paragraph group. Word adds 1. and positions the cursor a bit to the right.
- Enter your first list item and press Enter to wrap to the next line. Word enters 2. and positions the cursor to the right waiting for the next list item (Figure A).
- Repeat steps 2 and 3 as many times as needed to complete the list.
- At this point, you can press Enter once and then click the Numbering option or press Enter twice to disable the numbering feature.
Figure A
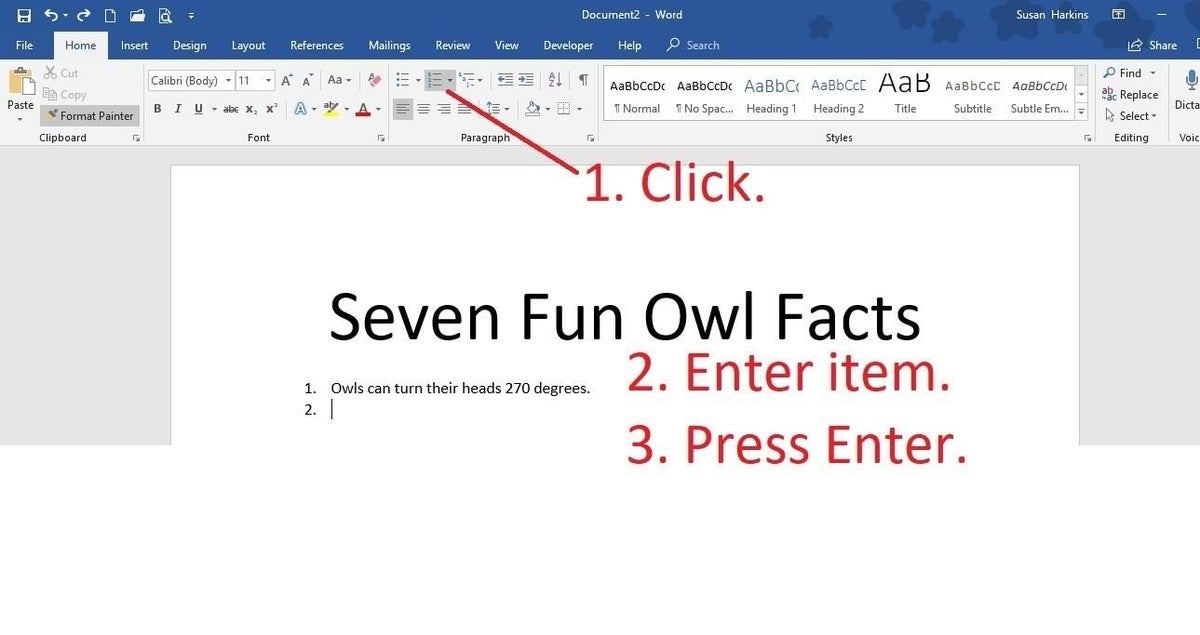
Word adds the sequential numbers to the left of each item for you.
You can also generate a numbered list from an existing list. Select the list and click Numbering; Word adds sequential numbers, beginning with 1, to the complete list all at once, as shown in Figure B.
Figure B
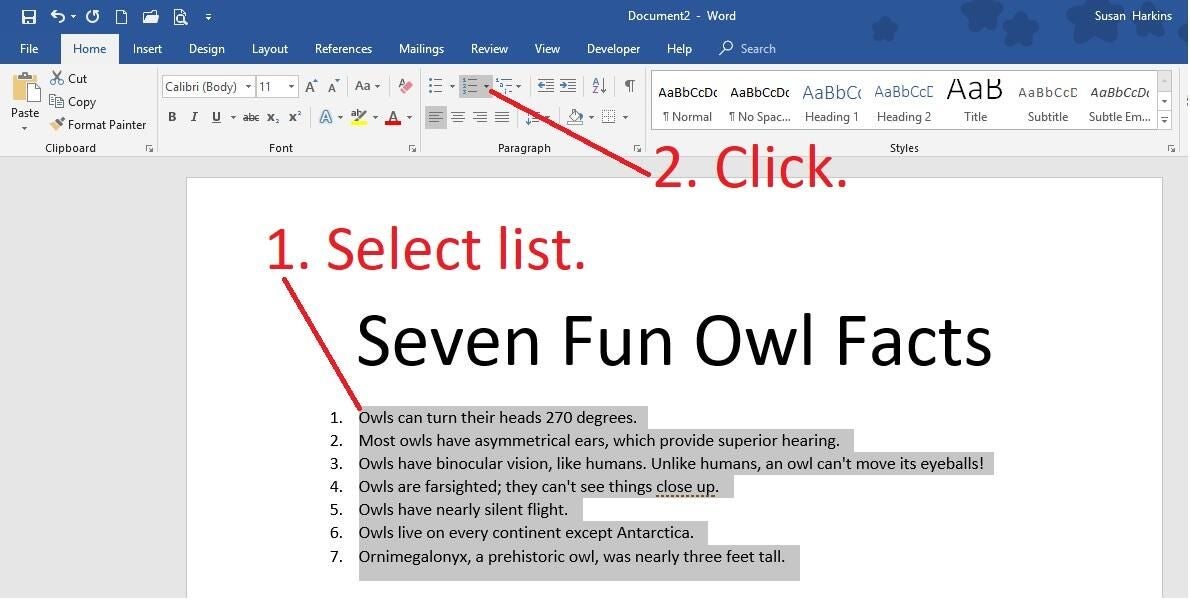
Generate the numbers after the fact.
Creating a numbered list is simple and most users catch on right away. One more thought before we move on–use numbered lists correctly. A numbered list, by its nature implies that the number of items or the order of those items has meaning. A list of simple facts, where neither order nor number have meaning is a bulleted list, not a numbered list. You can turn what might otherwise be a bulleted list by forcing a number into the mix, as I’ve done with our example list. Remove the word Seven from the title and you have a bulleted list!
SEE: 10 all-purpose keyboard shortcuts to boost your Word efficiency (free PDF) (TechRepublic)
Line indents and spacing
After adding a numbered list, you probably notice a few things:
- Word indents the list a quarter of an inch to the right of the left margin.
- There’s a half inch between the number and the first character in the item.
- That half inch is composed of a Tab character, not spaces. (This is less obvious than the first two.)
You can change all three settings, but they aren’t on the Numbering option’s dropdown, where you might expect them. To access these options, right-click the numbers (not the list) and choose Adjust List Indents from the resulting submenu, as shown in Figure C. In the resulting dialog, adjust the appropriate settings. For example, in Figure D, you can see that I’ve transposed the first two settings. Figure E shows the new settings in place. If the ruler is enabled, you can also see that the left tab the feature uses moved accordingly.
Figure C
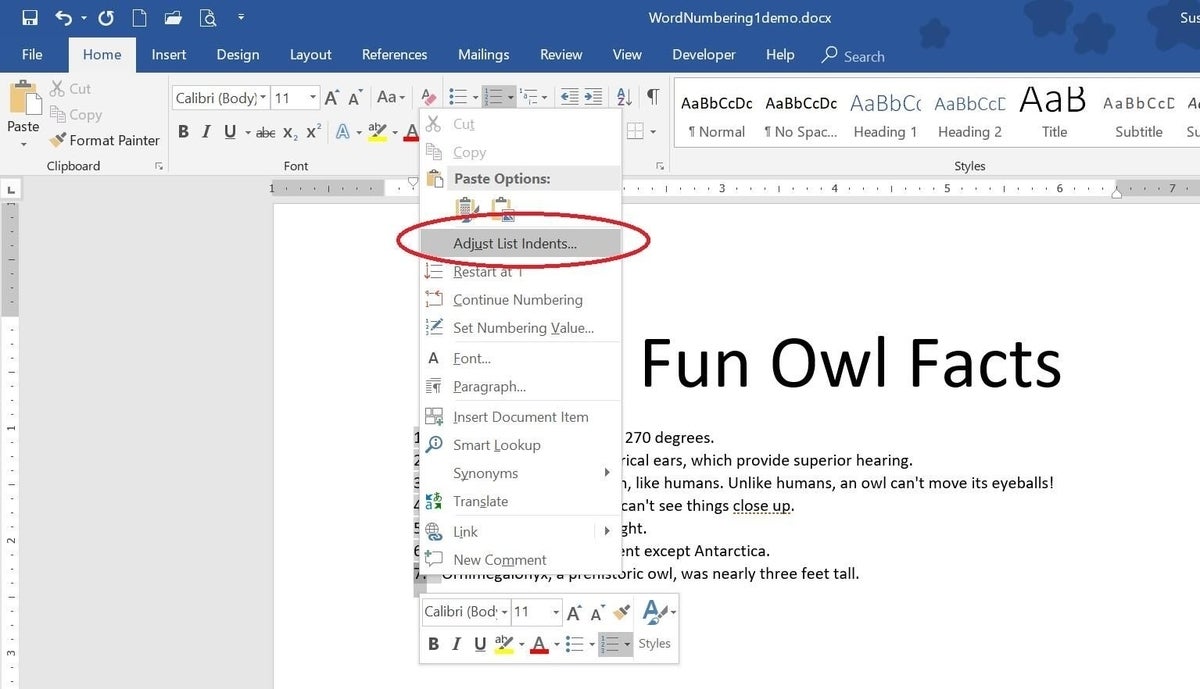
Modify the default list indent settings.
Figure D
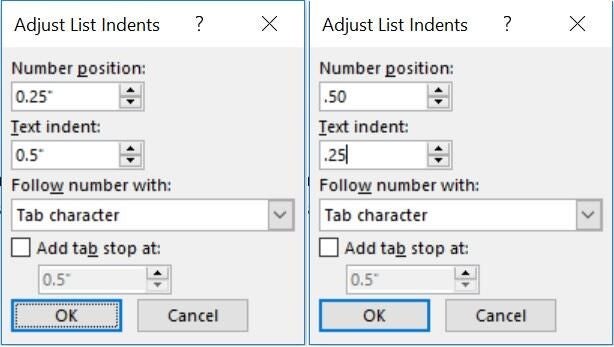
Modify the settings.
Figure E

The new list is closer to the left margin and there’s less space between each number and the item.
You could change the Follow number with option (Figure D) from a Tab character to spaces, but I don’t recommend doing so unless you have a specific reason for doing so–and you seldom will. If you choose Nothing from this setting, Word ignores the Text indent setting.
SEE: Microsoft Teams: The right collaboration platform for your organization? (free PDF) (TechRepublic)
Alignment
After adding a few more facts, as shown in Figure F, you might notice something new–the two-digit numbers don’t align with the previous one-digit numbers. You could leave the list as is, but most likely you’ll want to adjust it. Leaving it as is makes the reader uncomfortable; it’s simply not as readable as it should be. We expect numbers to align using the period character or the right-most digit if there’s no punctuation.
Figure F
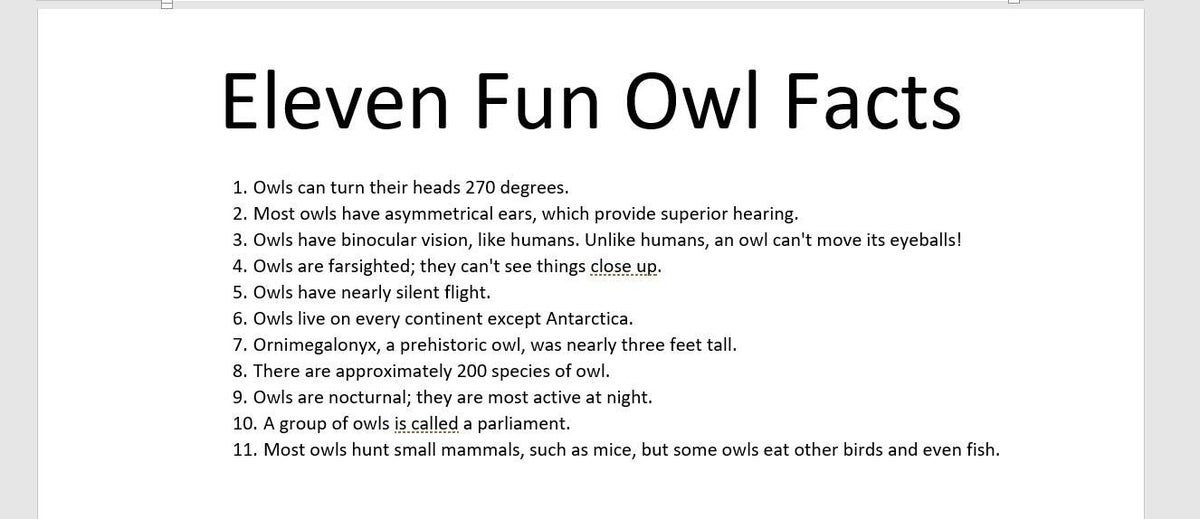
Word doesn’t align the numbers as expected.
Fortunately, the alignment setting is easier to find than indent and spacing settings; you’ll create a right-aligned number format as follows:
- Click anywhere inside the list.
- From the Numbering dropdown (in the Paragraph group), choose Define New Number Format (at the bottom).
- In the resulting dialog, change the Alignment setting from Left to Right, as shown in Figure G.
- Click OK to see the newly aligned list shown in Figure H.
Figure G
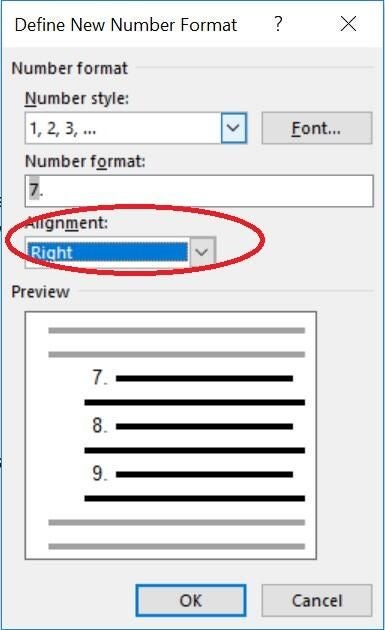
Change the Alignment setting.
Figure H
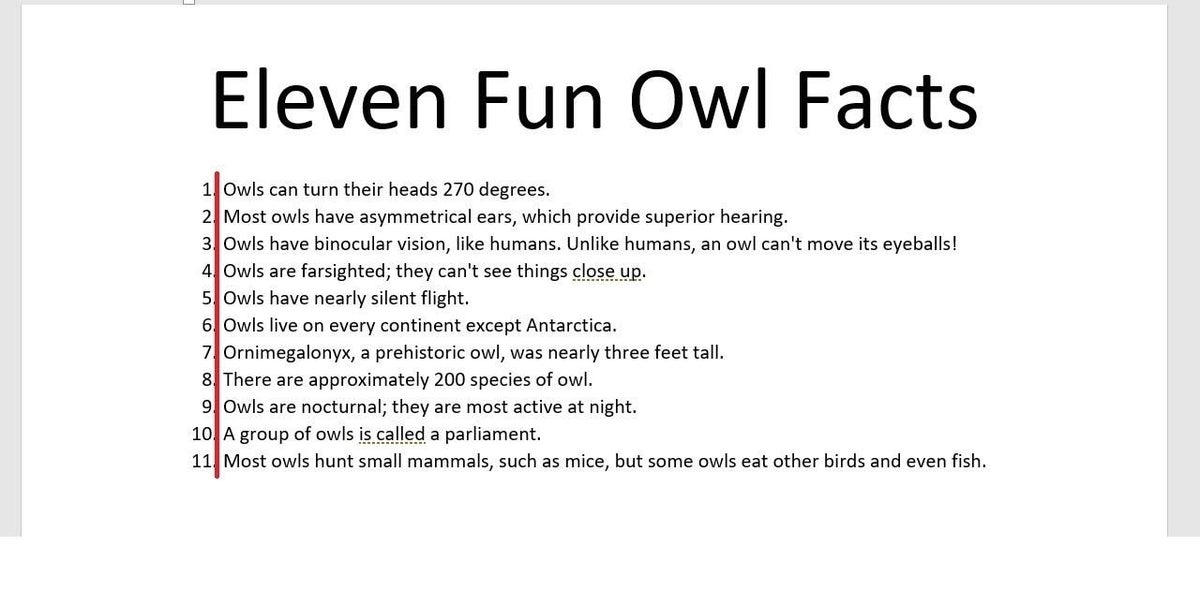
Word aligns the numbers as expected.
Stay tuned
Numbering basics are easy, but numbered lists can be much more complex. Over the next few months, we’ll look at some common numbering problems and their solutions.
Send me your question about Office
I answer readers’ questions when I can, but there’s no guarantee. Don’t send files unless requested; initial requests for help that arrive with attached files will be deleted unread. You can send screenshots of your data to help clarify your question. When contacting me, be as specific as possible. For example, “Please troubleshoot my workbook and fix what’s wrong” probably won’t get a response, but “Can you tell me why this formula isn’t returning the expected results?” might. Please mention the app and version that you’re using. I’m not reimbursed by TechRepublic for my time or expertise when helping readers, nor do I ask for a fee from readers I help. You can contact me at susansalesharkins@gmail.com.
Also see:
- How to use Excel’s Data Model to turn related data into meaningful information (TechRepublic)
- 5 ways to modify and customize styles in Microsoft Word (TechRepublic)
- How to use COUNTIFS() to compare multiple data sets (TechRepublic)
- Office Q&A: An easy Word Replace trick for a big problem and exposing duplicate records in Excel (TechRepublic)
- How to use Excel formulas to compare multi-column lists (TechRepublic)


