


Numbering a document’s headings is easy in Word. It offers both single-level and multilevel numbering schemes. Both are easy to implement ifyou rely on Word’s built-in heading styles. If you’re not familiar with this feature, you can read How to create multilevel numbered headings in Word 2016 to learn more.
But you might not always want to use the built-in heading styles that make this feature so seamless. The built-in styles might already be in use. Or you might be working with an existing document that uses custom styles for headings. Regardless of the reason, you can link custom text styles to multilevel list styles. It’s easier than you might think and can be accomplished with two quick steps:
- Create custom heading (text) styles if necessary.
- Link each level in a multilevel list to an appropriate custom style.
More about Software
- Software Installation Policy
- Five Methods to Insert a Checkmark Into Microsoft Office Products
- How to Hide and Handle Zero Values in an Excel Chart
- How to Use Section Breaks to Control Formatting in Word
I’m using Office 365 (Word 2016 desktop) on a Windows 10 64-bit system, but this feature is available in earlier versions. The multilevel list options used in this article aren’t available in the online 365 browser edition. For your convenience, you can download the demonstration .docx and .doc files, or you can work with your own content.
Step 1: Create custom heading styles
Ideally, you’ll have a plan before you create your document and apply the custom multilevel styles as you go. That’s not always practical though. For our example, we’ll use a simple document with two headings levels styled as Normal. (Word can accommodate up to nine levels.)
The first step is to create the custom text styles (if necessary). The simplest way to do so is to format existing text as follows:
- Select the existing text. In this case, let’s format the first header, Video.
- In the Font group, choose 16 from the Font Size dropdown.
- Click Bold.
- Choose a dark blue from the Font Color dropdown.
- Click the Font group’s dialog launcher and check the All Caps option in the Effects section and click OK.
With the text formatted, you’re ready to create a new style as follows:
- Right-click the formatted text. Doing so will display the mini-toolbar.
- At the far right, click Styles.
- From the dropdown list, choose Create A Style (Figure A).
- Name the custom style Custom Level One (Figure B) and click OK. The name is probably too long, and you’ll see why soon.
Figure A
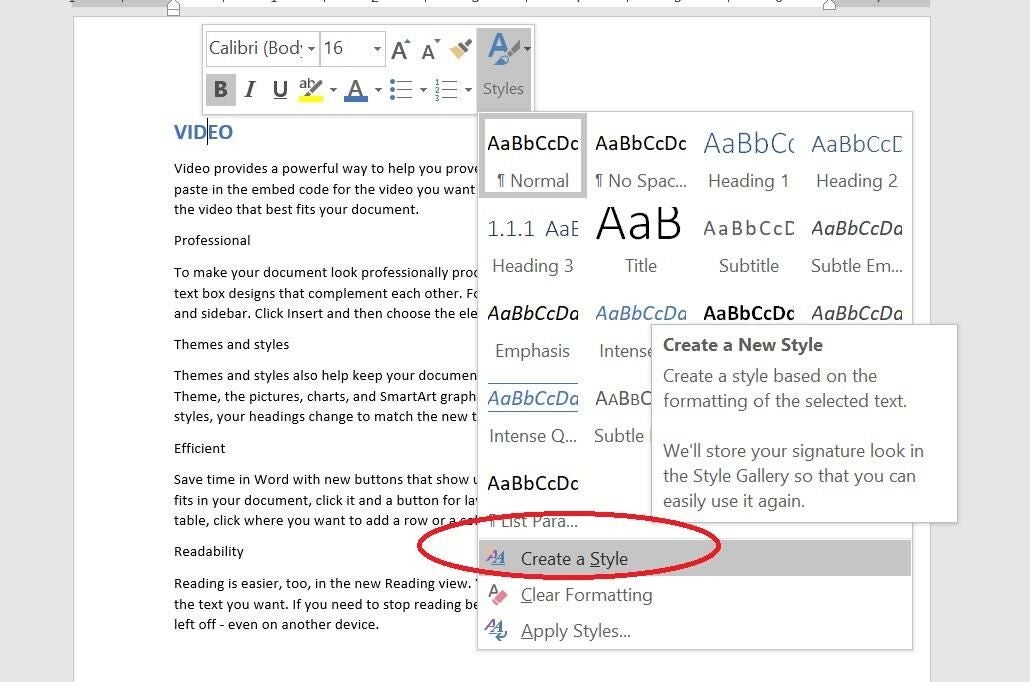
Create a new style.
Figure B
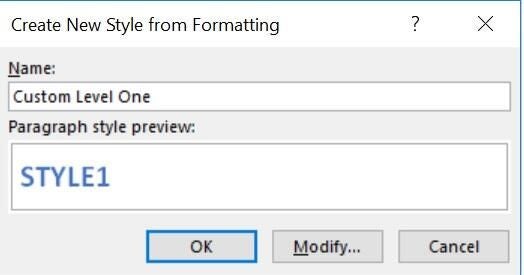
Name the new style.
Repeat the process to create the second level by selecting the Professional heading in the document. Name it Custom Level Two. Set this style’s font attributes to size 12, light blue, and italics. Feel free to create as many custom styles as you like; we’ll work with just these two. Figure C shows the two new styles in the Styles gallery. Currently neither thumbnail displays a numbering scheme. Adding the numbering scheme is next.
Figure C
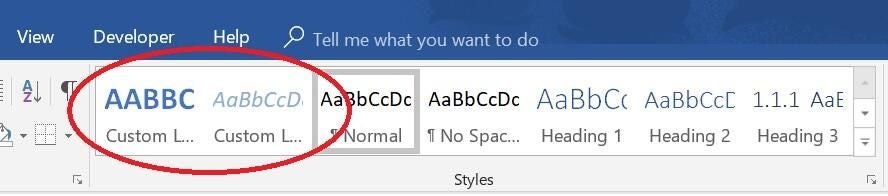
The Styles gallery displays the custom styles.
Before we move on though, notice that the gallery displays only a small portion of the style name. When naming styles, meaningful name are important, but so are short names that you (or your users) can see. Now, let’s link the custom styles to a numbering scheme–in this case, a multilevel list style.
SEE: Cost comparison calculator: G Suite vs. Office 365 (Tech Pro Research)
Step 2: Link each level to appropriate custom style
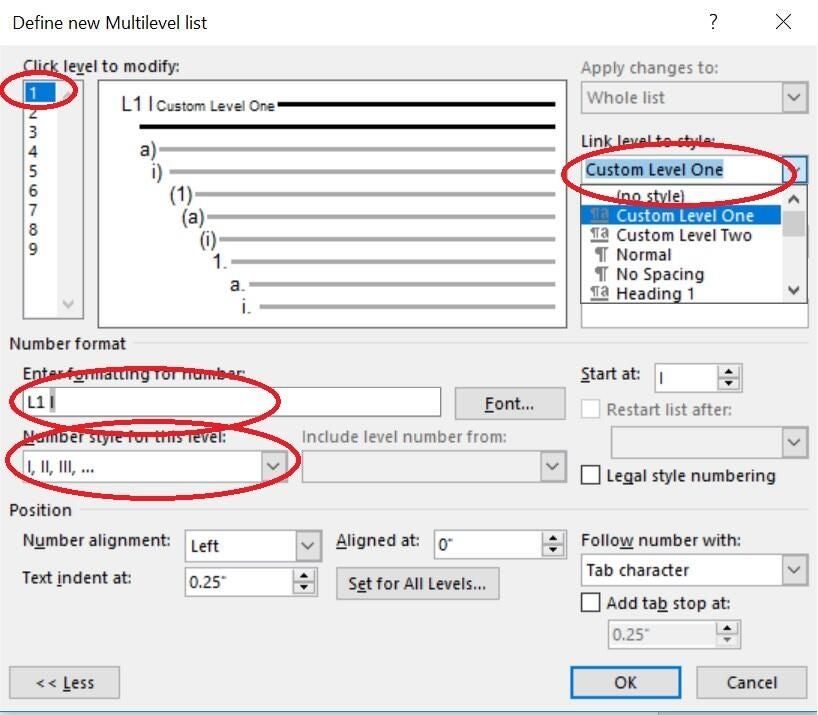
With your custom heading styles in place, you’re ready to link them to a new multilevel list style. To begin, click the Multilevel List option (in the Paragraph group) and choose Define New Multilevel List (at the bottom). If the button in the bottom-left corner of the resulting dialog displays More, click it to display additional options. This dialog contains all the options you need to format the number component of your custom style. (In step 1, you created the text style.)
As mentioned, Word supports nine levels, but you’ll seldom need more than a few. There’s a preview pane to the right of the level list. You’ll want to explore the many options further, but we’ll modify the number’s formatting and style for levels 1 and 2 and then link them to Custom Level One and Custom Level Two, respectively.
To begin, always select the appropriate level in the Click Level To Modify list; we’ll begin with 1. We want to display similar descriptive text for each level: L1 and L2. They mean nothing to the actual document, but the addition will make it easy to discern the applied styles and levels visually. To enter the text, click to the left of the 1 and type L1, including a space to separate the text from the number. Click to the right of the ) character and press Backspace to delete it. Do not delete the number (the result of a field code) or your numbering scheme won’t work.
Next, choose a style from the Number Style For This Level dropdown. There are many to choose from, but we’ll select the first Roman numeral option. Word will update the preview in the Enter Formatting For Number option and the preview pane.
SEE: Microsoft BitLocker: An insider’s guide (free TechRepublic PDF)
You can change the number’s position, alignment, and much more. Explore those options at another time; you’ll be surprised at how much you can do.
Your last step is to link level 1 to a custom style. To do so, click the Link Level To Style dropdown and find Custom Level One, as shown in Figure D.
Figure D
Link level 1 to the custom style Custom Level One.
Now you’re ready to format level 2. From the Click Level To Modify list, choose 2. Add the descriptive text, L2, and delete the ) character. From the Number Style For This Level dropdown, choose lowercase alpha characters. Finally, from the Link Level To Style dropdown, choose Custom Level Two. Figure E shows these settings.
Figure E
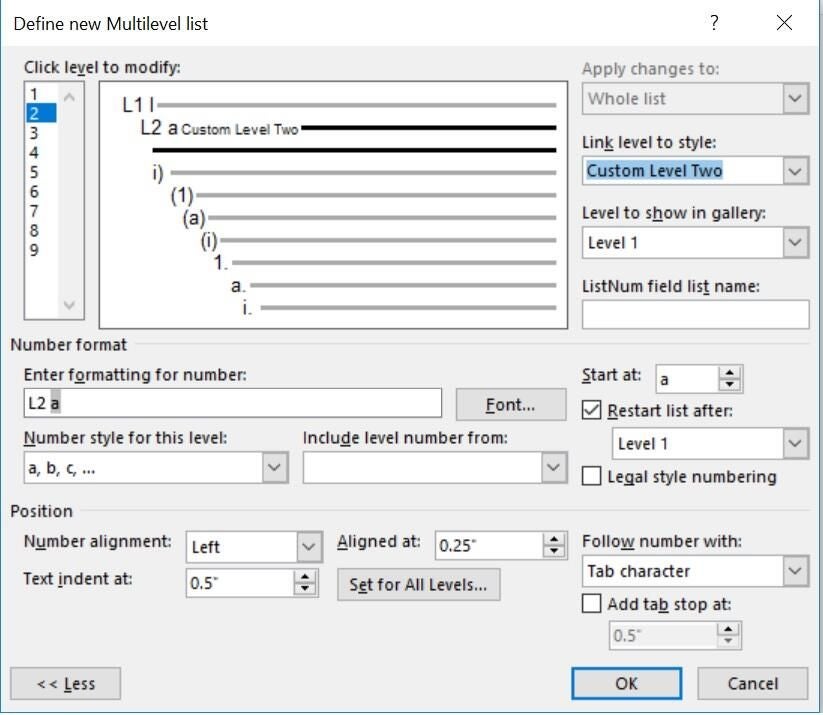
Configure level 2.
You could continue to define levels, but we don’t need to because our document uses only two. Click OK to return to the document.
As you can see in Figure F, the two headings we used earlier to create the custom text styles display the new multilevel list numbering style. Simply choose the remaining headers and click the appropriate styles from the Styles gallery, as shown in Figure G. Notice that both custom styles now display a numbering scheme.
Figure F
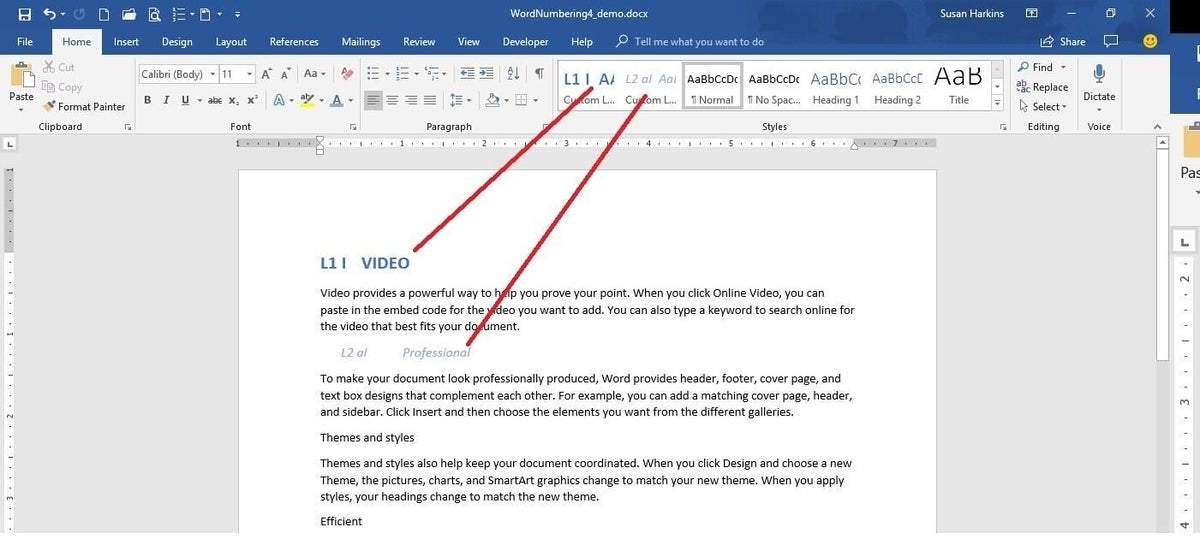
Previously styled text displays appropriate numbering.
Figure G
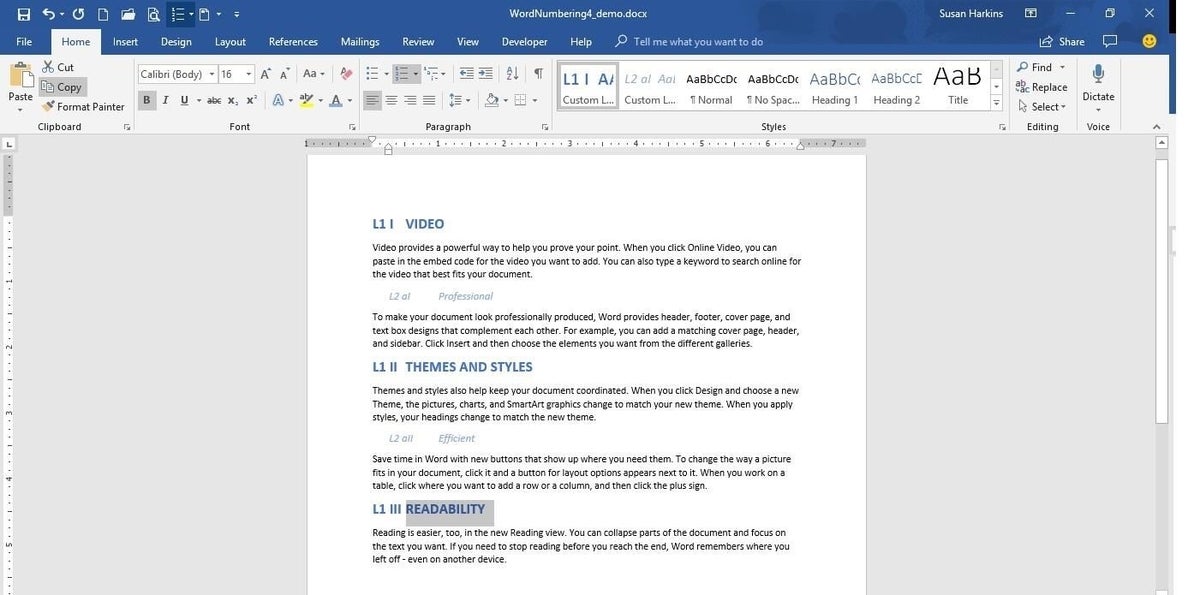
Apply the custom styles to apply numbering.
SEE: Project failure: 10 excuses your boss doesn’t want to hear (free TechRepublic PDF)
Tweaking
It’s possible that the results won’t be exactly what you wanted. In my option, our choices here are confusing and inconsistent–that’s where a plan can help. For now, level 2’s number is a bit confusing. It includes both levels, but there’s no separation to denote the different levels. You can fix that by displaying a period character between the level numbers as follows:
- Click anywhere inside a level 2 header.
- Click the Multilevel List option (in the Paragraph group) and choose Define New Multilevel List. We’re not really going to start over, so don’t worry.
- Options in the resulting dialog default to the currently applied multilevel list.
- Select level 2.
- Click in the Enter Formatting For Number control, between the a and the 1–don’t delete either because they’re both the results of field codes. Just click between them. Or if you don’t want to include numbering from level 1, delete the 1.
- Press the period character (.) on the keyboard (Figure H).
- Click OK. Figure I shows the updated headings; they now contain a period character between the level 1 and level 2 numbers.
Figure H
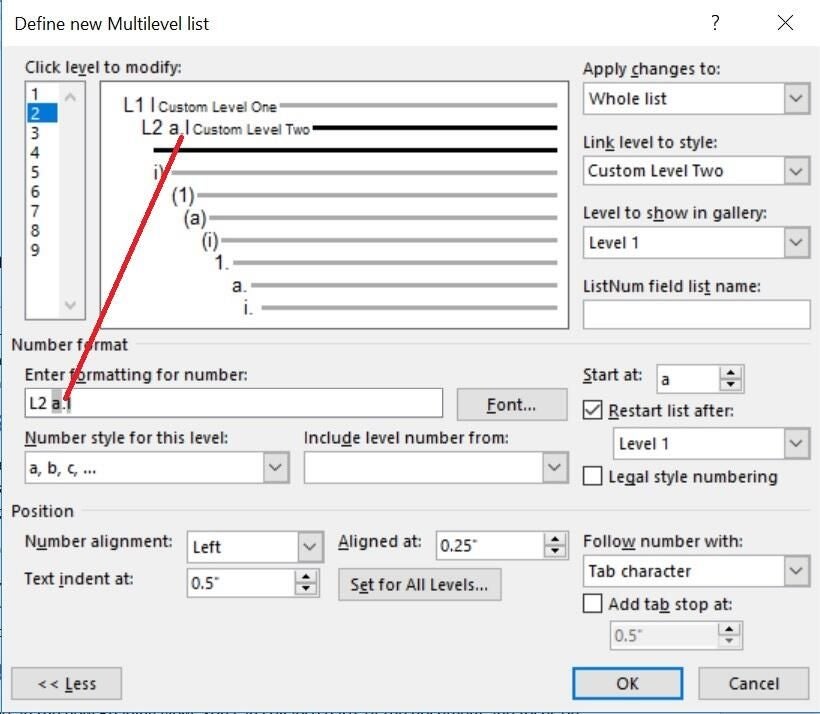
Enter a period.
Figure I
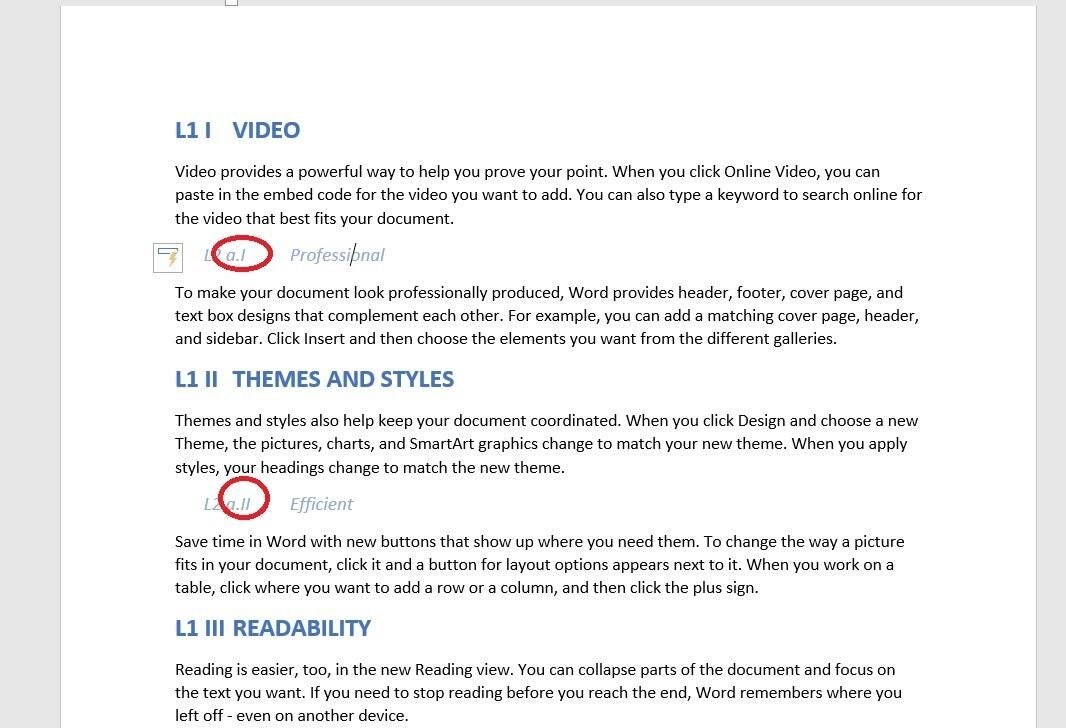
The level 1 and level 2 numbers are separated by a period.
You can learn more about Word’s numbering feature by reading the following articles:
How to control spacing and alignment in a numbered list in Microsoft Word
How to number headings in a Word 2016 document
Send me your question about Office
I answer readers’ questions when I can, but there’s no guarantee. Don’t send files unless requested; initial requests for help that arrive with attached files will be deleted unread. You can send screenshots of your data to help clarify your question. When contacting me, be as specific as possible. For example, “Please troubleshoot my workbook and fix what’s wrong” probably won’t get a response, but “Can you tell me why this formula isn’t returning the expected results?” might. Please mention the app and version that you’re using. I’m not reimbursed by TechRepublic for my time or expertise when helping readers, nor do I ask for a fee from readers I help. You can contact me at susansalesharkins@gmail.com.
Also read…
- You’ve been using Excel wrong all along–and that’s OK (ZDNet)
- An Excel macro that deletes blank rows in a specified range (TechRepublic)
- How to add custom galleries to Word’s QAT and ribbon for quick access (TechRepublic)
- Office Q&A: How to modify Word’s TOC field to display specific heading levels (TechRepublic)
- How to create custom galleries and categories to control organization in Word docs (TechRepublic)