


If you paste formatted values into a cell with another applied format, the pasted format wins. It’s an unusual behavior that most of us don’t expect. Why format a cell if it can be so easily undermined? That’s the problem Aditee ran into with a distributed Excel template. In this article, we’ll discuss the problem and two simple solutions–neither of them perfect.
More about Software
- Software Installation Policy
- Five Methods to Insert a Checkmark Into Microsoft Office Products
- How to Hide and Handle Zero Values in an Excel Chart
- How to Use Section Breaks to Control Formatting in Word
I’m using Excel 2016 (desktop) on a Windows 10 64-bit system. You can work with your own data or download the demonstration .xlsx, .xls, and .cls files. The first solution works in Excel’s browser edition; the VBA procedure doesn’t.
SEE: 10 Excel time-savers you might not know about (TechRepublic)
The problem: Excel paste task overwrites destination cell’s format
Aditee collects data from several different vendors, who use an Excel template. When entering date values, the template’s formatting accommodates the YYYY-MM-DD format–it works as expected. On the other hand, when someone pastes a date value, Excel ignores the destination cell’s format, retaining the formatting from the original source–not what users expect. Aditee wants an automated process that will warn users when they enter data in the wrong format.
There are lots of features you might consider. Data validation can reject non-date entries, but I’ve yet to come up with a formula that also rejects date values that don’t fit a specific format because the underlying value is a date serial value. For example, Excel stores May 10, 2018 as 43230, regardless of its format. You can change the cell’s format to text and use a custom rule to catch string values that don’t match the format you want, but the inherent problem still exists: When the user pastes a valid date value, Excel accepts it as a date value–and your data validation rule is out the window. You might try combining features such as data validation and conditional formatting, but again, Excel ignores your best efforts when a user pastes a valid date value. If you’re going to allow users to paste values, you must train them to paste only the values.
To illustrate this problem, let’s work through a quick example. Figure A shows the YYYY-MM-DD custom format. Regardless of how you enter the date May 10, 2018, Excel displays it as 2018-5-4, as shown in Figure B. Try it yourself a few times.
Figure A
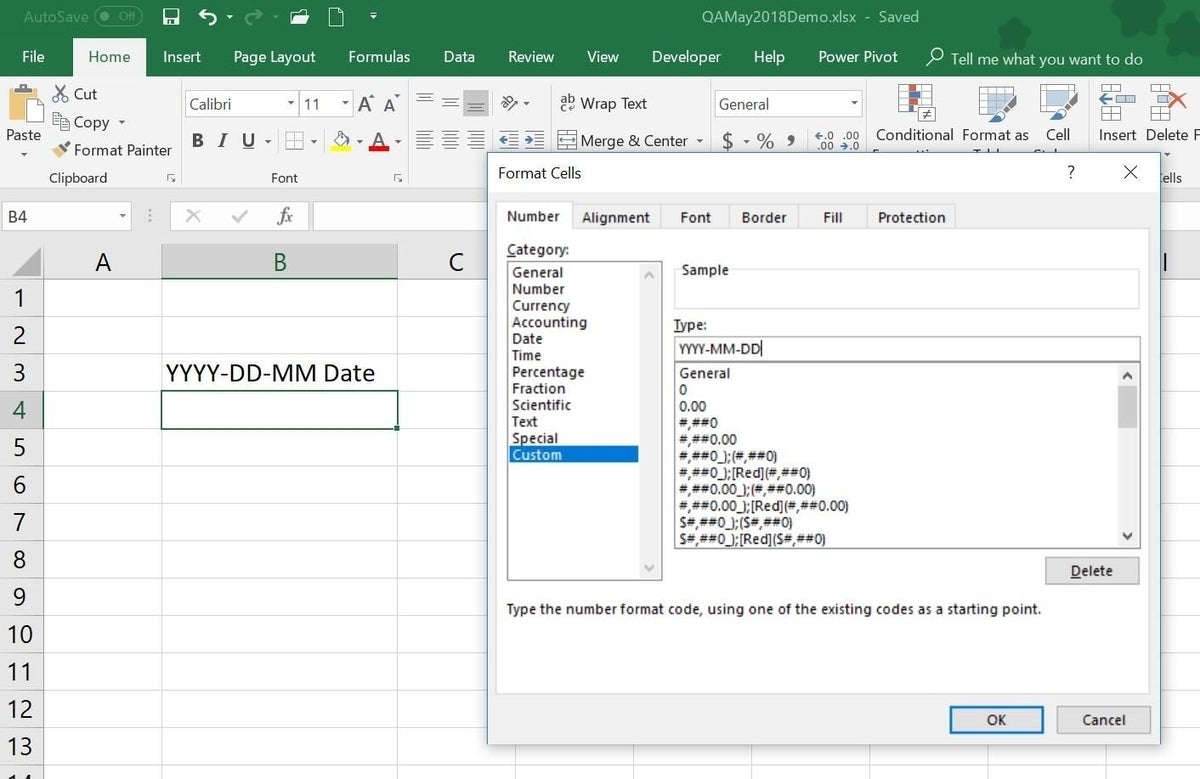
Apply a custom format to display dates in YYYY-MM-DD format.
Figure B
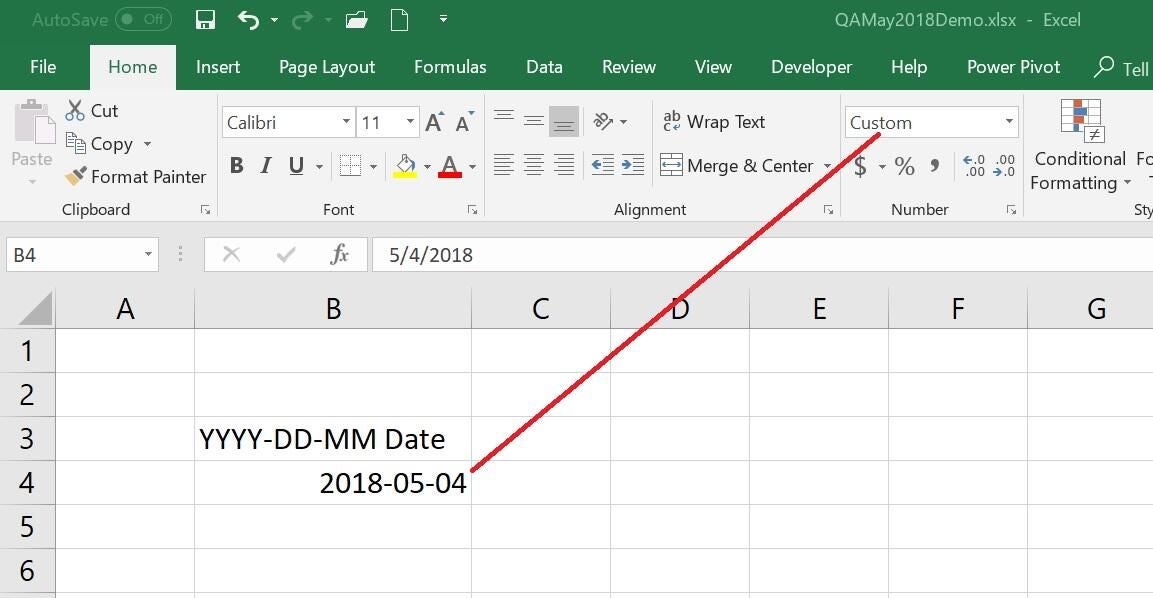
The custom format at work.
However, if you paste a differently formatted date, Excel accepts the source formatting. To further complicate the situation, Excel changes the format of the target cell to that of the pasted value! In other words, after pasting the value in Date-formatted C4 into the Custom-formatted B4, B4’s format matches that of C4–B4 is now a Date-formatted cell instead of a Custom-formatted cell, as you can see in Figure C.
Figure C
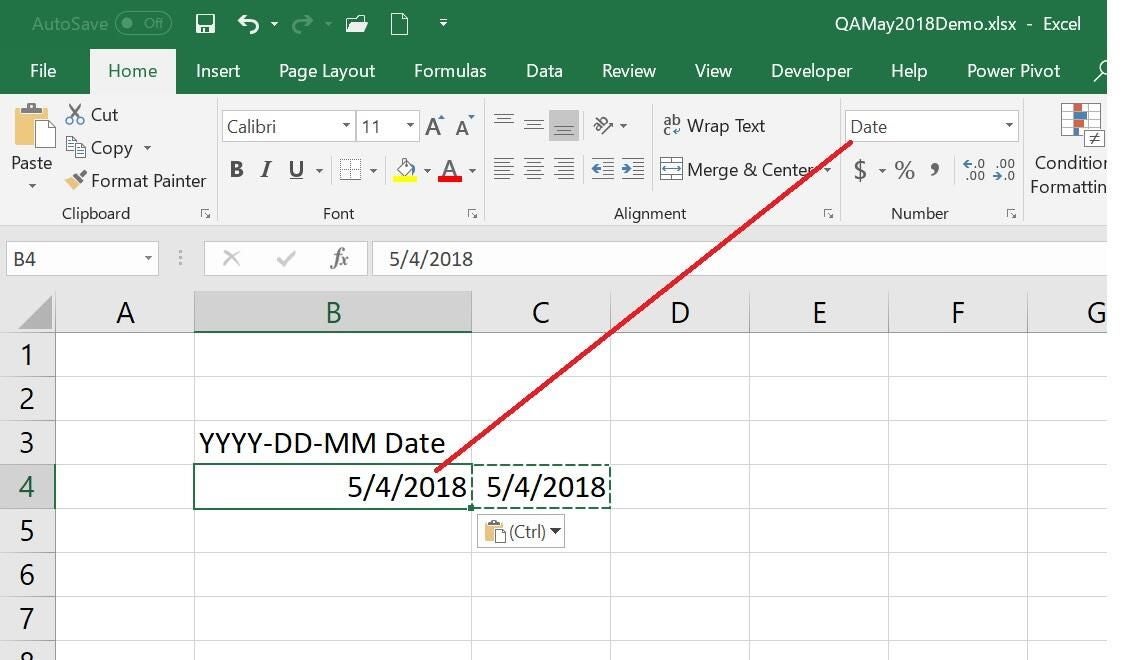
Pasting usurps the target cell’s format.
Solution 1: Train the users
The easiest way around this problem is to use Excel’s Paste Values option to paste only the values. Let’s use the same example to illustrate how this simple feature works:
- If you’re following along, press Ctrl+z to undo the last paste.
- With C4 selected, press Ctrl+c to copy the date value to the Clipboard.
- Select B4, but don’t press Ctrl+v to paste the value as you normally would. Instead, choose Values from the Paste dropdown (Figure D) in the Clipboard group (on the Home tab).
Figure D
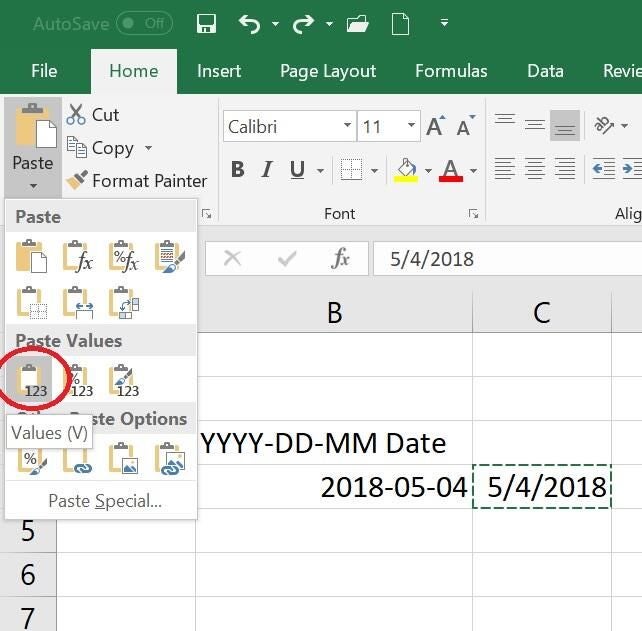
Paste Values copies only the value, so the target cell’s format retains intact.
Users might find it easier to use the Paste Options button instead:
- Repeat step 2 above.
- Select B4 and press Ctrl+v as you normally would.
- When Excel displays the Paste Options button, click the dropdown, and choose Values (Figure E). Excel keeps the date value but removes the formatting that came with it.
Figure E
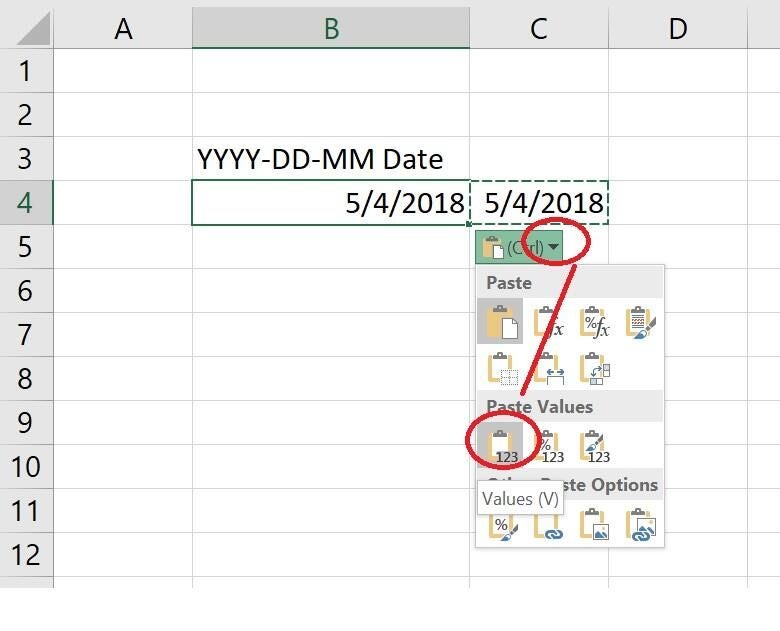
Use the Paste Options button.
If the Paste Options button isn’t visible, do the following:
- Click the File menu and select Options.
- In the left pane, choose Advanced.
- In the Cut, copy, and paste selection, check the Show Paste Options button when content is pasted option.
- Click OK.
SEE: How to use Excel’s what-if tools to analyze business scenarios (free PDF) (TechRepublic)
Solution 2: Use VBA, with a bit of caution
If you can’t rely on users, you can add a simple VBA procedure to the template that you distribute. But, a little training is still in order because users won’t use the normal paste routine. The first step is to add the procedure in Listing A to the template:
- Press Alt+F11 to open the Visual Basic Editor (VBE).
- Using the Project Explorer select ThisWorkbook.
- Enter the code using the Workbook_SheetSelectionChange() event. Don’t copy the code from this web page; the VBE won’t recognize all the characters. Instead, type the code or use the ThisWorkbook.cls file provided in the demonstration download.
- If you’re using a ribbon version, return to the workbook and save the file as a macro-enabled workbook. (Figure F).
Listing A
Private Sub Workbook_SheetSelectionChange(ByVal Sh As Object, ByVal Target As Range)

    On Error Resume Next

    Target.PasteSpecial xlPasteValues

    Application.CutCopyMode = True

    Application.CutCopyMode = False

End Sub
Figure F
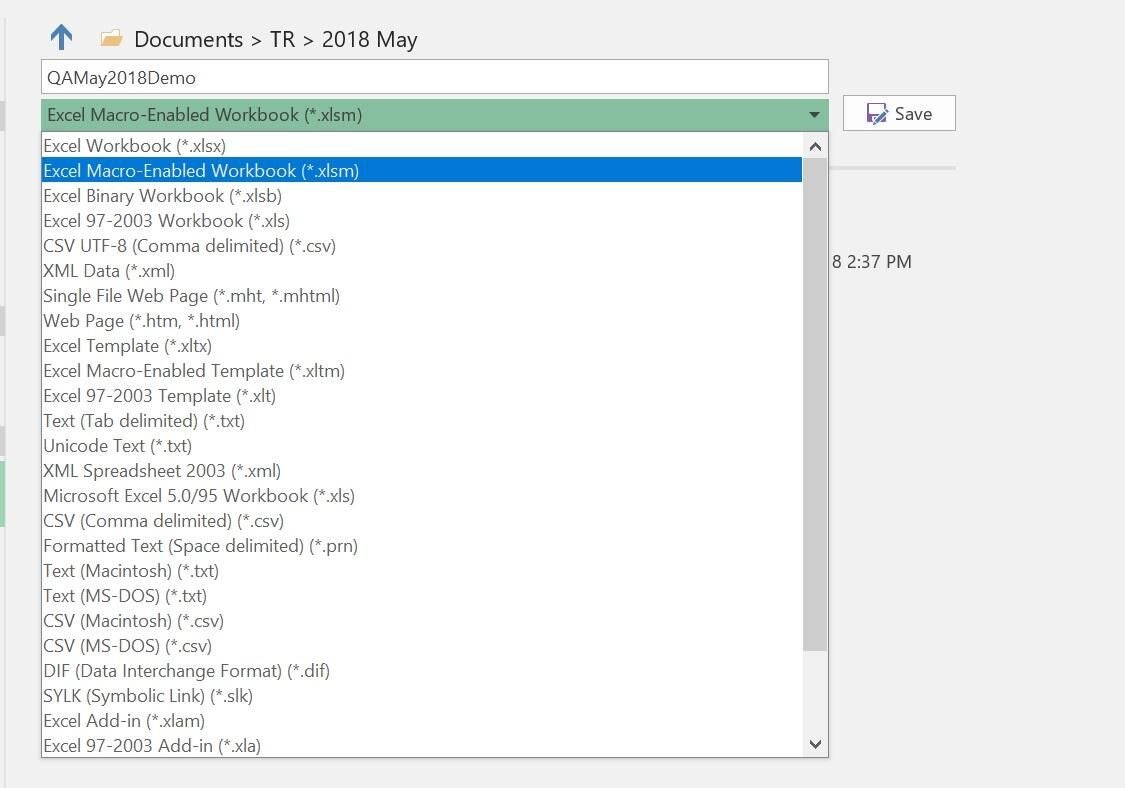
You must save the file as a macro-enabled file.
Before you try it out, delete the contents of B4; I want you to see how this works! Select C4 and press Ctrl+c to copy the date to the Clipboard. Now, click B4–that’s it! Simply click the destination cell and the procedure pastes only the date from the Clipboard into the clicked cell.
There is a bit of training for your users because the paste task is different. In addition, the SheetSelectionChange event can slow things down in a busy workbook.
One ugly side effect is that the procedure will paste other Clipboard contents in unintended ways. Although the last line in the procedure clears the Clipboard so you can move around your sheet and work normally, it only works in Excel. If you copy something in another document (say an open Word file) to the Clipboard and then return to the Excel file, the procedure will copy the (new) contents of the Clipboard into every cell you click! The only way to stop this annoying effect is to clear the Clipboard manually. (You can run an internet search on “Clear Windows Clipboard” for more information on that task.)
The truth is, it’s not an easy condition to live with and that’s why I recommend option 1. Try it if you’re brave, but don’t be surprised if users complain and you end up reverting to solution 1.
Send me your question about Office
I answer readers’ questions when I can, but there’s no guarantee. Don’t send files unless requested; initial requests for help that arrive with attached files will be deleted unread. You can send screenshots of your data to help clarify your question. When contacting me, be as specific as possible. For example, “Please troubleshoot my workbook and fix what’s wrong” probably won’t get a response, but “Can you tell me why this formula isn’t returning the expected results?” might. Please mention the app and version that you’re using. I’m not reimbursed by TechRepublic for my time or expertise when helping readers, nor do I ask for a fee from readers I help. You can contact me at susansalesharkins@gmail.com.
Also see:
- How to control spacing and alignment in a numbered list in Microsoft Word (TechRepublic)
- How to use Excel’s Data Model to turn related data into meaningful information (TechRepublic)
- 5 ways to modify and customize styles in Microsoft Word (TechRepublic)
- How to use COUNTIFS() to compare multiple data sets (TechRepublic)
- Office Q&A: An easy Word Replace trick for a big problem and exposing duplicate records in Excel (TechRepublic)